API Access Control & Gateway Management
The FlowGenX Agent Gateway provides comprehensive access control management for your APIs. This guide will help you set up groups, manage consumers, and control who can access your services through a powerful permission-based system.
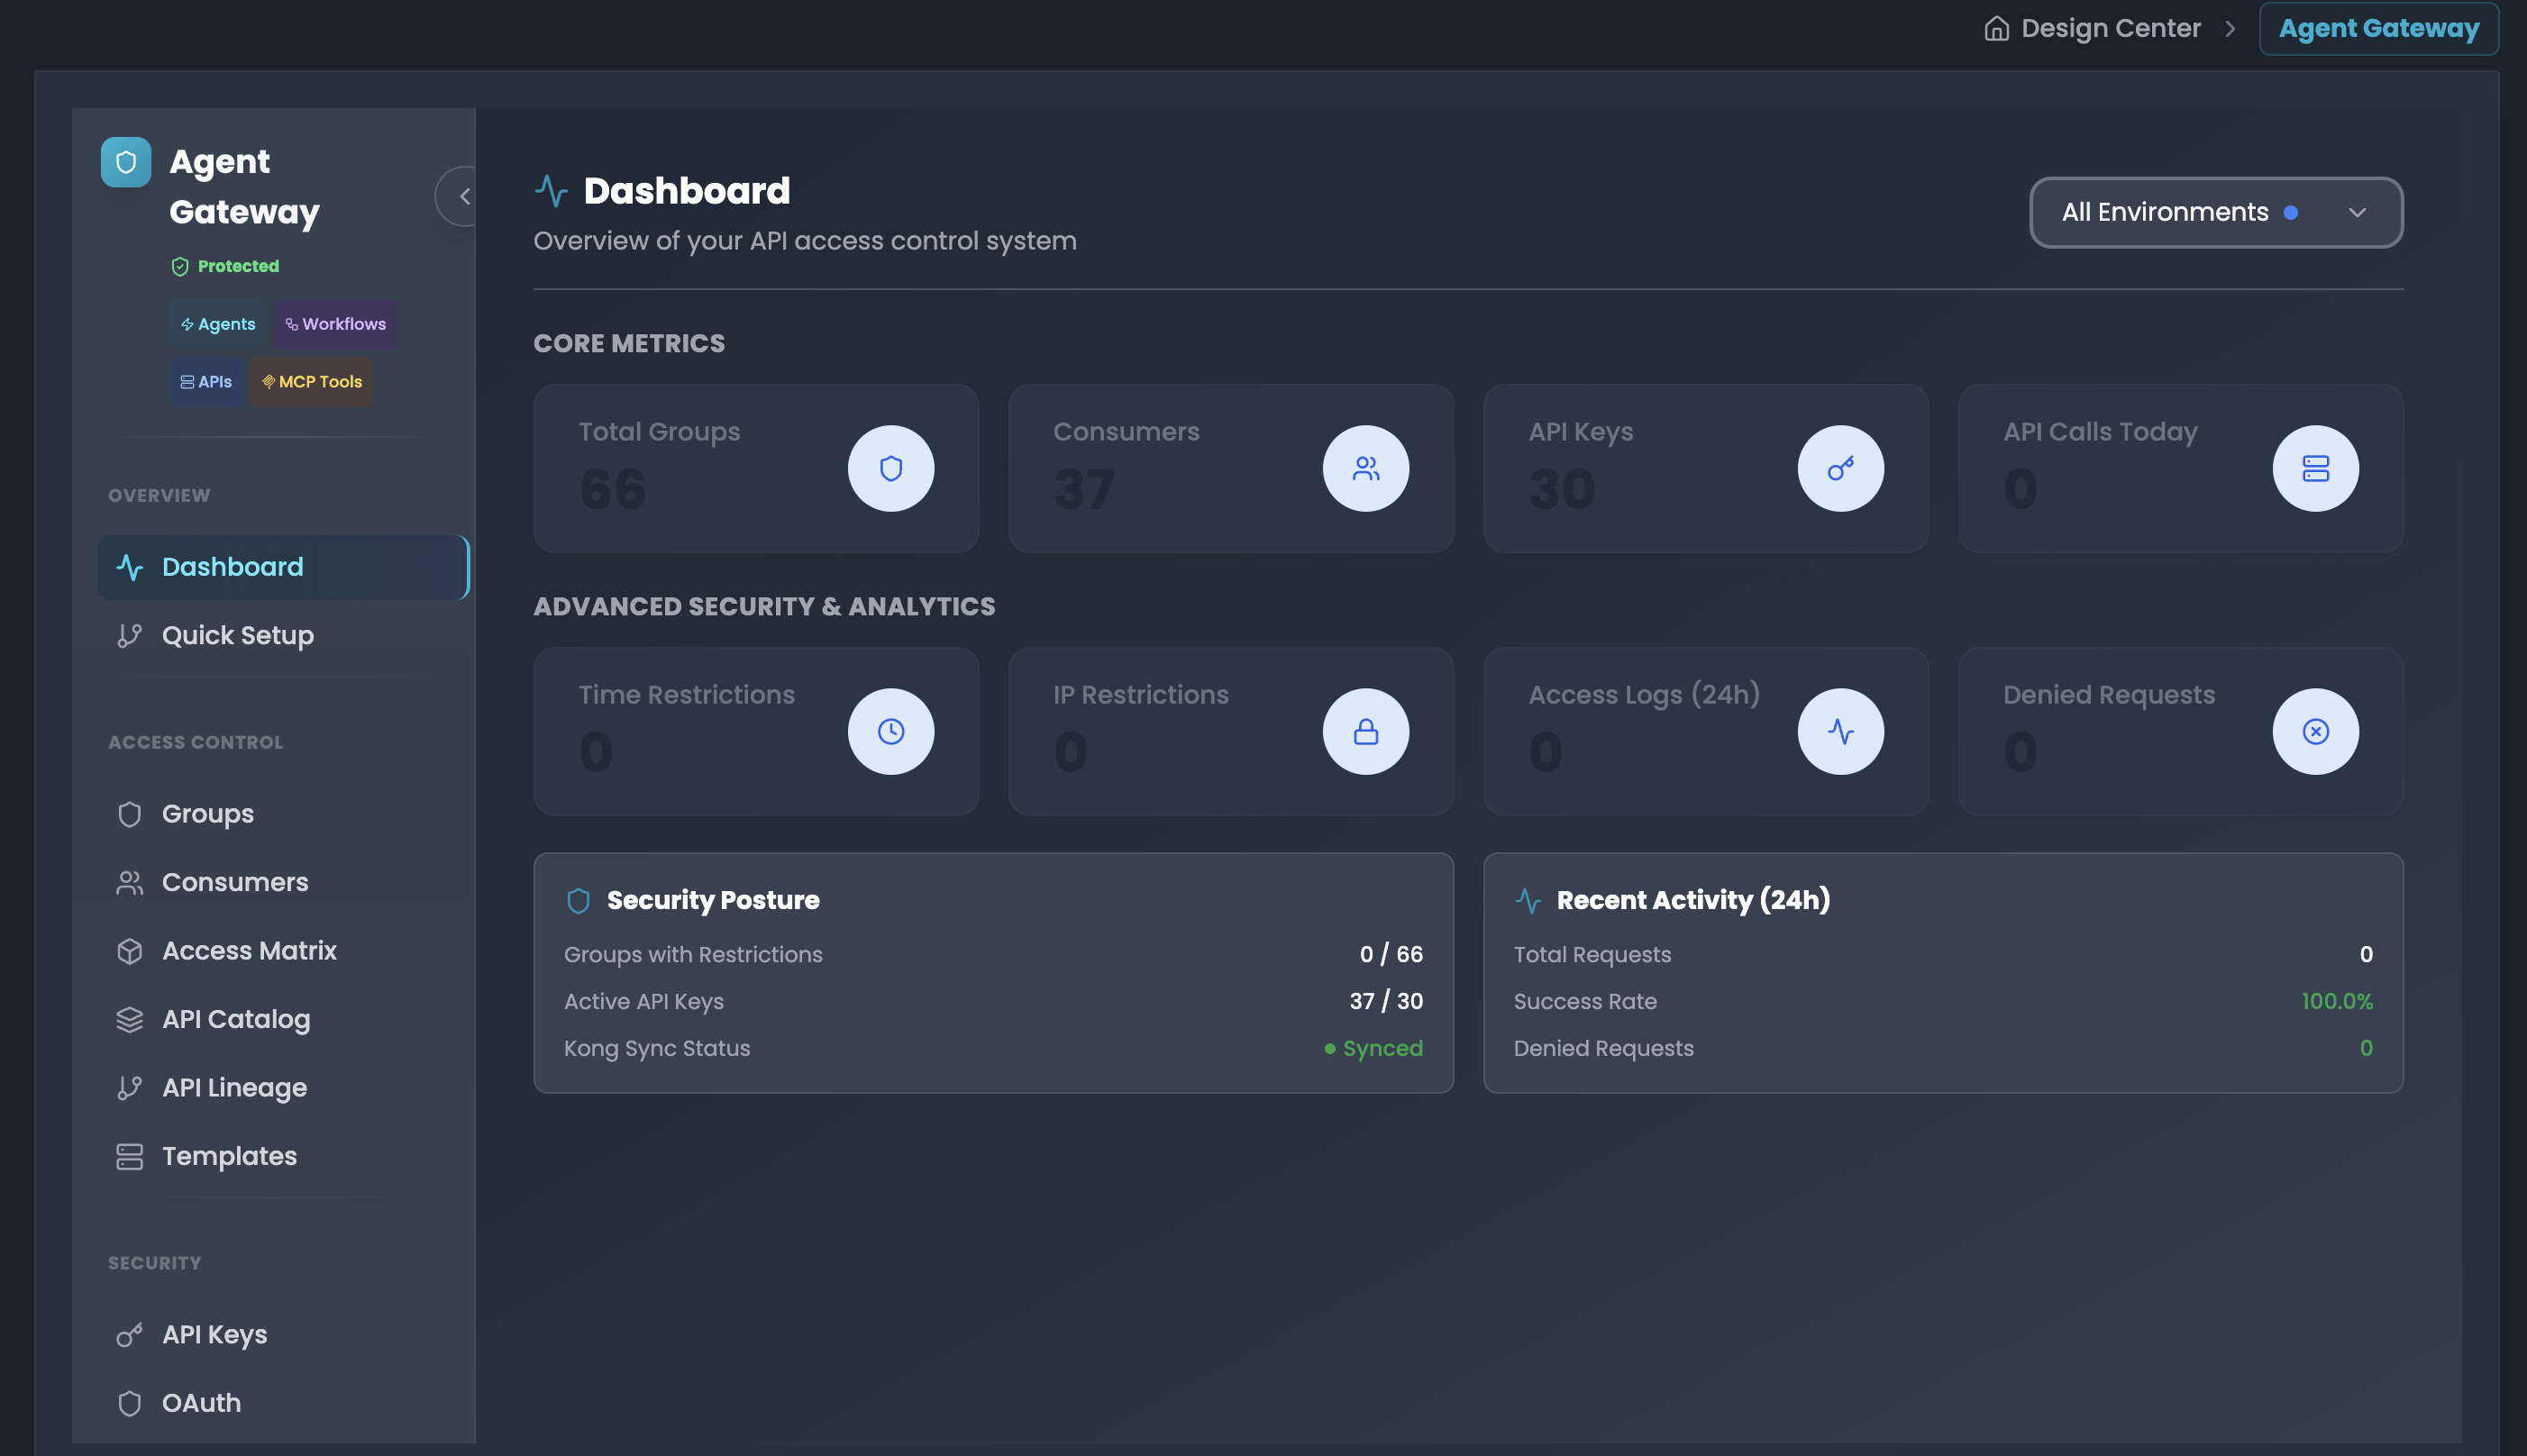
Overview
The Agent Gateway Access Control system allows you to:
- Define granular access policies through groups
- Control access at both route and service levels
- Manage API consumers with multiple authentication methods
- Assign consumers to multiple groups for flexible permissions
- Synchronize permissions to API Gateway in real-time
- Monitor and audit API access across your organization
- Secure your APIs with API keys or OAuth/OIDC authentication
Core Concepts
Groups - The Foundation of Access Control
Groups are the building blocks of your access control system. Each group defines:
Route-Level Permissions
- Allowed Routes: Specific API endpoints that group members can access (whitelist)
- Denied Routes: Specific API endpoints explicitly blocked for group members (blacklist)
Service-Level Permissions
- Allowed Services: Entire services available to group members (whitelist)
- Denied Services: Entire services explicitly blocked for group members (blacklist)
Consumers - Your API Users
Consumers are the entities (users, applications, services) that access your APIs through the gateway.
Multi-Group Membership
- A single consumer can belong to one or more groups
- Consumers inherit combined permissions from all their assigned groups
- This flexibility allows complex permission scenarios
Dual Authentication
- API Key Authentication: Secure, revocable keys for programmatic access
- OAuth/OIDC Authentication: Integration with Keycloak for advanced auth flows
- Consumers can use either or both authentication methods
How Access Control Works
When a consumer makes an API request:
- Authentication - The gateway verifies the API key or OAuth token
- Group Resolution - The system identifies all groups the consumer belongs to
- Permission Calculation - Allowed and denied routes/services are combined from all groups
- Access Decision - Request is allowed only if:
- The route/service is in the allowed list, AND
- The route/service is NOT in the denied list (deny takes precedence)
- Request Forwarding - Approved requests are forwarded to the target service
Getting Started
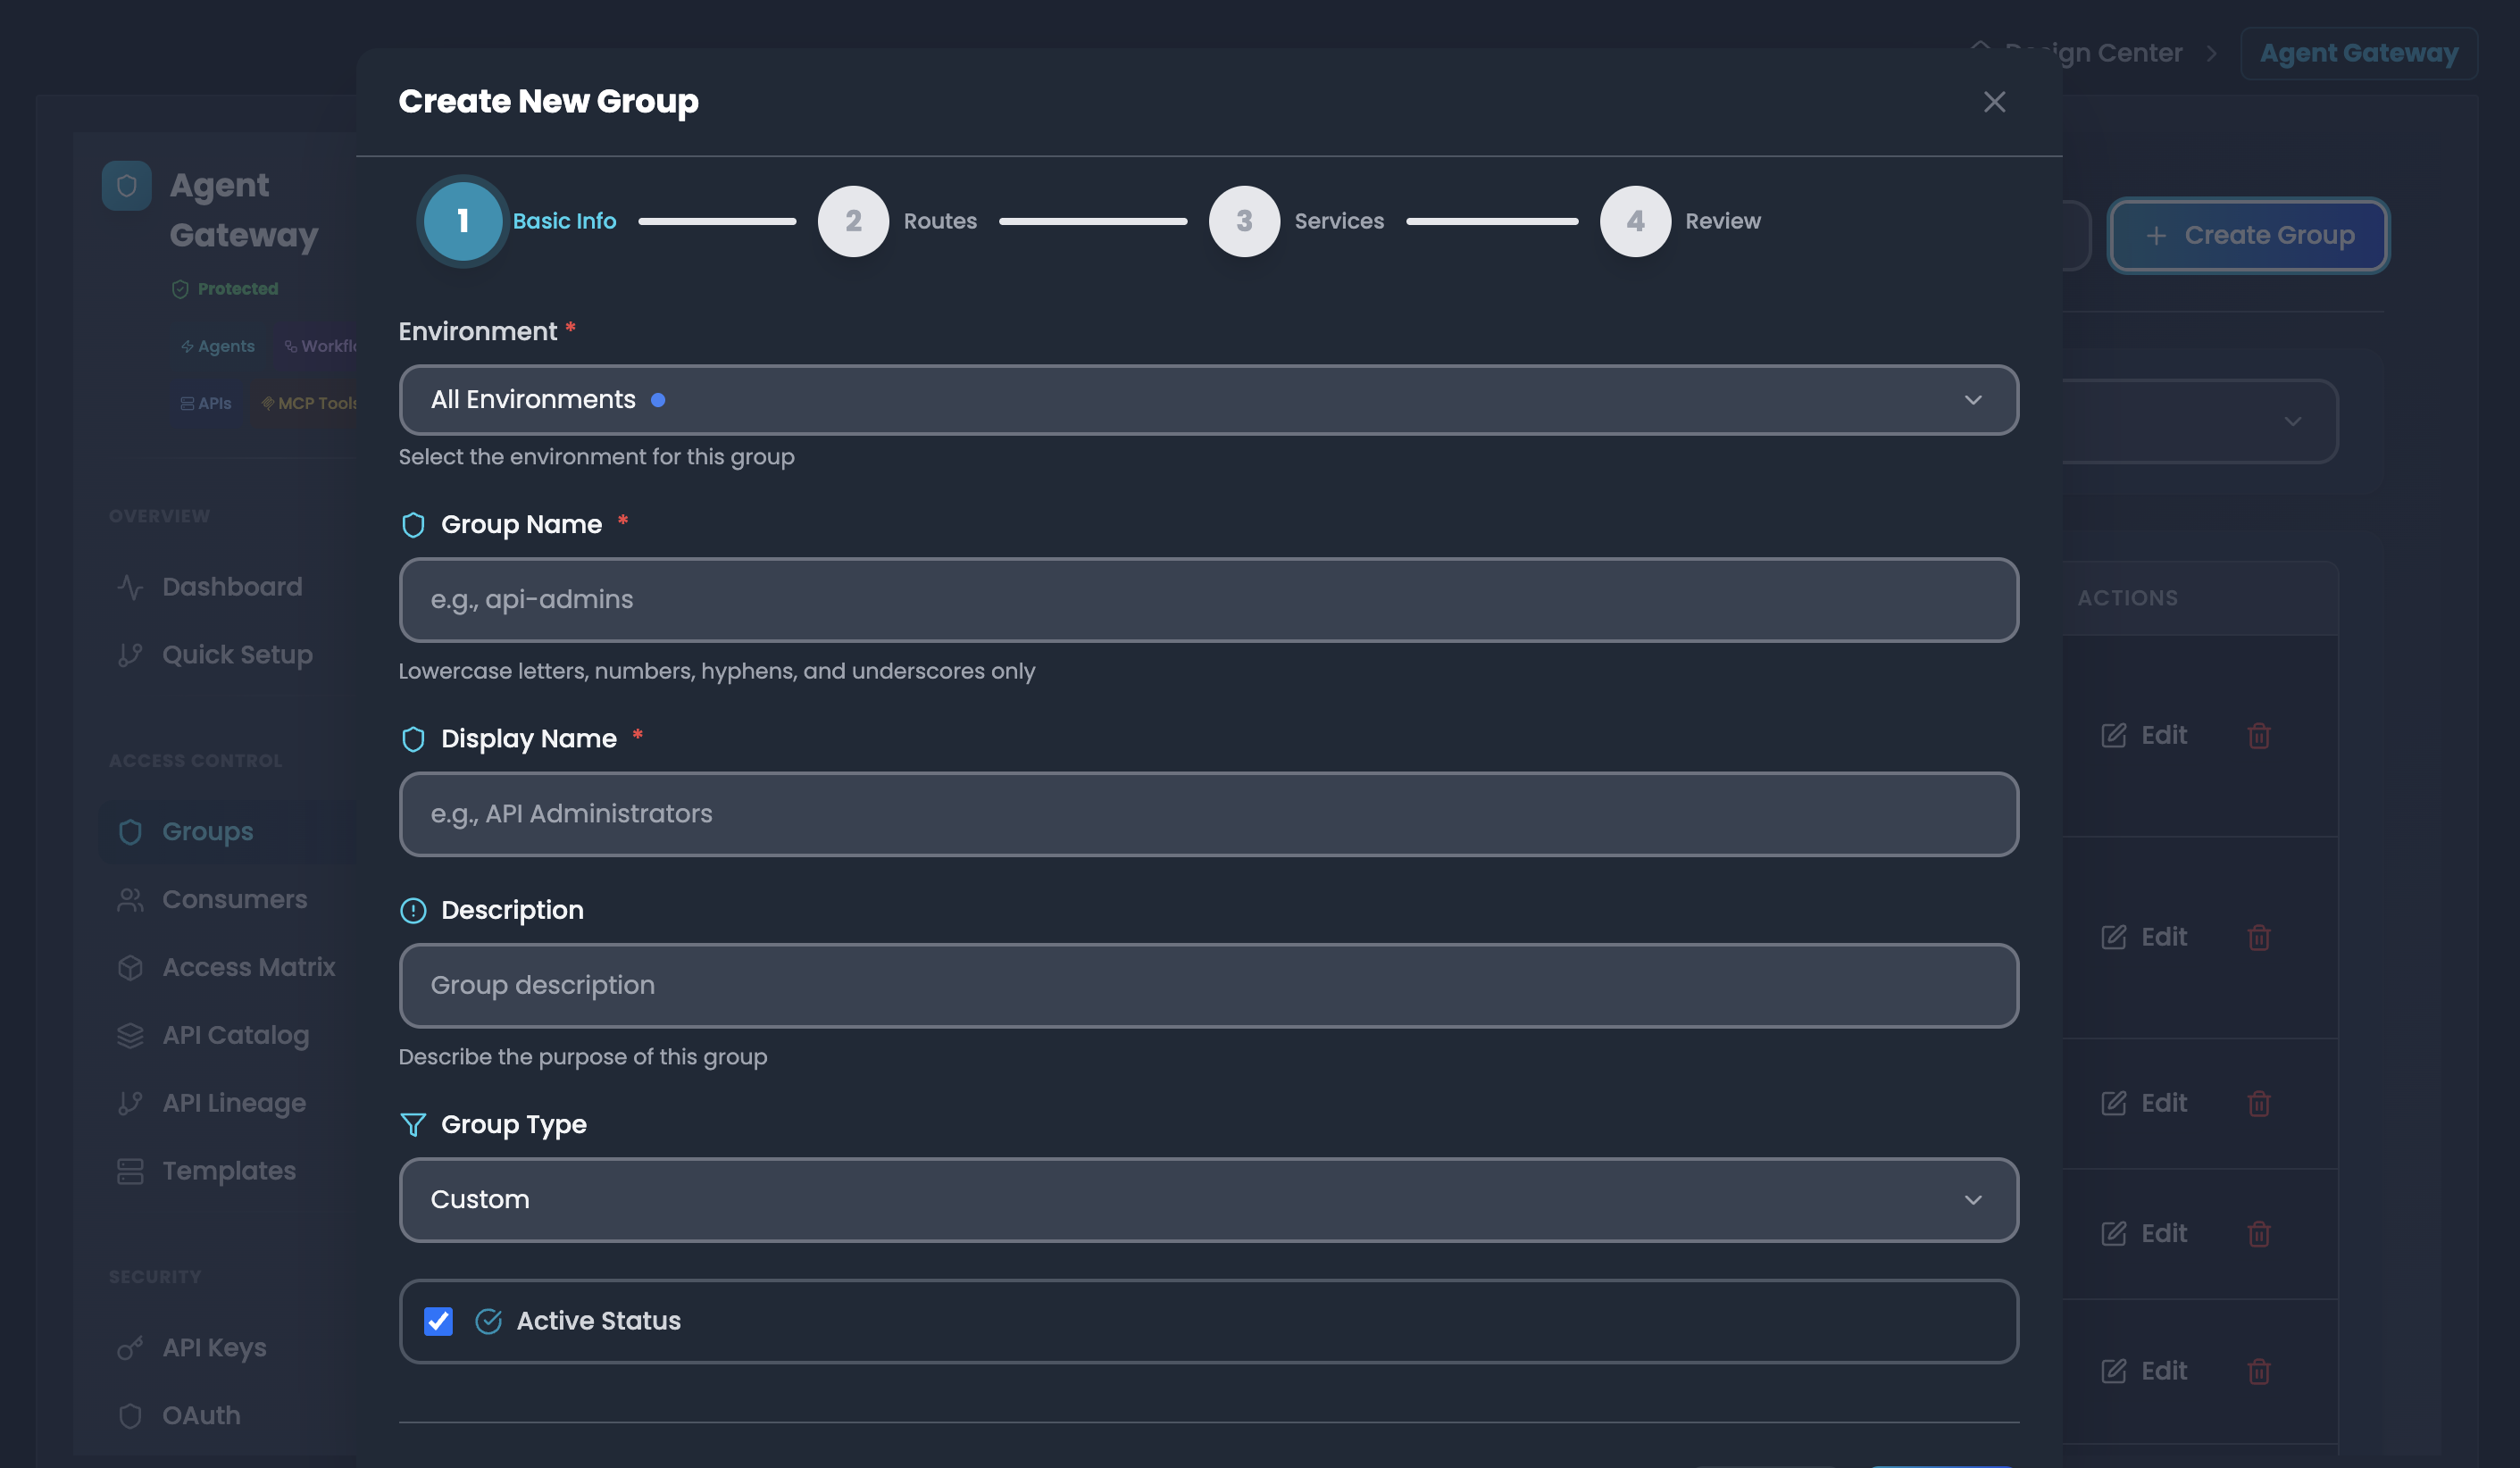
Step 1: Create Your First Group
-
Navigate to Access Management → API ACL Management → Groups
-
Click "Create Group" button
-
Fill in group details:
- Environment: Select production, staging, or development
- Group Name: Unique identifier (e.g., "developers-team")
- Display Name: Human-readable name (e.g., "Developers Team")
- Description: Purpose and scope of this group
- Group Type: Select a group Type(Custom, System, Global)
- Active Status: Set Groups status (Active, Diactive)
-
Configure Route Permissions:
- Click "Add Allowed Route" to whitelist specific endpoints
- Example:
/api/v1/users,/api/v1/products
- Example:
- Click "Add Denied Route" to blacklist specific endpoints
- Example:
/api/v1/admin/*
- Example:
- Click "Add Allowed Route" to whitelist specific endpoints
-
Configure Service Permissions:
- Click "Add Allowed Service" to whitelist entire services
- Example:
user-service,product-service
- Example:
- Click "Add Denied Service" to blacklist entire services
- Example:
admin-service
- Example:
- Click "Add Allowed Service" to whitelist entire services
-
Click "Create Group"
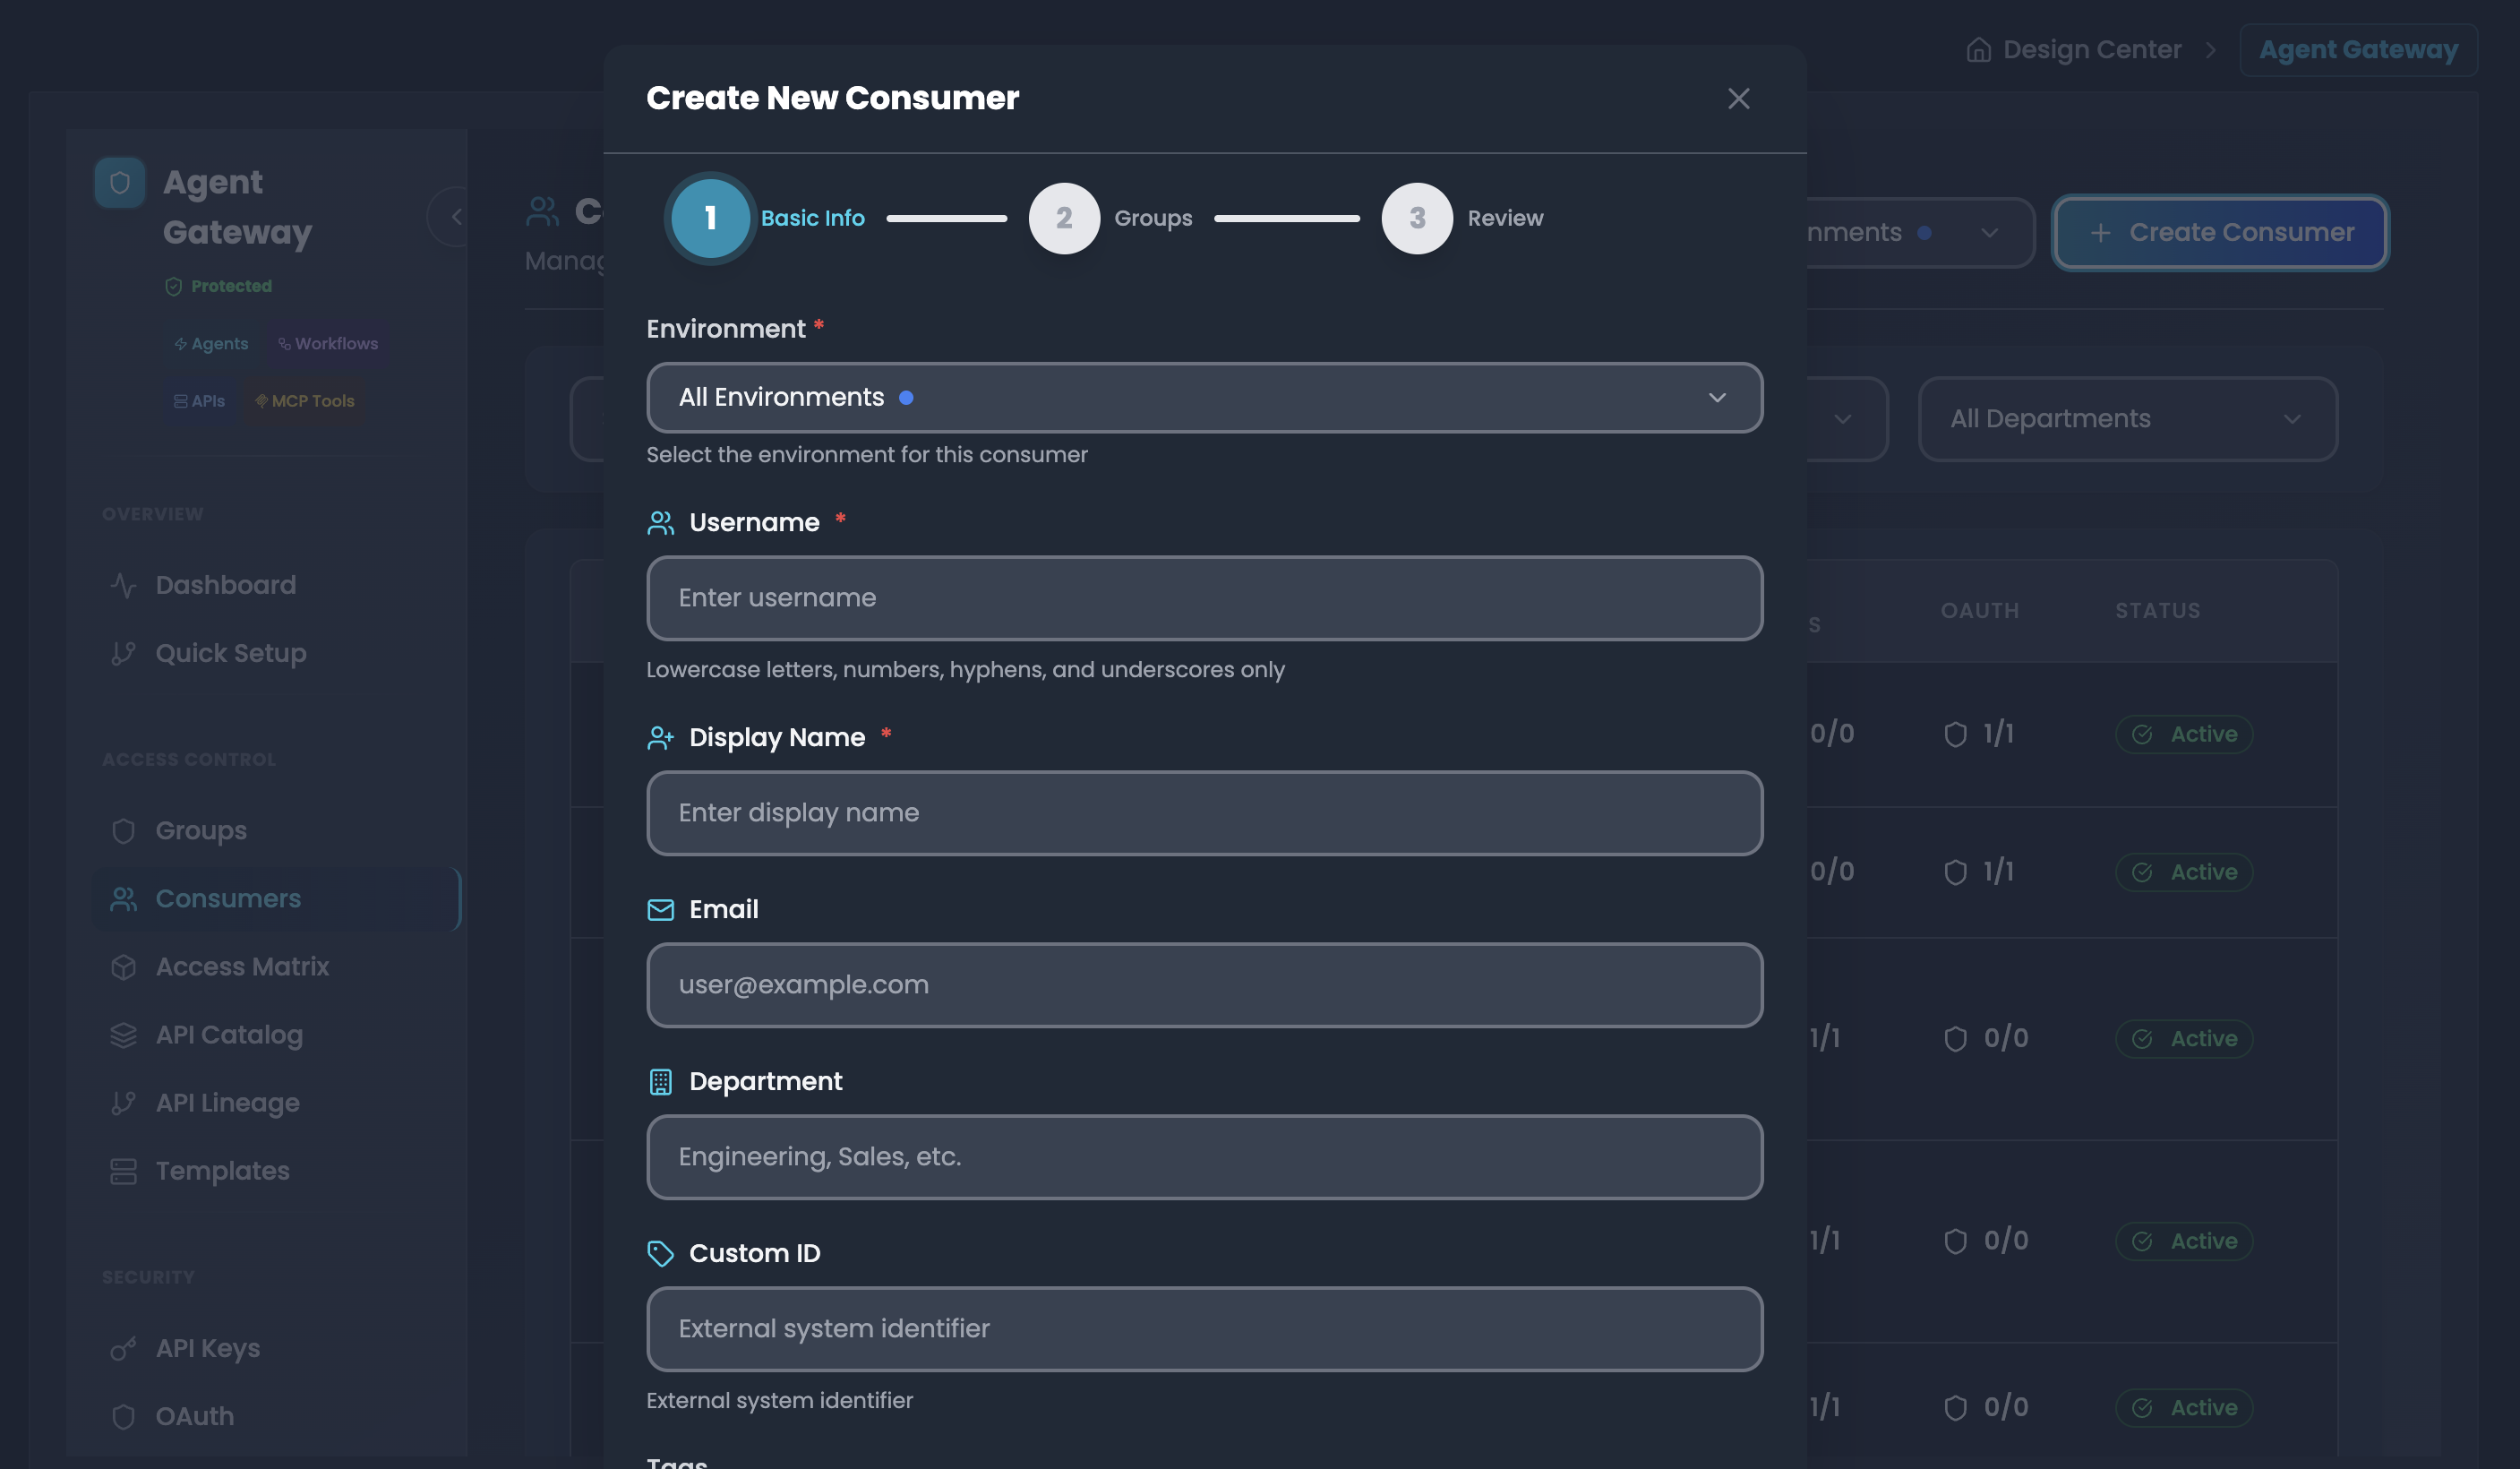
Step 2: Create a Consumer
-
Navigate to Consumers section
-
Click "Create Consumer" button
-
Enter consumer details:
- Environment: Select production, staging, or development
- Username: Unique identifier (e.g., "john-doe-app")
- Display Name: Human-readable name
- Email: Contact email for the consumer
- Department: Organizational unit (e. g., "Engineering, Sales")
- Custom Tags: Additional metadata for organization
- Active Status: Set Groups status (Active, Diactive)
- Auto-Generate API Key: Set Auto-Generate API Key. This activate automatic API key Generation (Active, Diactive)
-
Assign Groups:
- Select one or more groups from the available list
- The consumer will inherit permissions from all selected groups
- Example: Assign to both "developers-team" and "api-users" groups
-
Click "Create Consumer"
Step 3: Manage API Keys
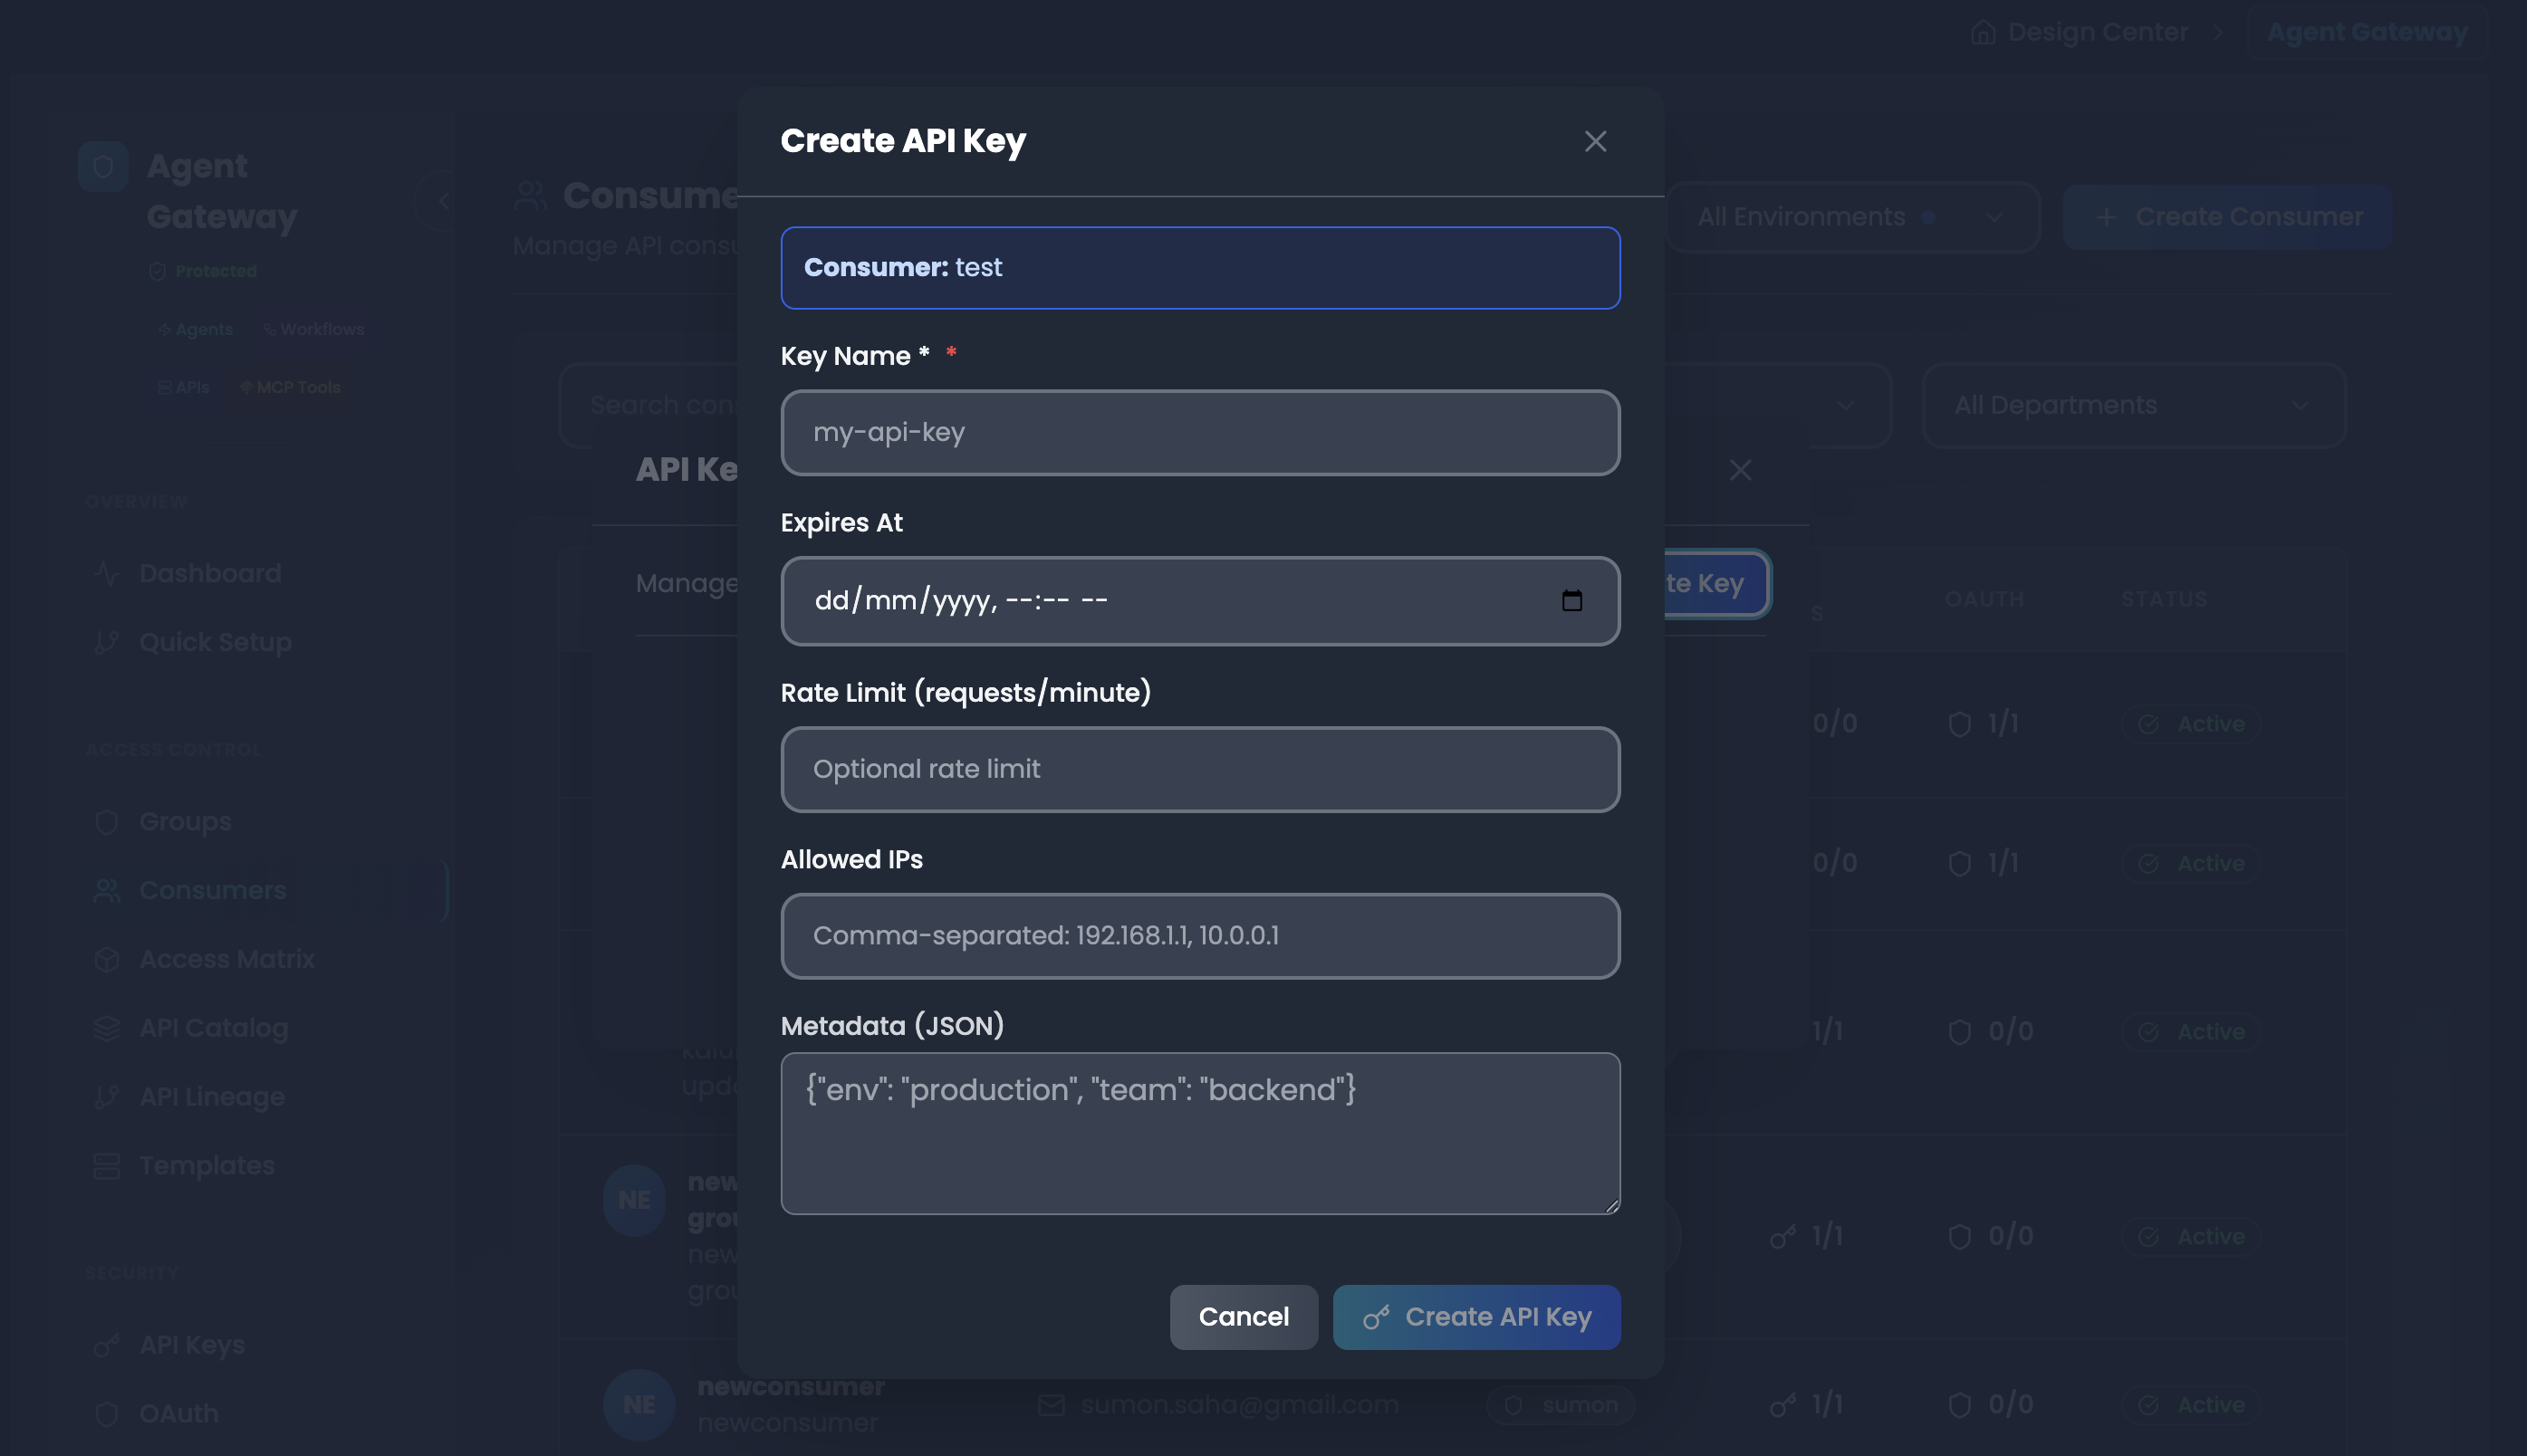
Generating a New API Key
-
Click on the API Keys count for a consumer in the Consumers list
-
This opens the API Keys modal for that consumer
-
Click "Create Key"
-
Configure key settings:
- Key Name: Required descriptive identifier (e.g., "production-app-key")
- Expires At: Set expiry date/time or leave blank for no expiration
- Rate Limit (requests/minute): (Optional) Set maximum requests per minute
- Allowed IPs: (Optional) Comma-separated IP addresses (e.g., "192.168.1.1, 10.0.0.1")
- Metadata (JSON): (Optional) Additional metadata in JSON format (e.g.,
{"env": "production", "team": "backend"})
-
Click "Create API Key"
-
Important: Copy the key immediately - it won't be shown again
Step 4: Configure OAuth Authentication
-
Click on the OAuth count for a consumer in the Consumers list
-
This opens the OAuth Clients modal for that consumer
-
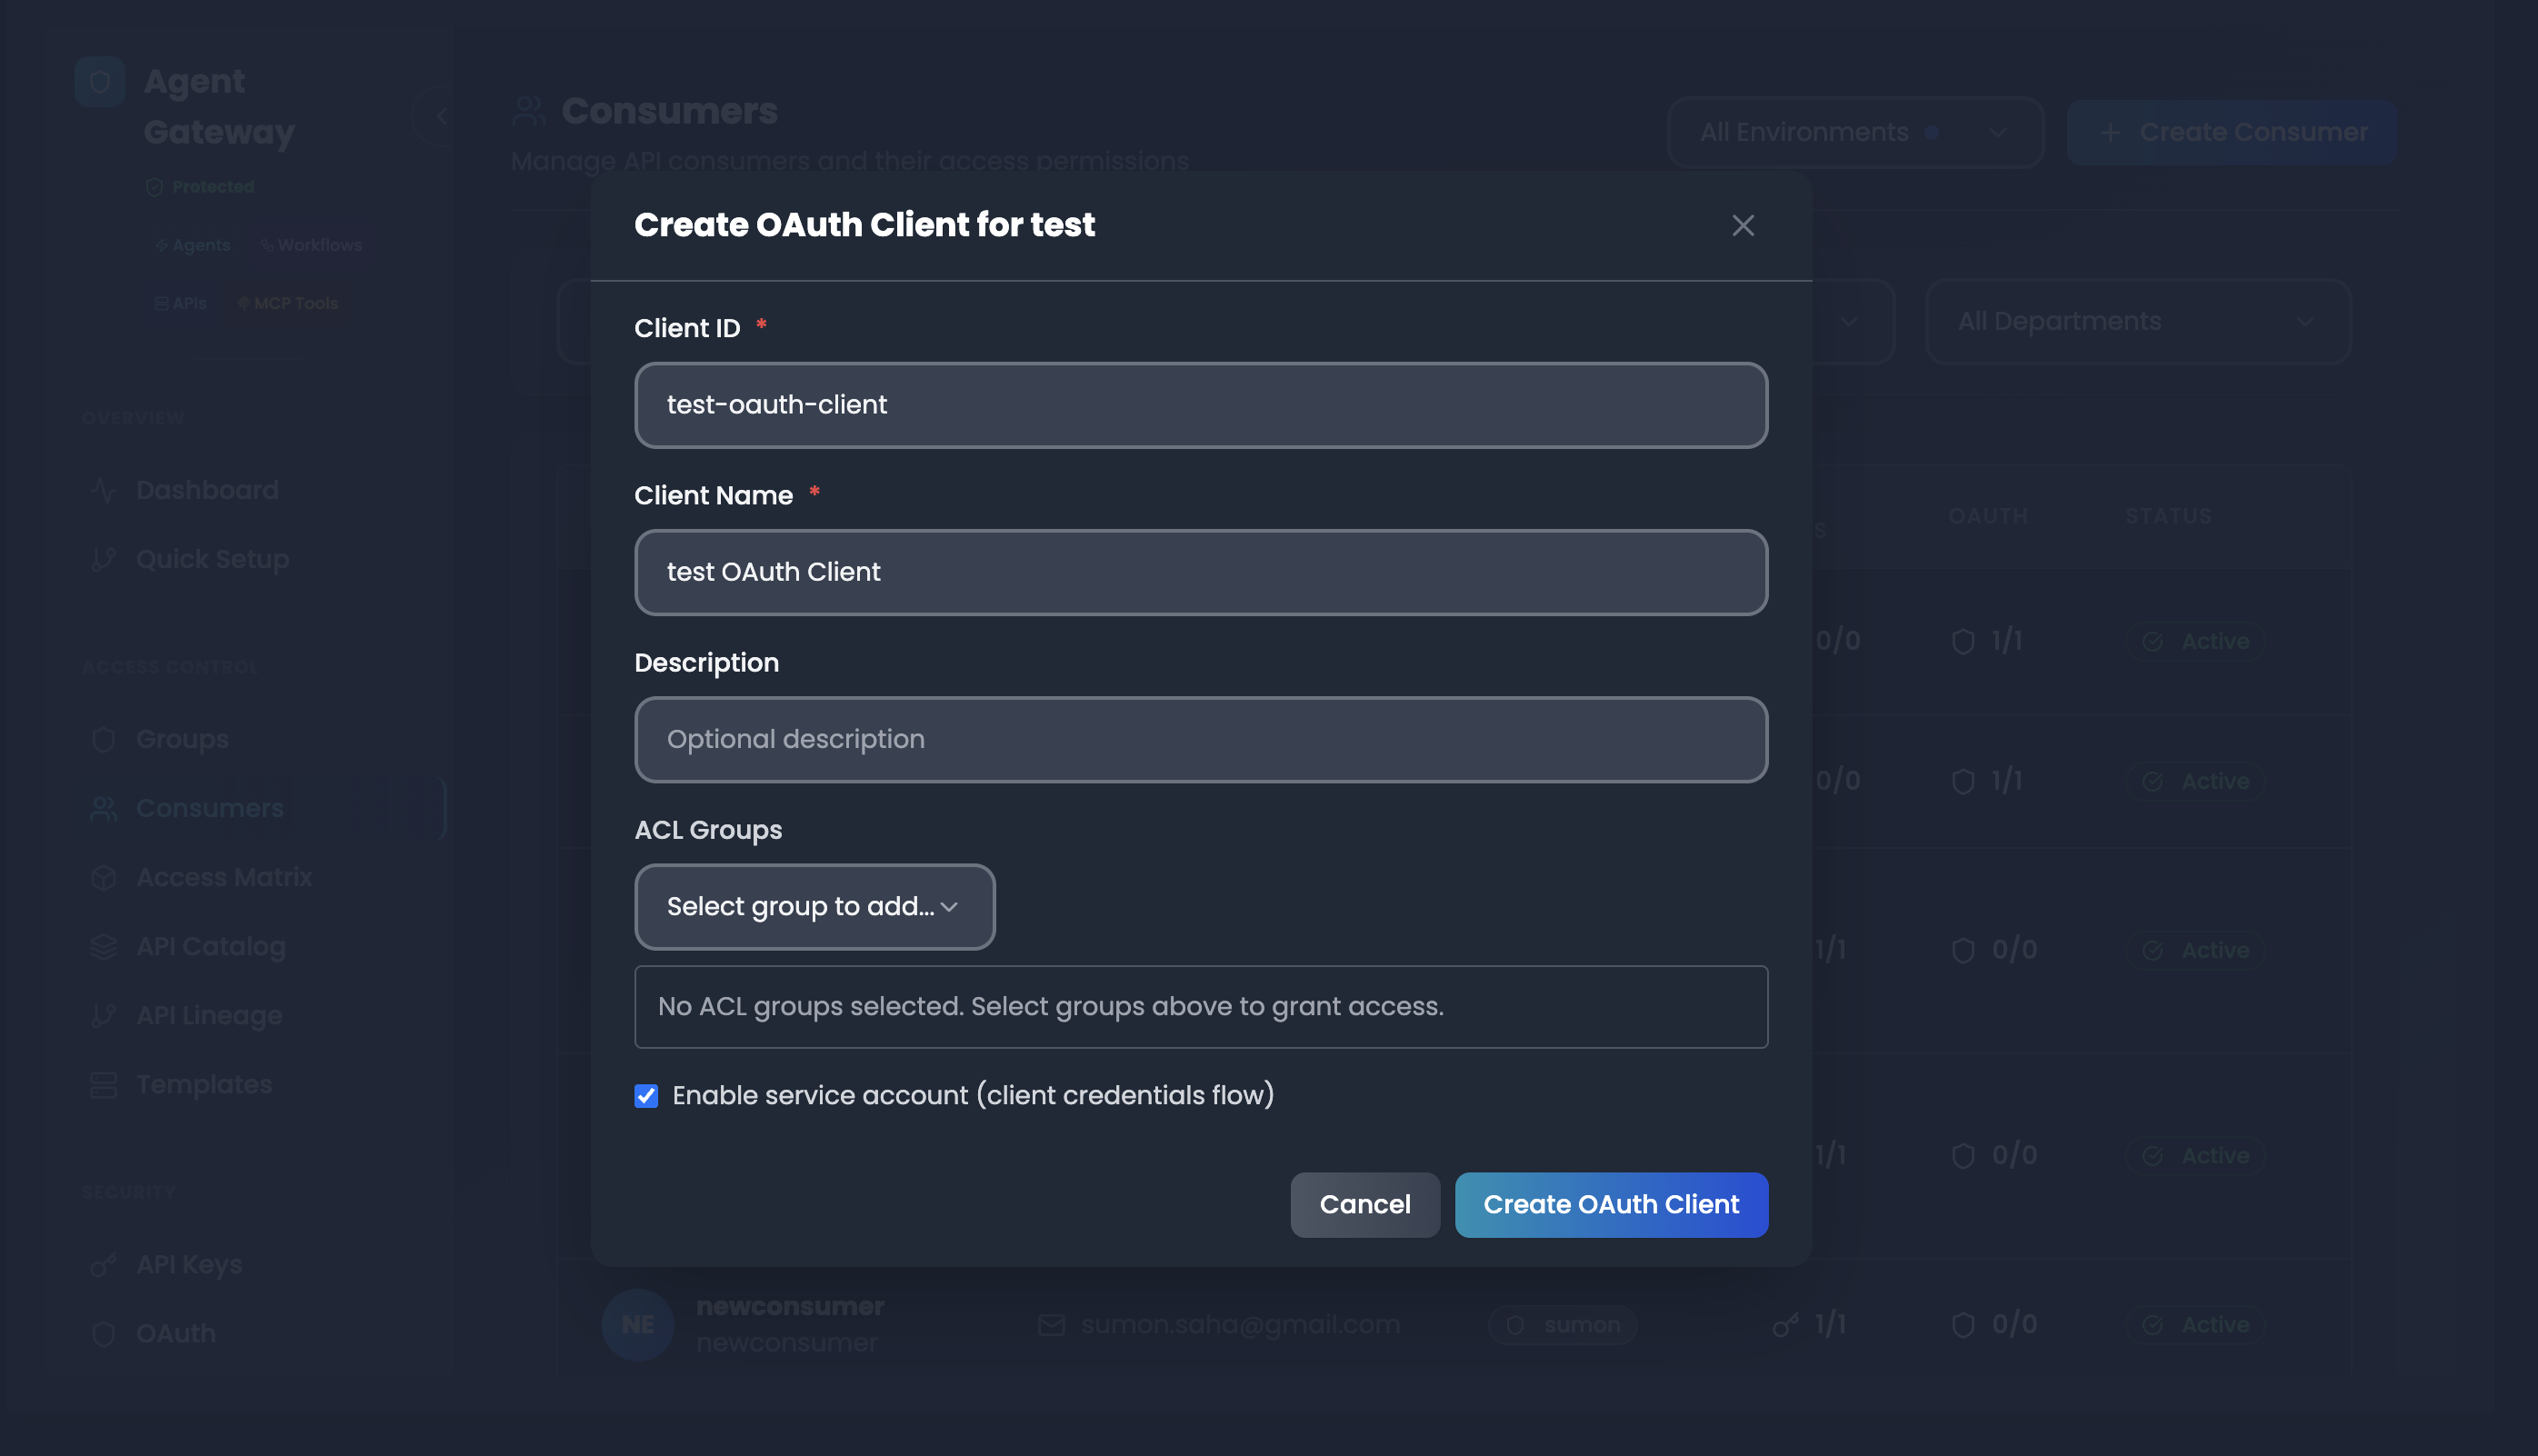
Click "Create OAuth Client"
-
Configure client settings:
- Client ID: Required unique identifier (e.g., "test-oauth-client")
- Client Name: Required display name (e.g., "test OAuth Client")
- Description: (Optional) Description of the OAuth client
- ACL Groups: (Optional) Select groups to grant access permissions
- Enable service account (client credentials flow): Check to enable client credentials authentication
-
Click "Create OAuth Client"
-
Save the Client Secret securely
-
Use the client credentials for JWT-based authentication
API Catalog & Service Discovery
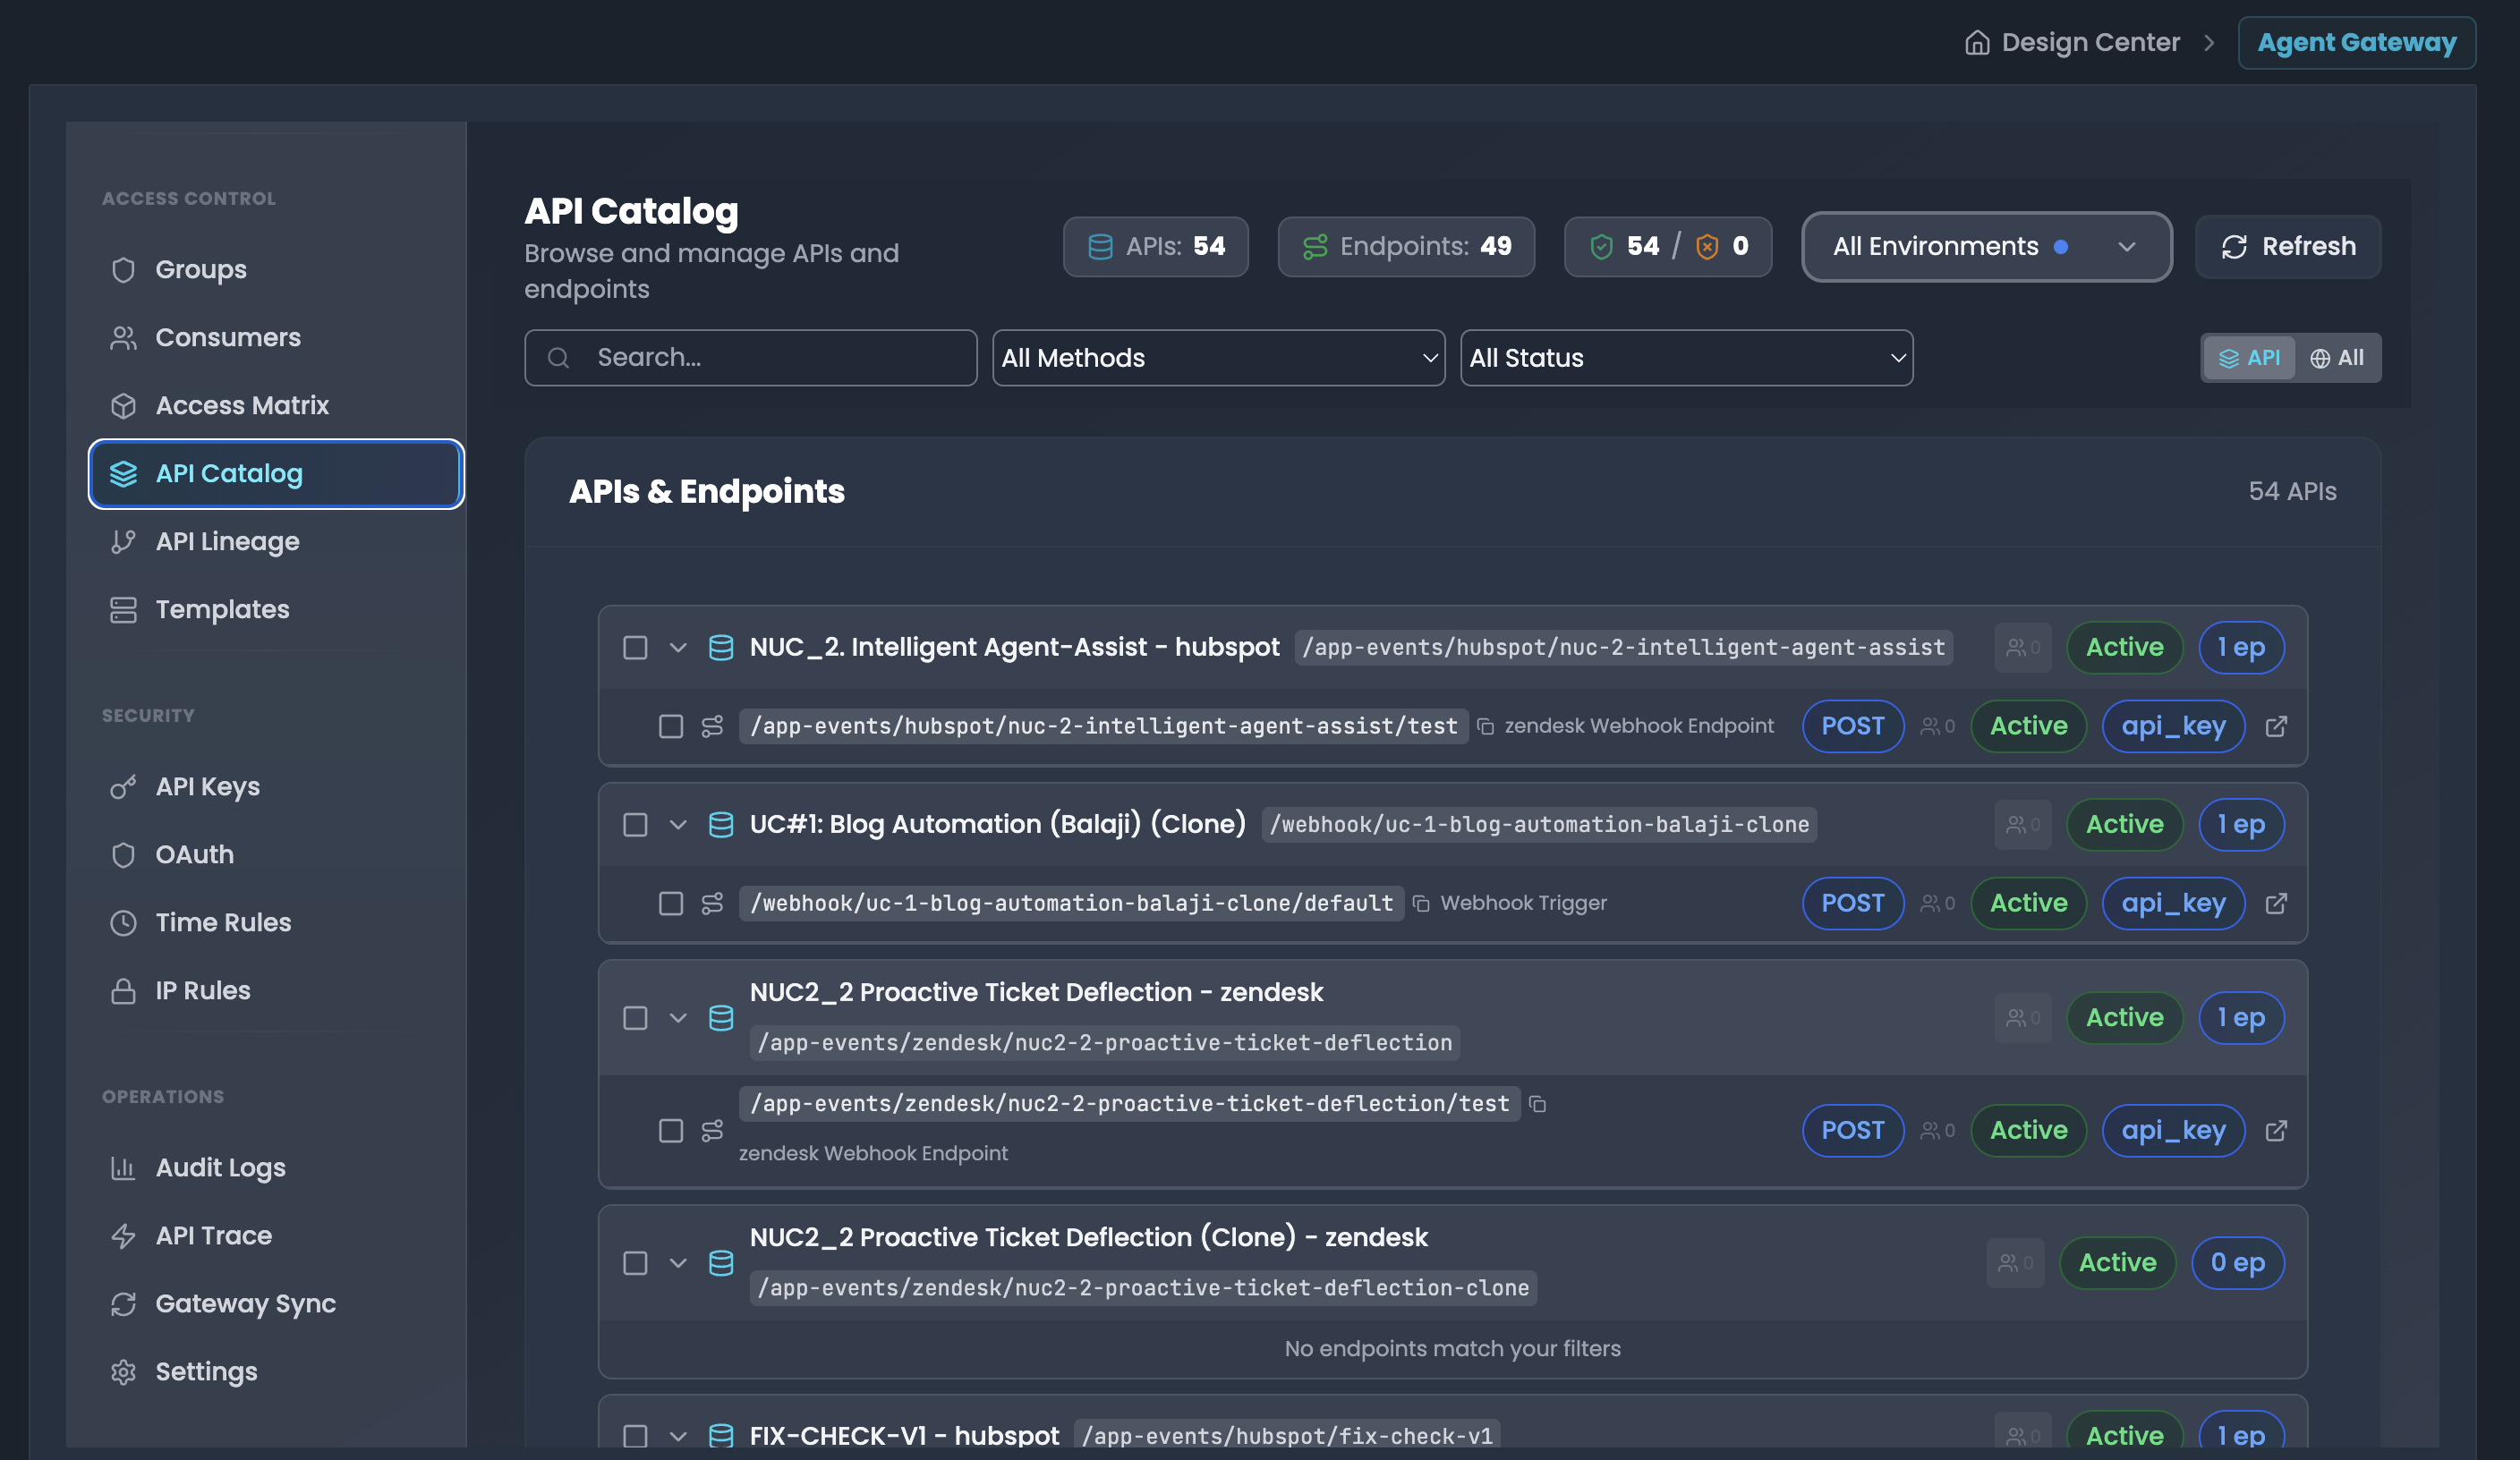
Browse and manage APIs and endpoints in FlowGenX AI:
Overview The API Catalog displays all registered APIs and endpoints with their metadata:
- APIs Count: Total number of unique APIs
- Endpoints Count: Total number of endpoints across all APIs
- Environment Filter: Filter by environment (All Environments dropdown)
- Refresh: Reload the catalog data
API & Endpoint Details Each API entry shows:
- API name and description
- Base path with wildcard indicator
- Associated endpoints with HTTP methods
- Endpoint types (Webhook Endpoint, etc.)
- Authentication requirements (api_key, POST, etc.)
- Status badges (Active/Inactive)
- Number of endpoints per API
Adding APIs to Groups
- Navigate to API Catalog
- Select APIs or endpoints by checking their checkboxes
- A banner appears showing count (e.g., "1 API(s) (wildcard)")
- Click "Add to Group" button
- In the modal dialog:
- Filter by Environment: Select target environment (All Environments, dev, etc.)
- Target Group: Choose the group to grant access
- Selected APIs (wildcard access): Preview shows selected API paths
- Wildcard notation:
- Use
**for recursive matching (all sub-paths) - Use
*for single level matching
- Use
- Click "Add to Group" to confirm
- Click "Clear" to deselect all
API Lineage & Dependencies
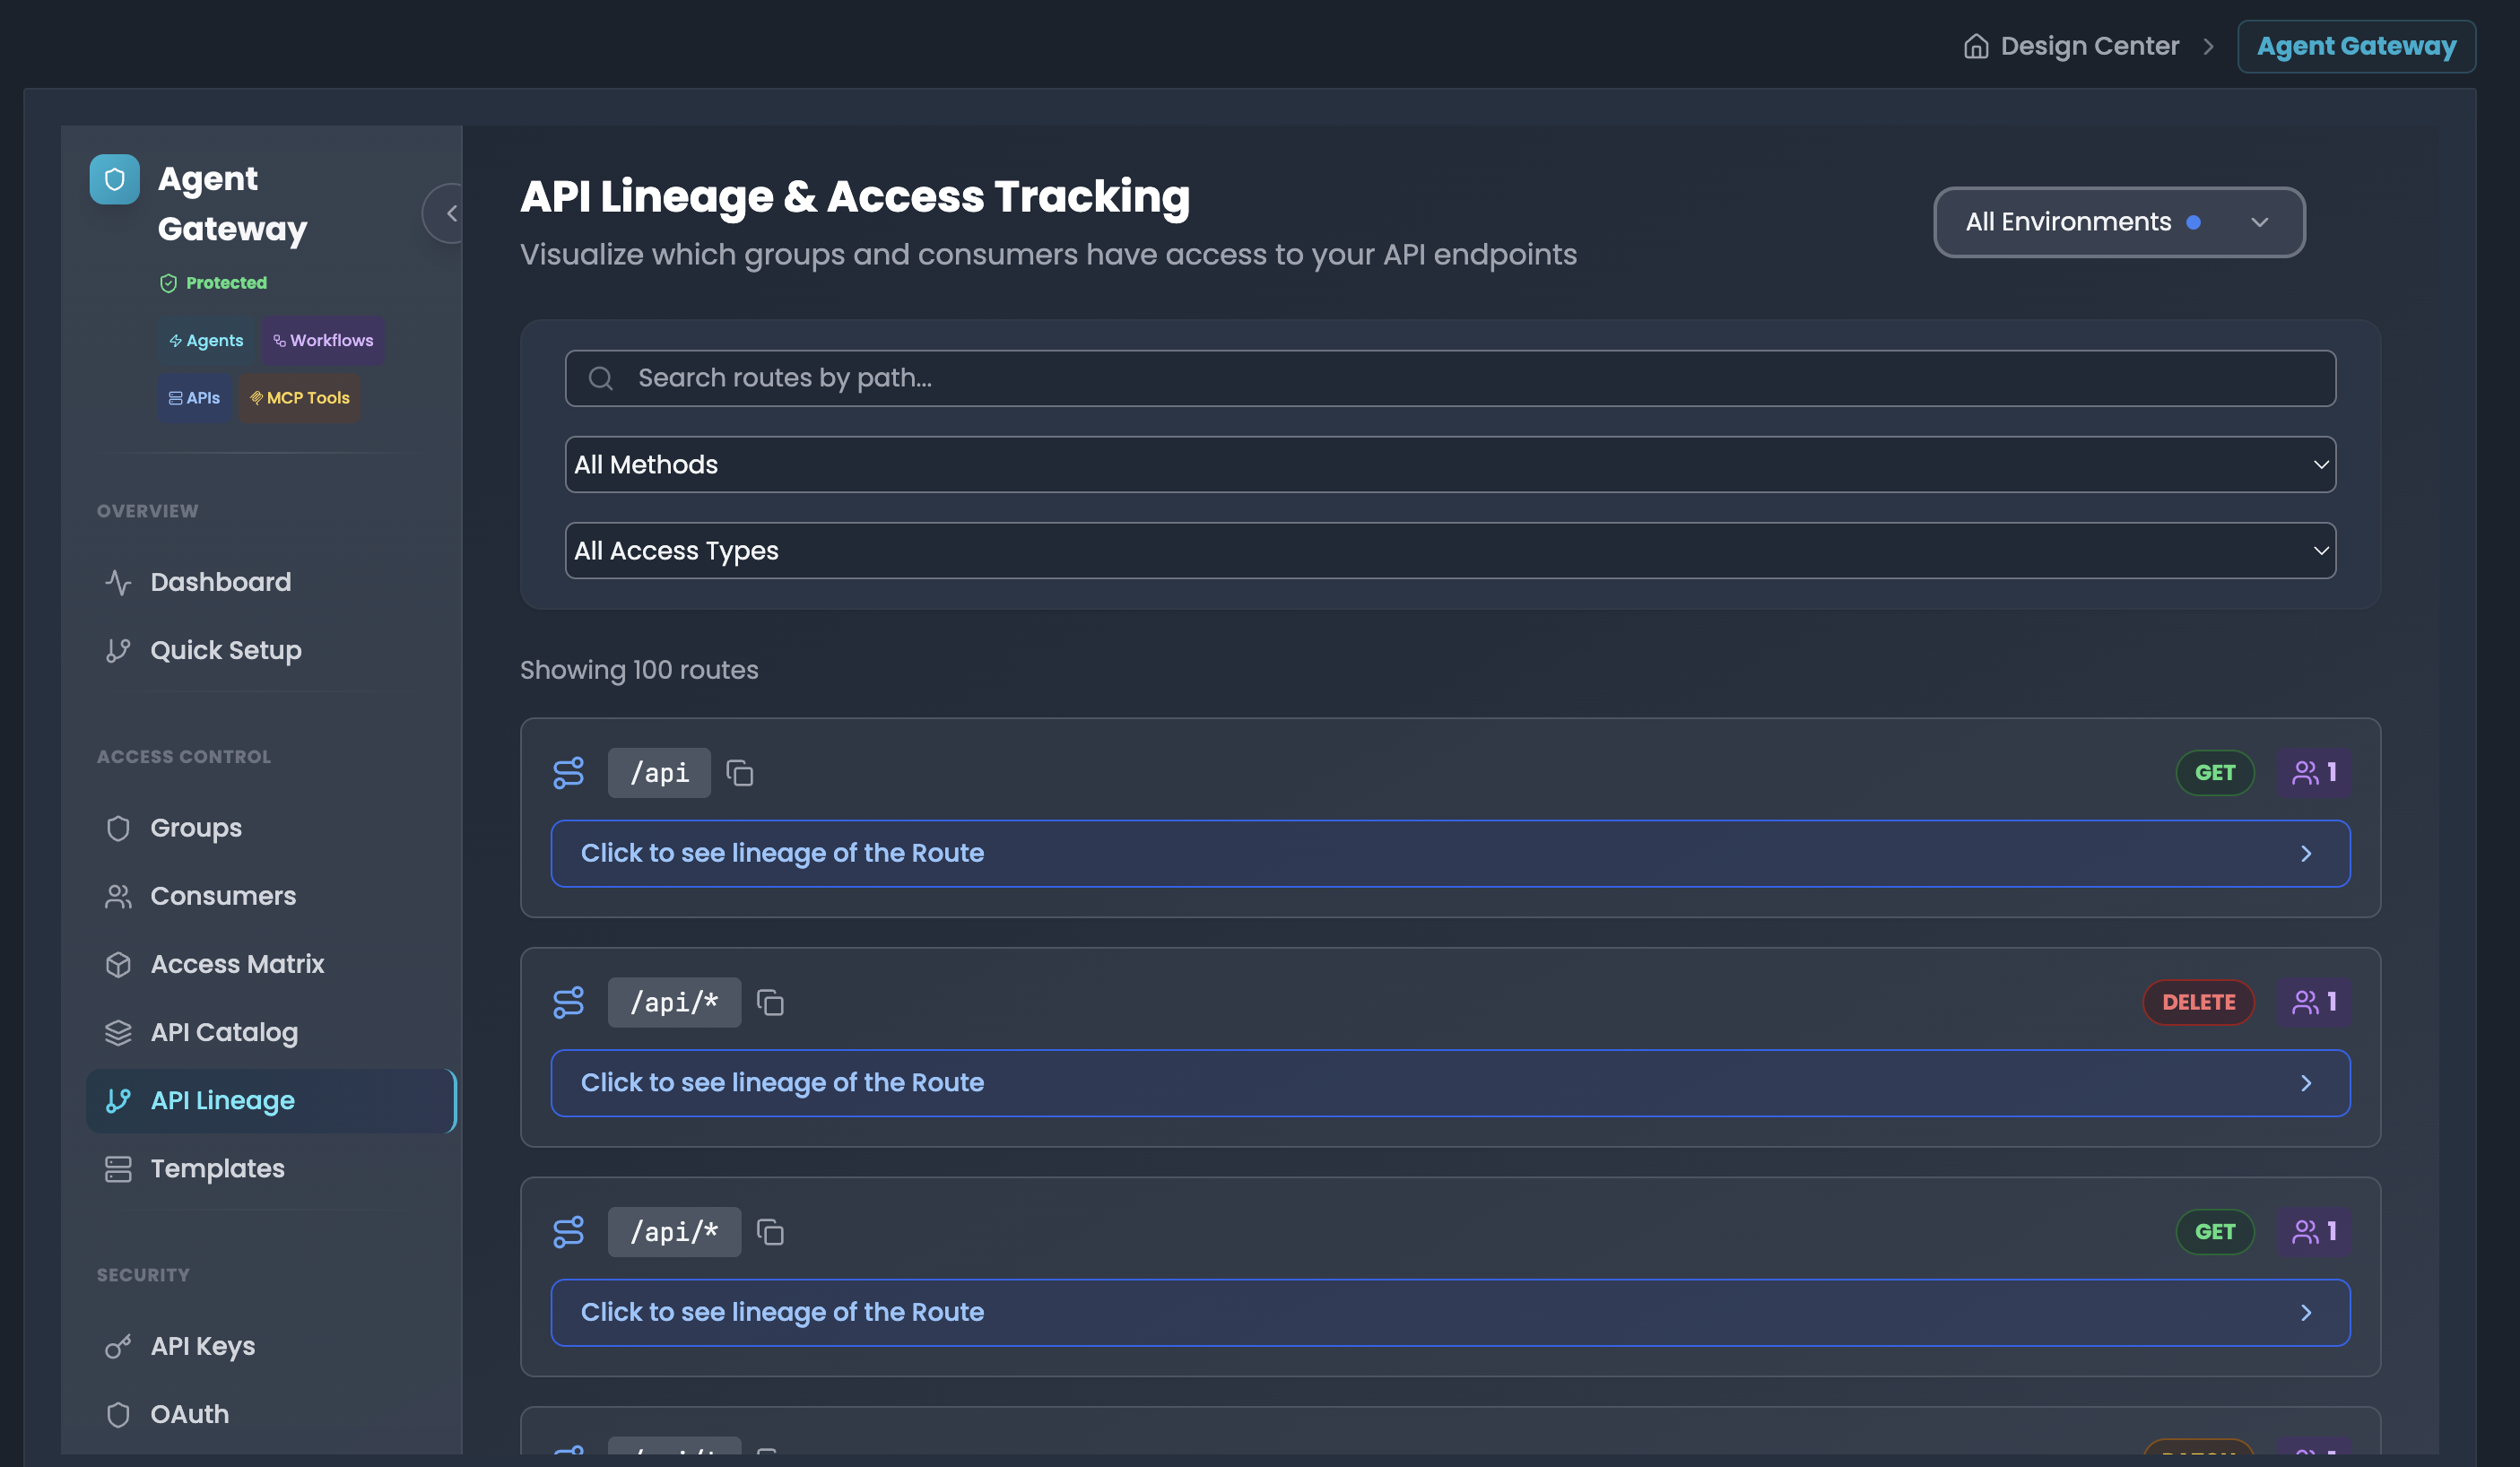
Visualize and understand the complete access path from API routes to groups, consumers, and their credentials.
Accessing API Lineage
- Navigate to API Lineage in the sidebar
- Browse the list of API routes with their HTTP methods (GET, POST, PUT, PATCH, DELETE)
- Each route shows method badges (e.g., PATCH, POST, PUT) and count indicators
Route Lineage Visualization Click "Click to see lineage of the Route" to expand the complete access chain for any API route.
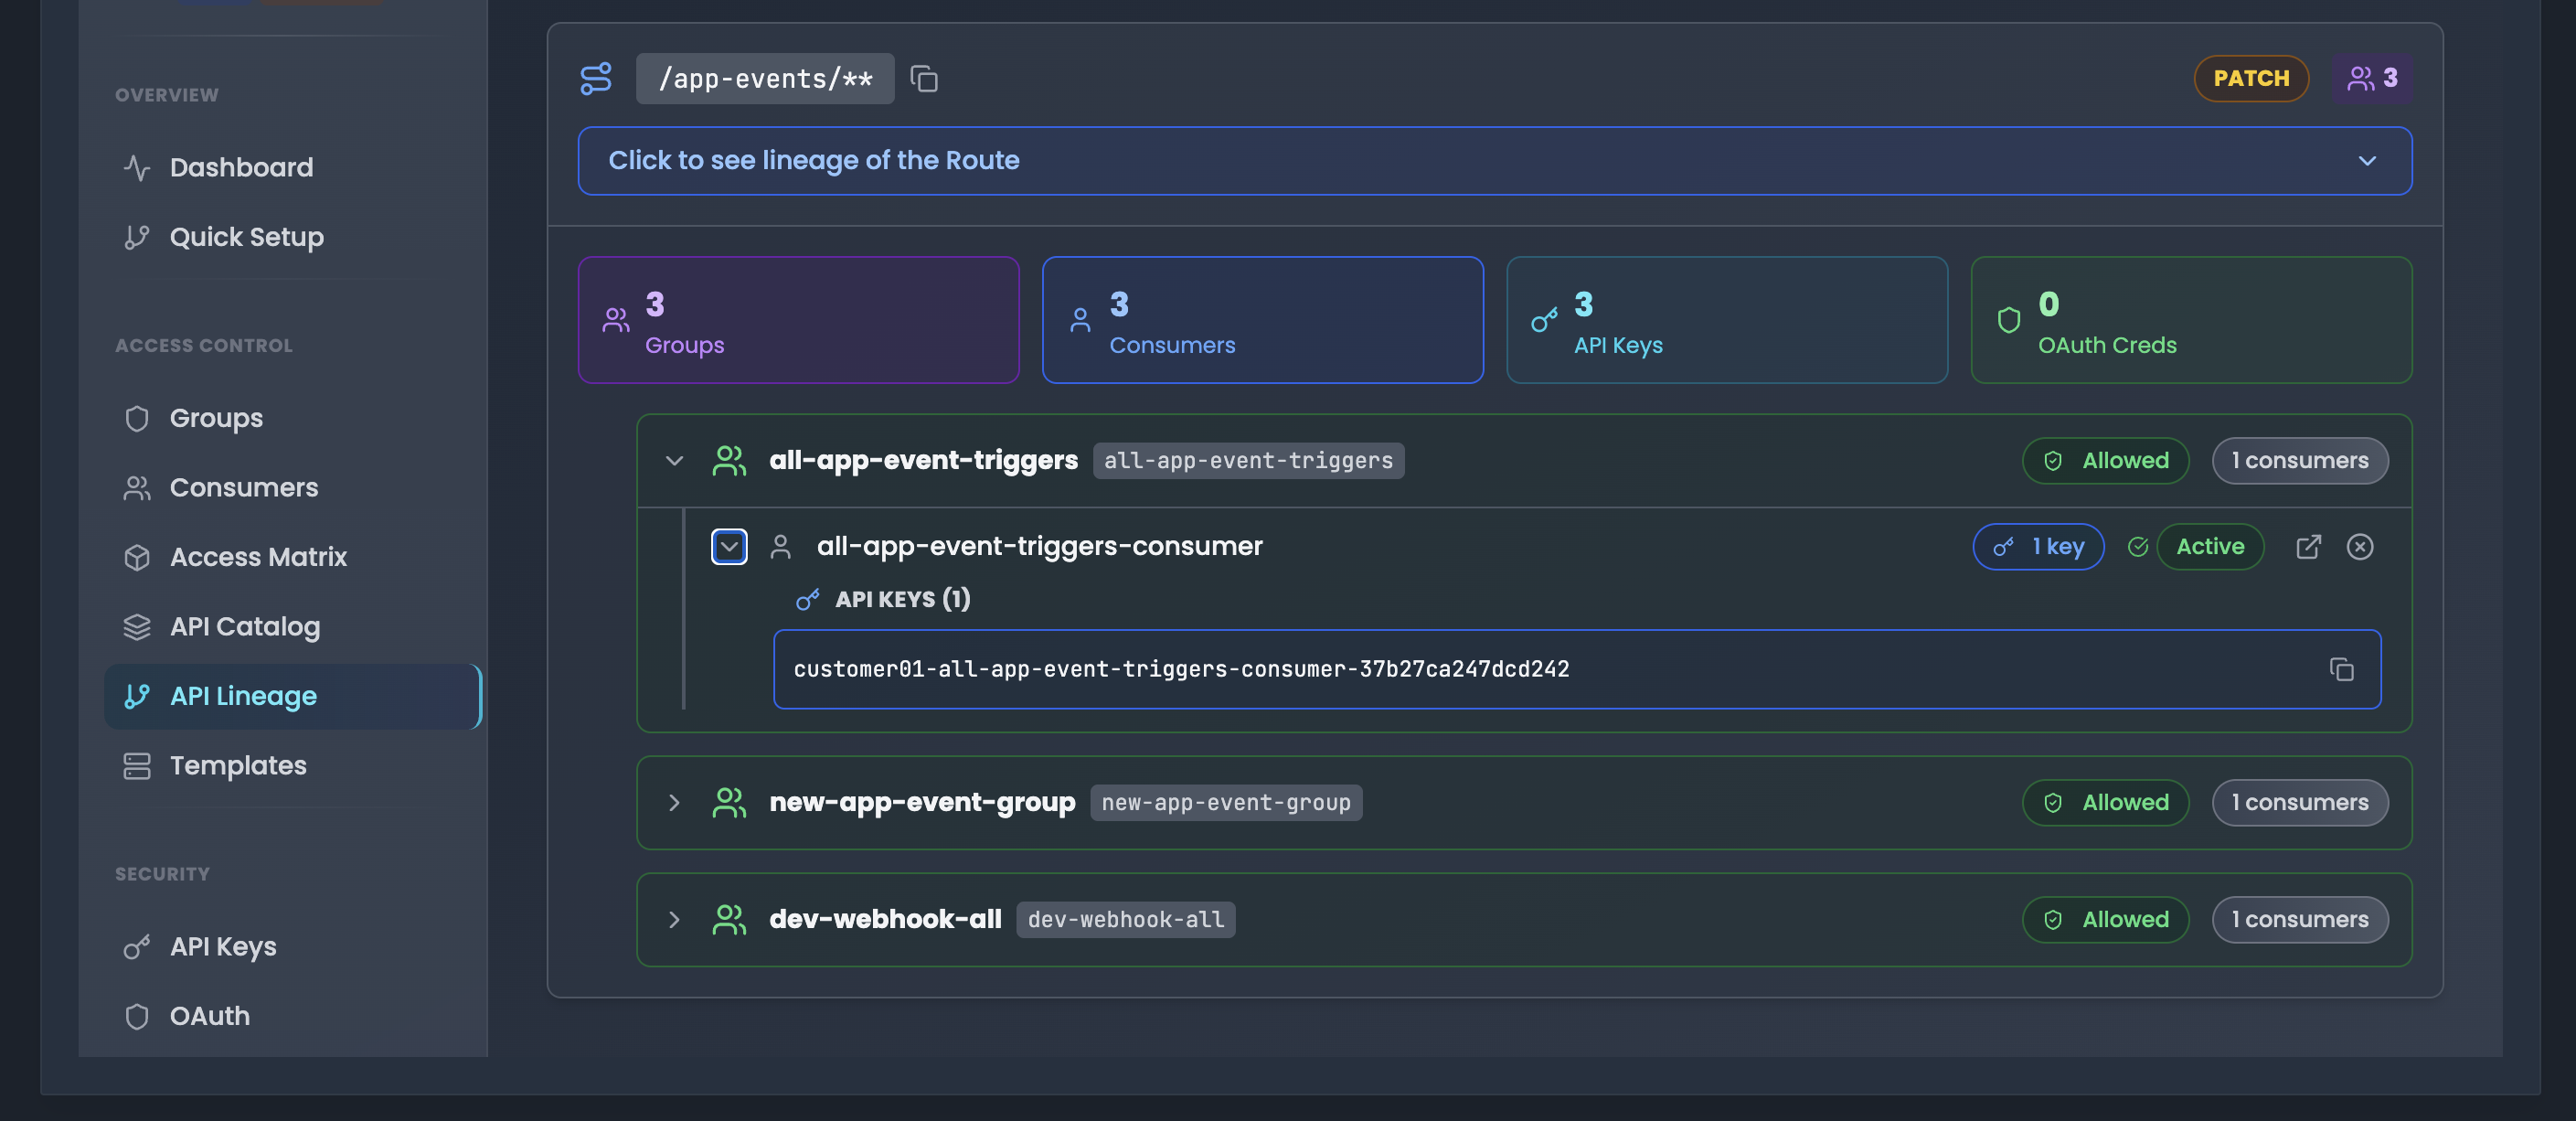
Summary Cards The lineage view displays four summary cards showing the access hierarchy:
- Groups (purple): Number of groups with access to this route
- Consumers (blue): Number of consumers who can access this route
- API Keys (teal): Number of API keys configured for access
- OAuth Creds (green): Number of OAuth clients with access
Access Hierarchy Tree The expandable tree structure shows the complete access chain:
Level 1: Groups
- Group name with tag (e.g., "all-app-event-triggers")
- Access status badge (e.g., "Allowed")
- Consumer count (e.g., "3 consumers")
- Expand/collapse icon
Level 2: Consumers
- Consumer username (e.g., "all-app-event-triggers-consumer")
- Status badge (Active/Inactive)
- Credential counts (e.g., "1 key", "1 OAuth")
- Quick action icons (view, info)
Level 3: Credentials When consumers have credentials, they are shown:
- API KEYS (n): Expandable section showing:
- Full API key value with copy button
- Key format:
customer01-all-app-event-triggers-consumer-37b27ca247dcd242
- OAuth Credentials: Badge showing count (e.g., "1 OAuth")
Hierarchy Flow
Route (e.g., /app-events/**)
  └── Groups (with allowed/denied status)
      └── Consumers (inheriting group permissions)
          └── Credentials (API Keys and OAuth clients)
This hierarchical view makes it easy to understand:
- Which groups grant access to a route
- Which consumers inherit that access
- Which credentials (keys/OAuth) are actually configured for authentication
API Keys Management
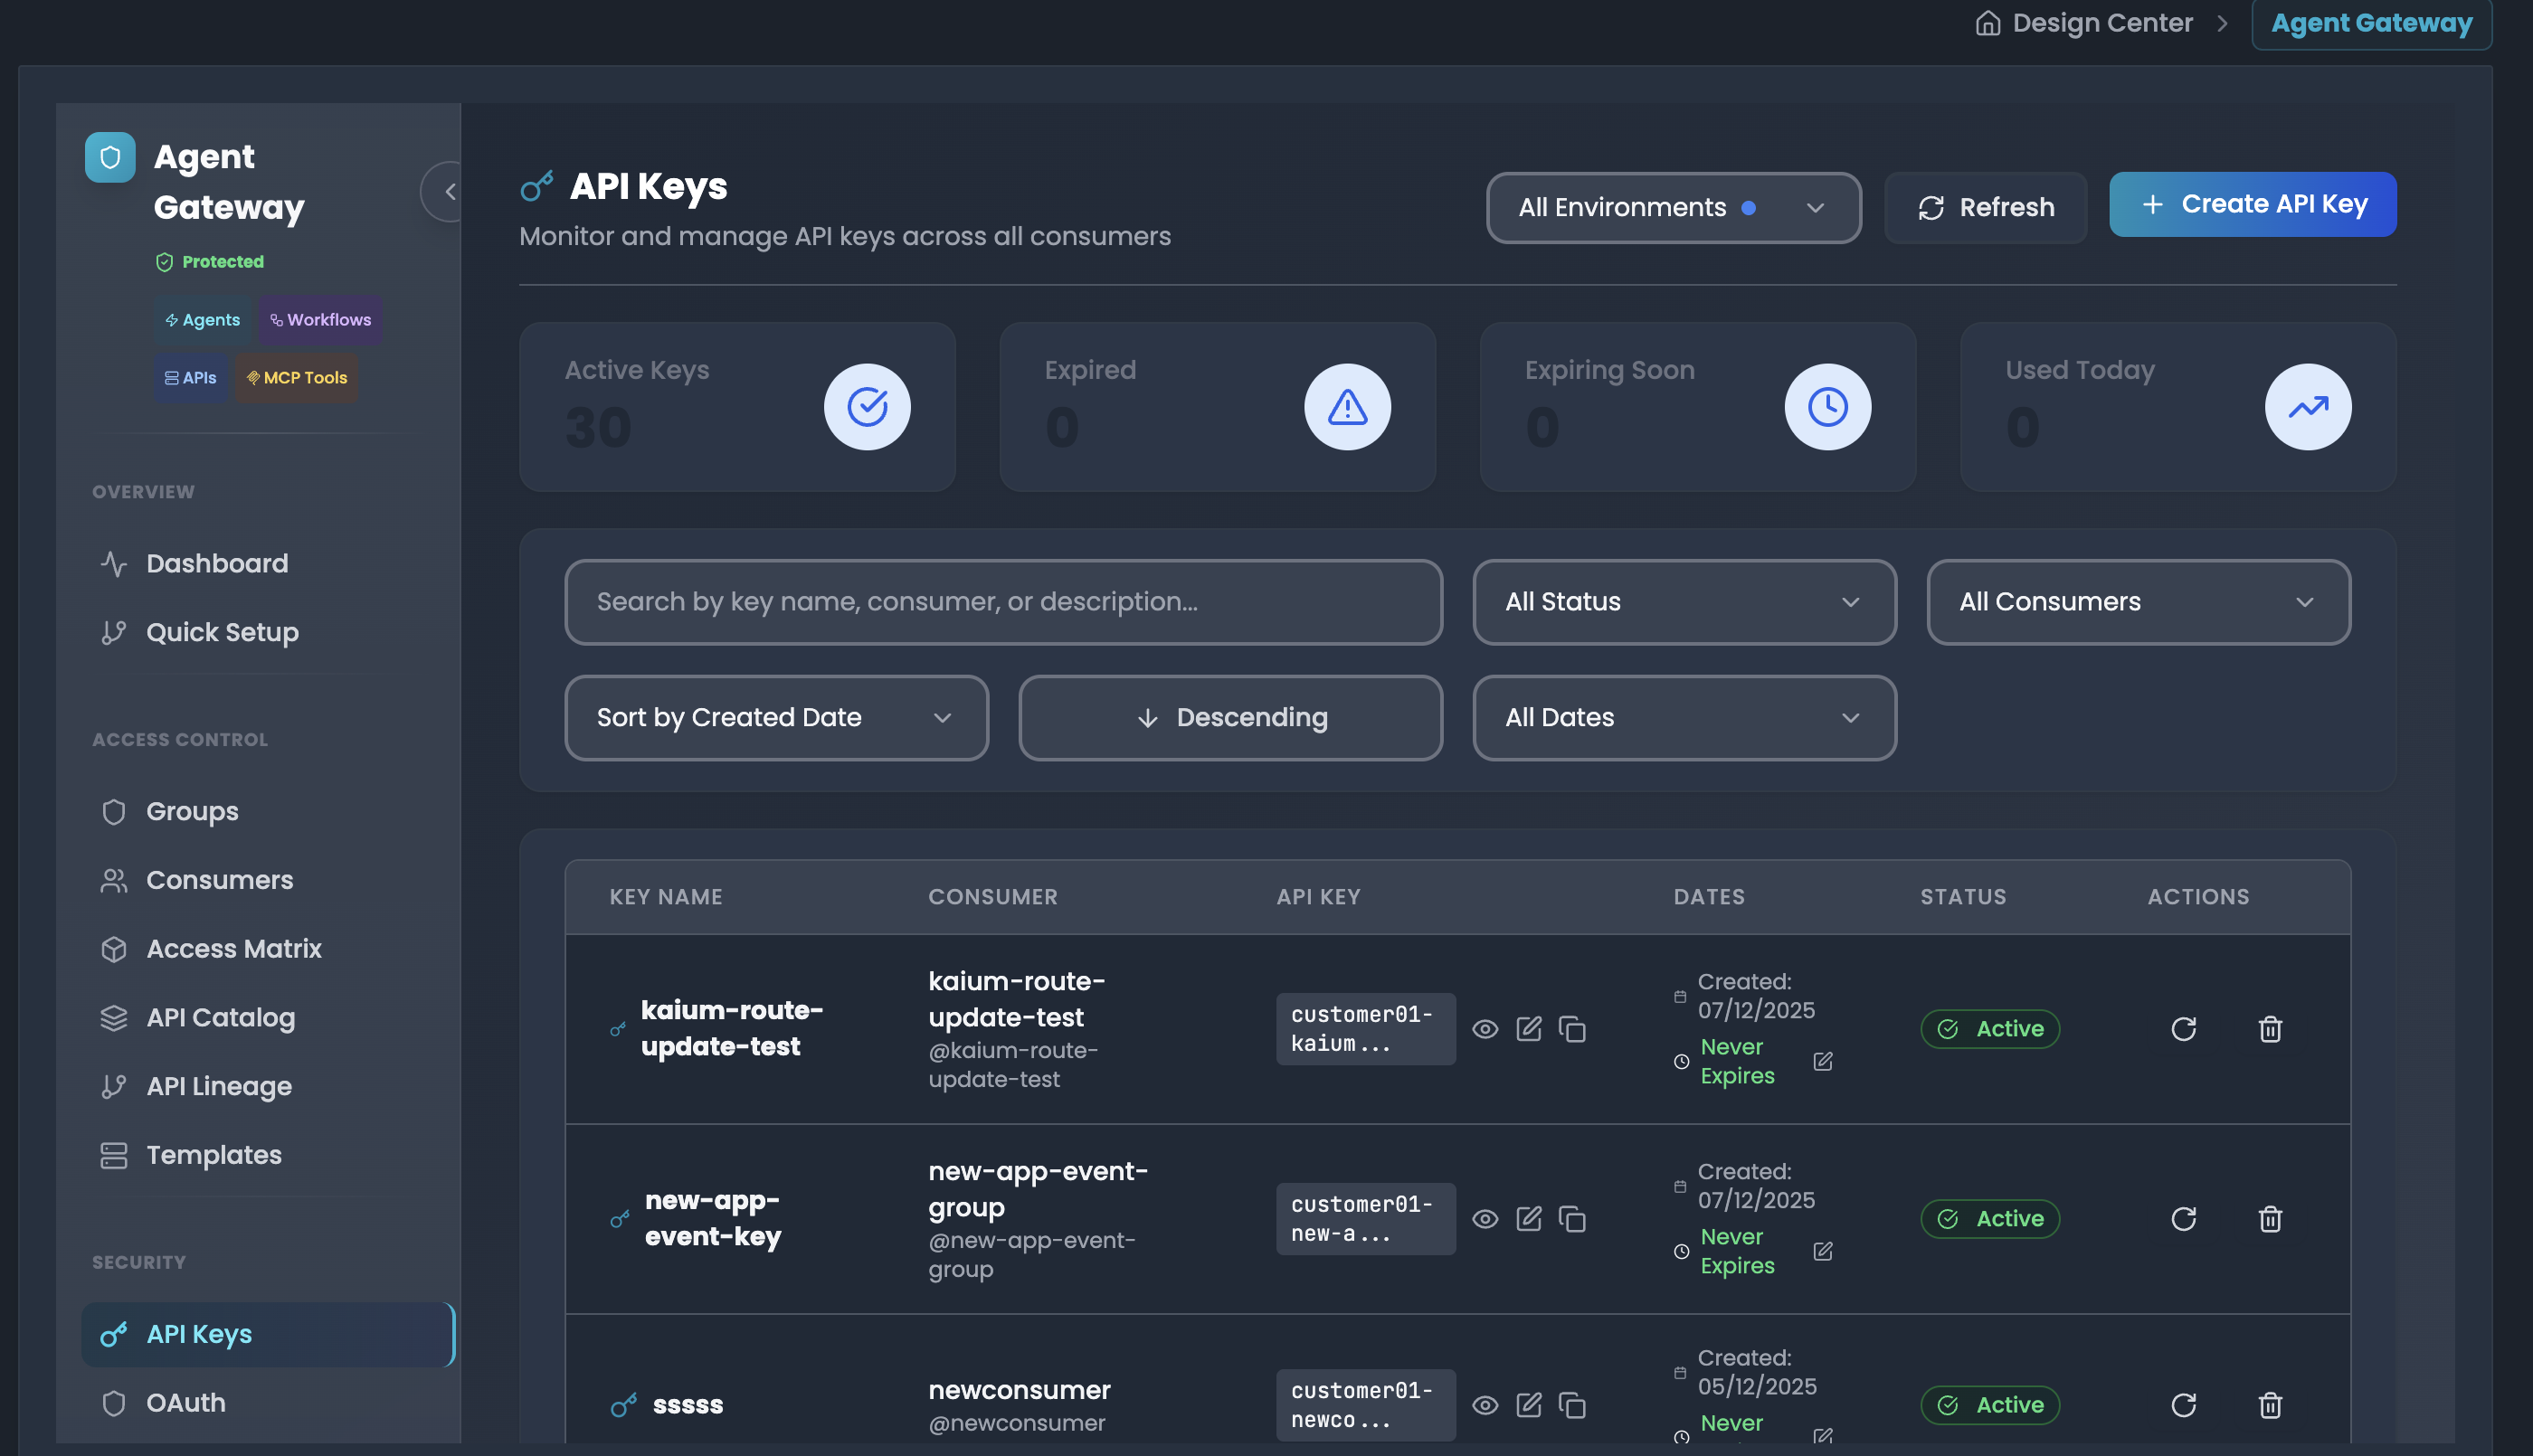
Monitor and manage all API keys across all consumers in a centralized dashboard.
Accessing API Keys Dashboard
- Navigate to API Keys in the sidebar
- Select environment from the All Environments dropdown
- View the comprehensive API keys dashboard
Dashboard Metrics The top of the dashboard displays key statistics:
- Active Keys: Total number of currently active API keys (e.g., 30)
- Expired: Number of expired keys that need attention (e.g., 0)
- Expiring Soon: Keys approaching expiration date (e.g., 0)
- Used Today: Number of keys that have been used today (e.g., 0)
API Keys Table The table displays comprehensive information for each key:
- KEY NAME: Descriptive name of the API key (e.g., "kaium-route-update-test", "new-app-event-key")
- CONSUMER: Associated consumer username and identifier (e.g., "@kaium-route-update-test")
- API KEY: Partially masked key value (e.g., "customer01-kaium...") for security
- DATES:
- Created date (e.g., "07/12/2025")
- Expiration status (e.g., "Never Expires")
- STATUS: Visual status badge (Active in green, Expired in red, etc.)
- ACTIONS: Quick action buttons for each key
Creating New Keys
- Click "Create API Key" button in the top-right
- This allows creating API keys directly from the centralized dashboard
- Configure all key settings including consumer assignment
Use Cases
- Monitor all API keys across your entire organization
- Quickly identify expired or expiring keys
- Bulk key management
- Security audits of API key usage
- Track which consumers are using API keys
- Search for specific keys by name or consumer
OAuth & JWT Management
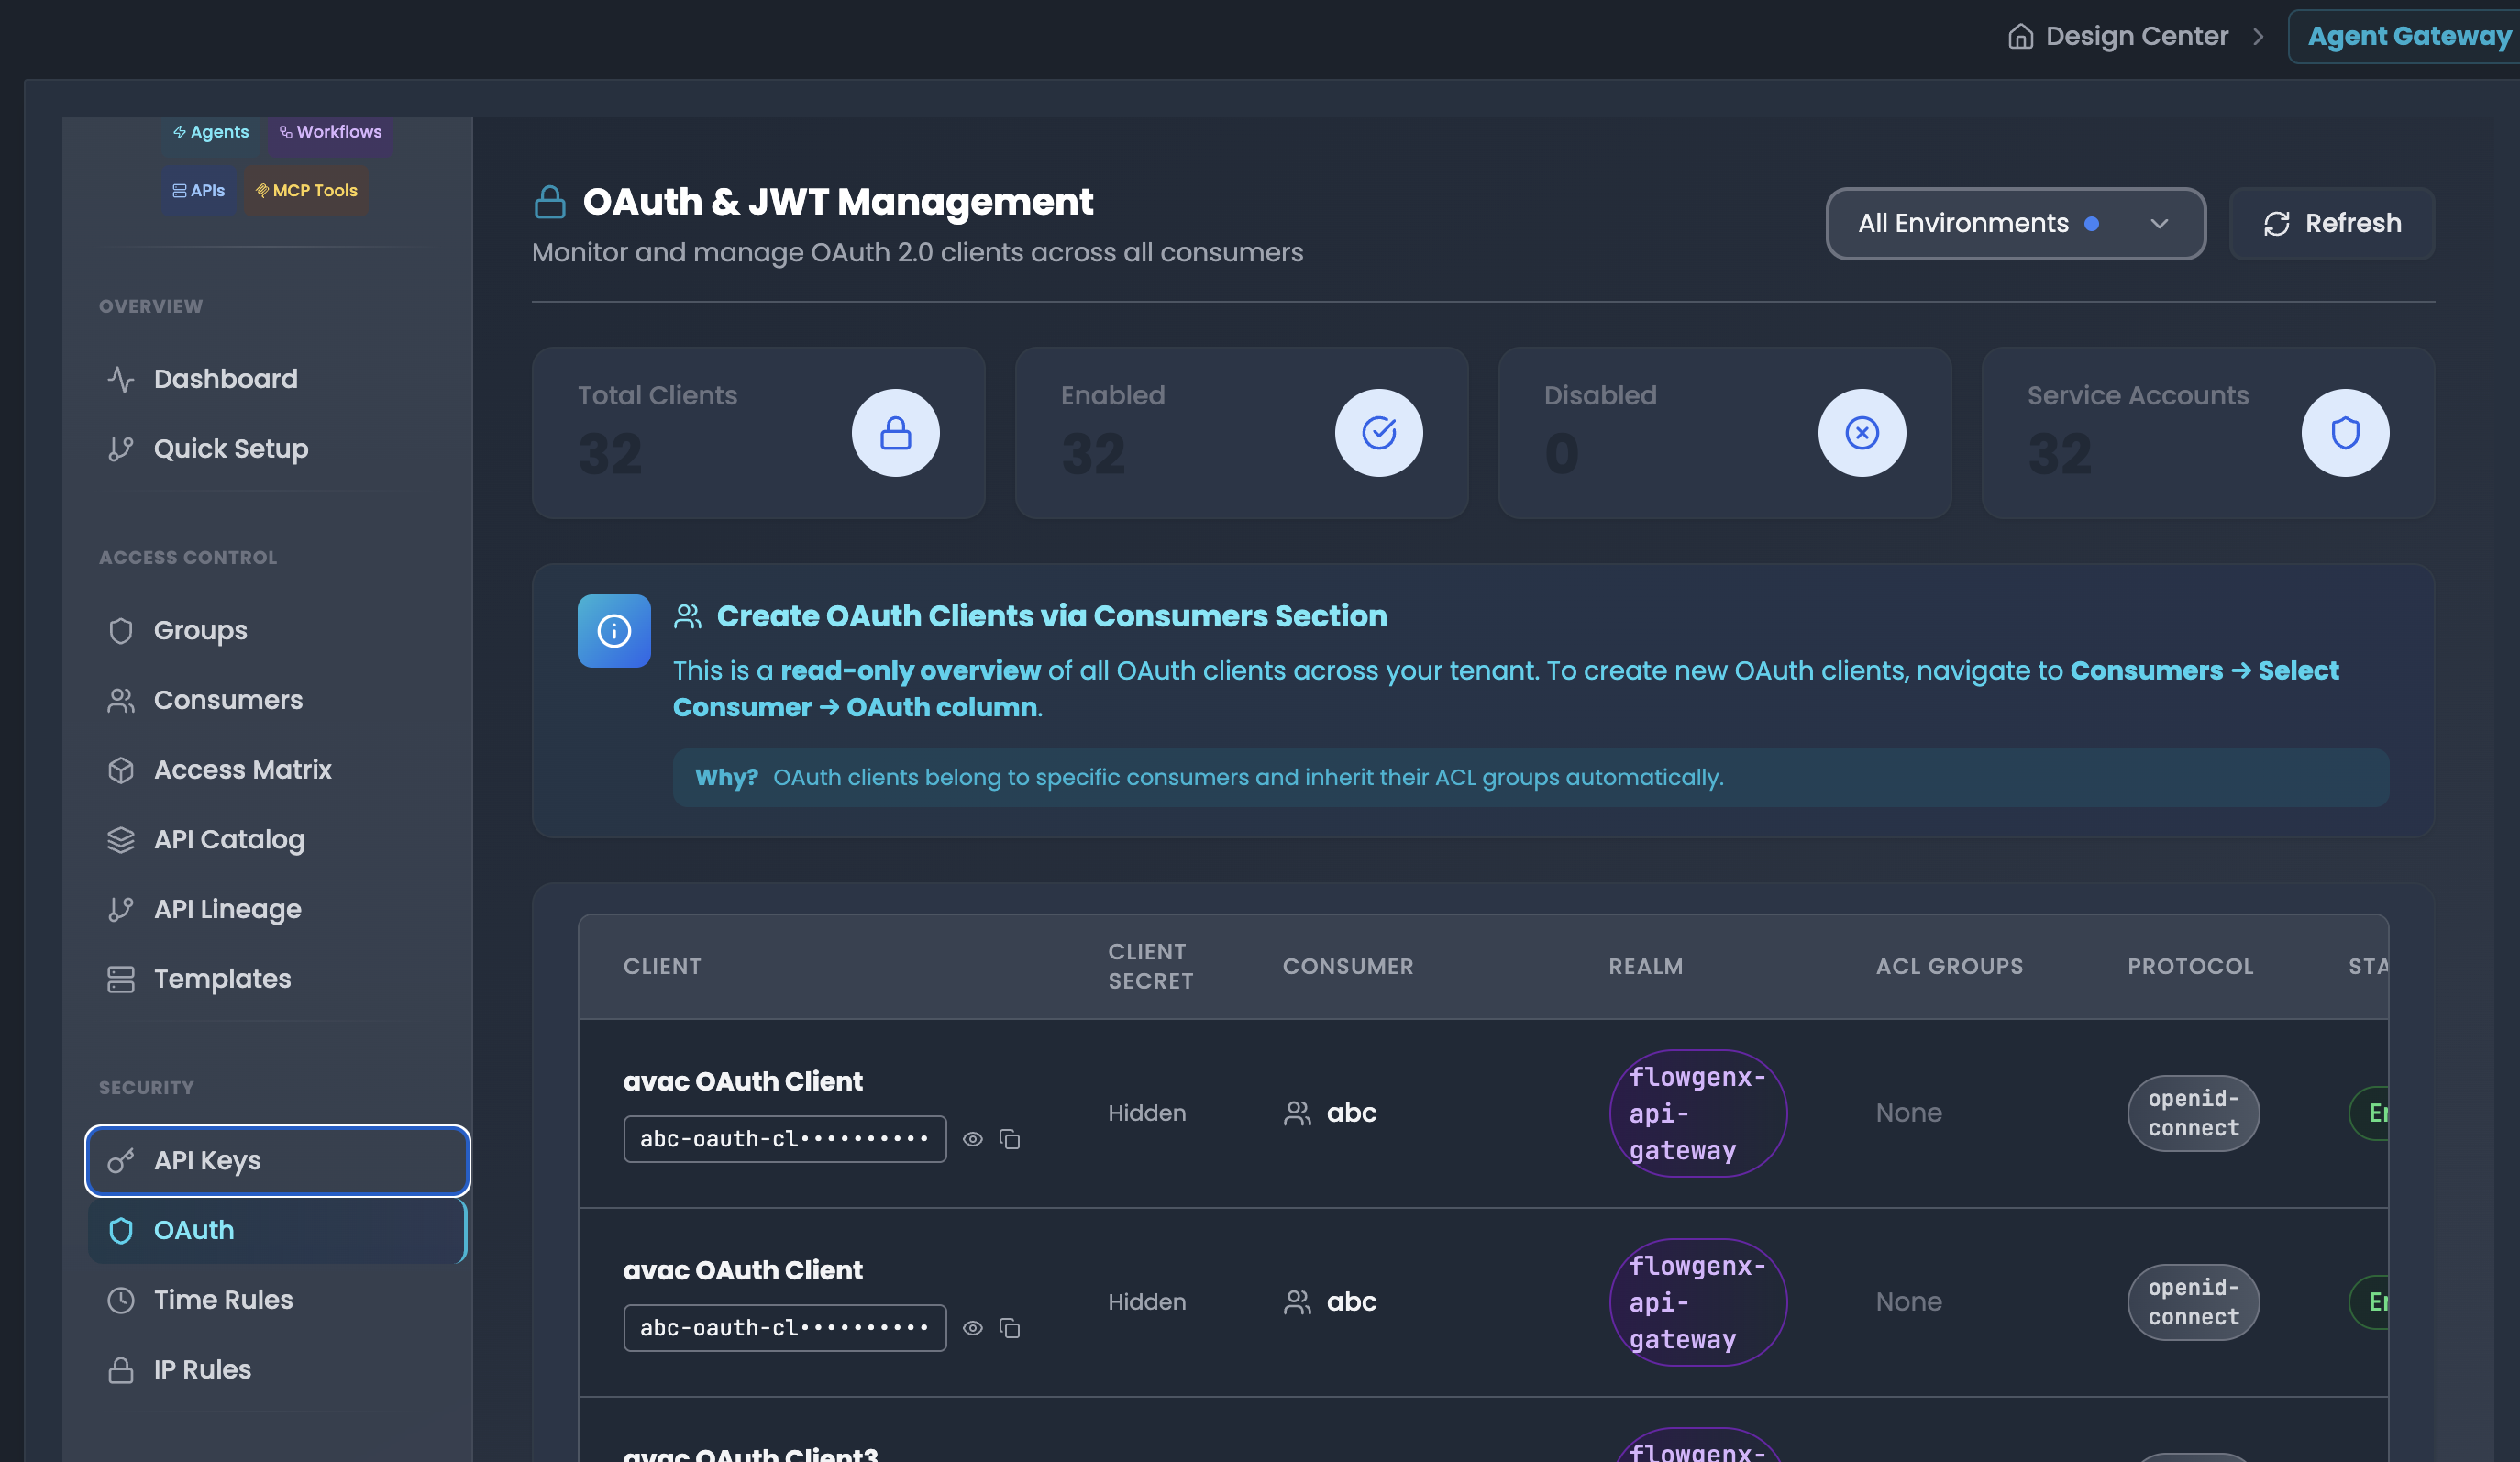
Monitor and manage OAuth 2.0 clients across all consumers in a centralized, read-only dashboard.
Accessing OAuth Management Dashboard
- Navigate to OAuth in the sidebar
- Select environment from the All Environments dropdown
- View the OAuth & JWT Management dashboard
Dashboard Metrics The top displays OAuth client statistics:
- Total Clients: Total number of OAuth clients (e.g., 32)
- Enabled: Number of active OAuth clients (e.g., 32)
- Disabled: Number of inactive clients (e.g., 0)
- Service Accounts: OAuth clients with service account enabled (e.g., 32)
OAuth Clients Table The table displays comprehensive OAuth client information:
- CLIENT: OAuth client name/identifier (e.g., "avac OAuth Client", "avac OAuth Client3")
- CLIENT SECRET:
- Masked client ID (e.g., "abc-oauth-cl*********")
- View icon (eye) to reveal full client ID
- Copy icon to copy to clipboard
- Secret itself shown as "Hidden" for security
- CONSUMER: Associated consumer username (e.g., "abc")
- REALM: Keycloak realm (e.g., "flowgenx-api-gateway")
- ACL GROUPS: Associated groups (e.g., "None" or specific group names)
- PROTOCOL: OAuth protocol type (e.g., "openid-connect")
- STATUS: Client status badge (Enabled/Disabled)
Use Cases
- Monitor all OAuth clients across your organization
- Audit which consumers have OAuth clients
- Review OAuth client configurations
- Verify realm associations
- Check service account enablement
- Security compliance reviews
- Track ACL group inheritance
Time-Based Access Control
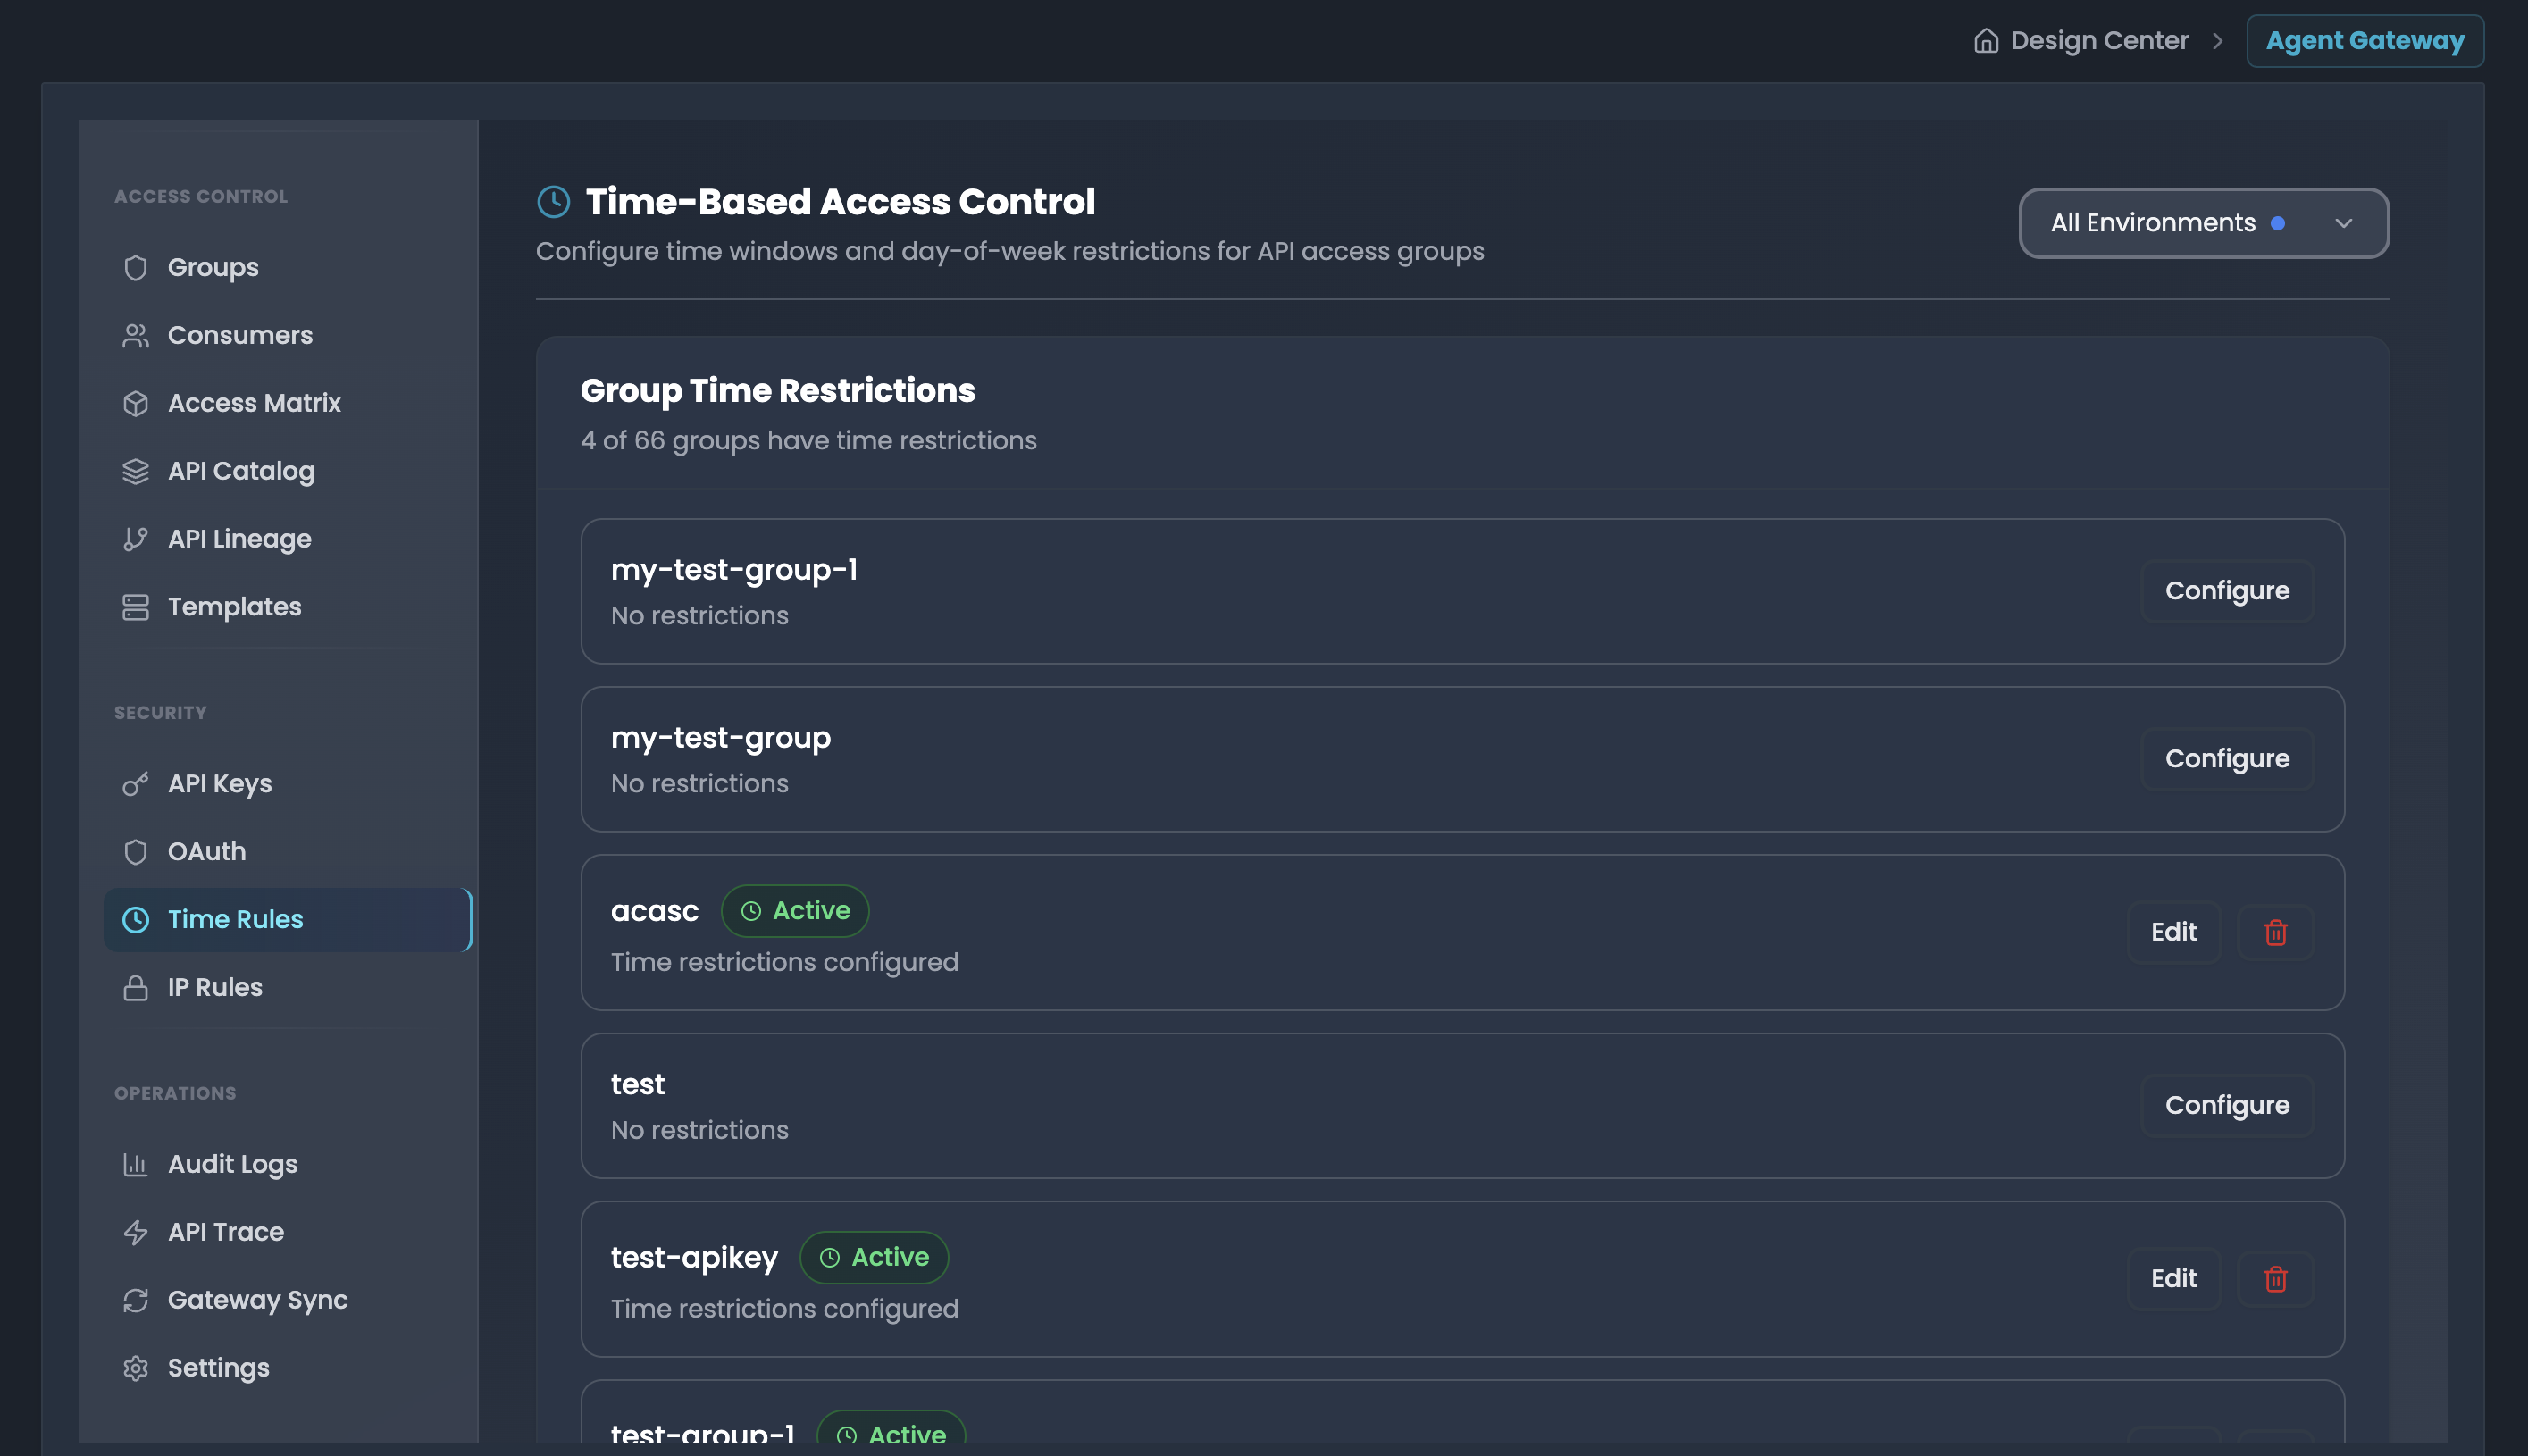
Configure time windows and day-of-week restrictions to control when groups can access your APIs.
Accessing Time Rules
- Navigate to Time Rules in the sidebar
- Select environment from the All Environments dropdown
- View the Time-Based Access Control dashboard
Group Time Restrictions List All groups are displayed with their current time restriction status:
Groups without restrictions:
- Group name displayed
- Status: "No restrictions"
- Action: Configure button (blue outline)
Groups with restrictions:
- Group name displayed
- Status badge: Active (green)
- Description: "Time restrictions configured"
- Actions:
- Edit button (blue outline): Modify existing restrictions
- Delete icon (red): Remove time restrictions
Configuring Time Restrictions
Step 1: Enable Restrictions
- Click Configure button for a group without restrictions, or Edit for existing restrictions
- A modal opens: "Configure Time Restrictions: [group-name]"
- Toggle Enable Time Restrictions switch
- Description: "When enabled, API access is limited to configured time windows"
- Switch turns blue when enabled
Step 2: Select Days of Week Choose which days the group can access APIs:
- Seven buttons for each day: Sun, Mon, Tue, Wed, Thu, Fri, Sat
- Click to toggle selection (selected days are highlighted)
- Select multiple days for weekly schedules
- Leave all unselected to block access every day
Step 3: Set Time Window Define the allowed access hours:
Start Time:
- Field label: "Start Time" with clock icon
- Time picker input (e.g., "09:00 AM")
- 12-hour format with AM/PM
End Time:
- Field label: "End Time" with clock icon
- Time picker input (e.g., "05:00 PM")
- Click to open time selection dropdown
- 12-hour format with AM/PM
Step 4: Select Timezone
- Field label: "Timezone" with clock icon
- Dropdown selector (e.g., "America/New_York")
- Choose the timezone for time window enforcement
- Supports all major timezones
Use Cases
- Business Hours Only: Restrict API access to 9 AM - 5 PM, Monday-Friday
- Maintenance Windows: Block access during scheduled maintenance periods
- Temporary Access: Grant contractors access only during specific hours
- Geographic Compliance: Align access hours with specific timezone regulations
- Weekend Lockdown: Prevent API access on weekends for security
- Rate Limiting by Time: Combine with rate limits for time-based throttling
- Off-Hours Testing: Allow test environments only during off-peak hours
IP-Based Access Control
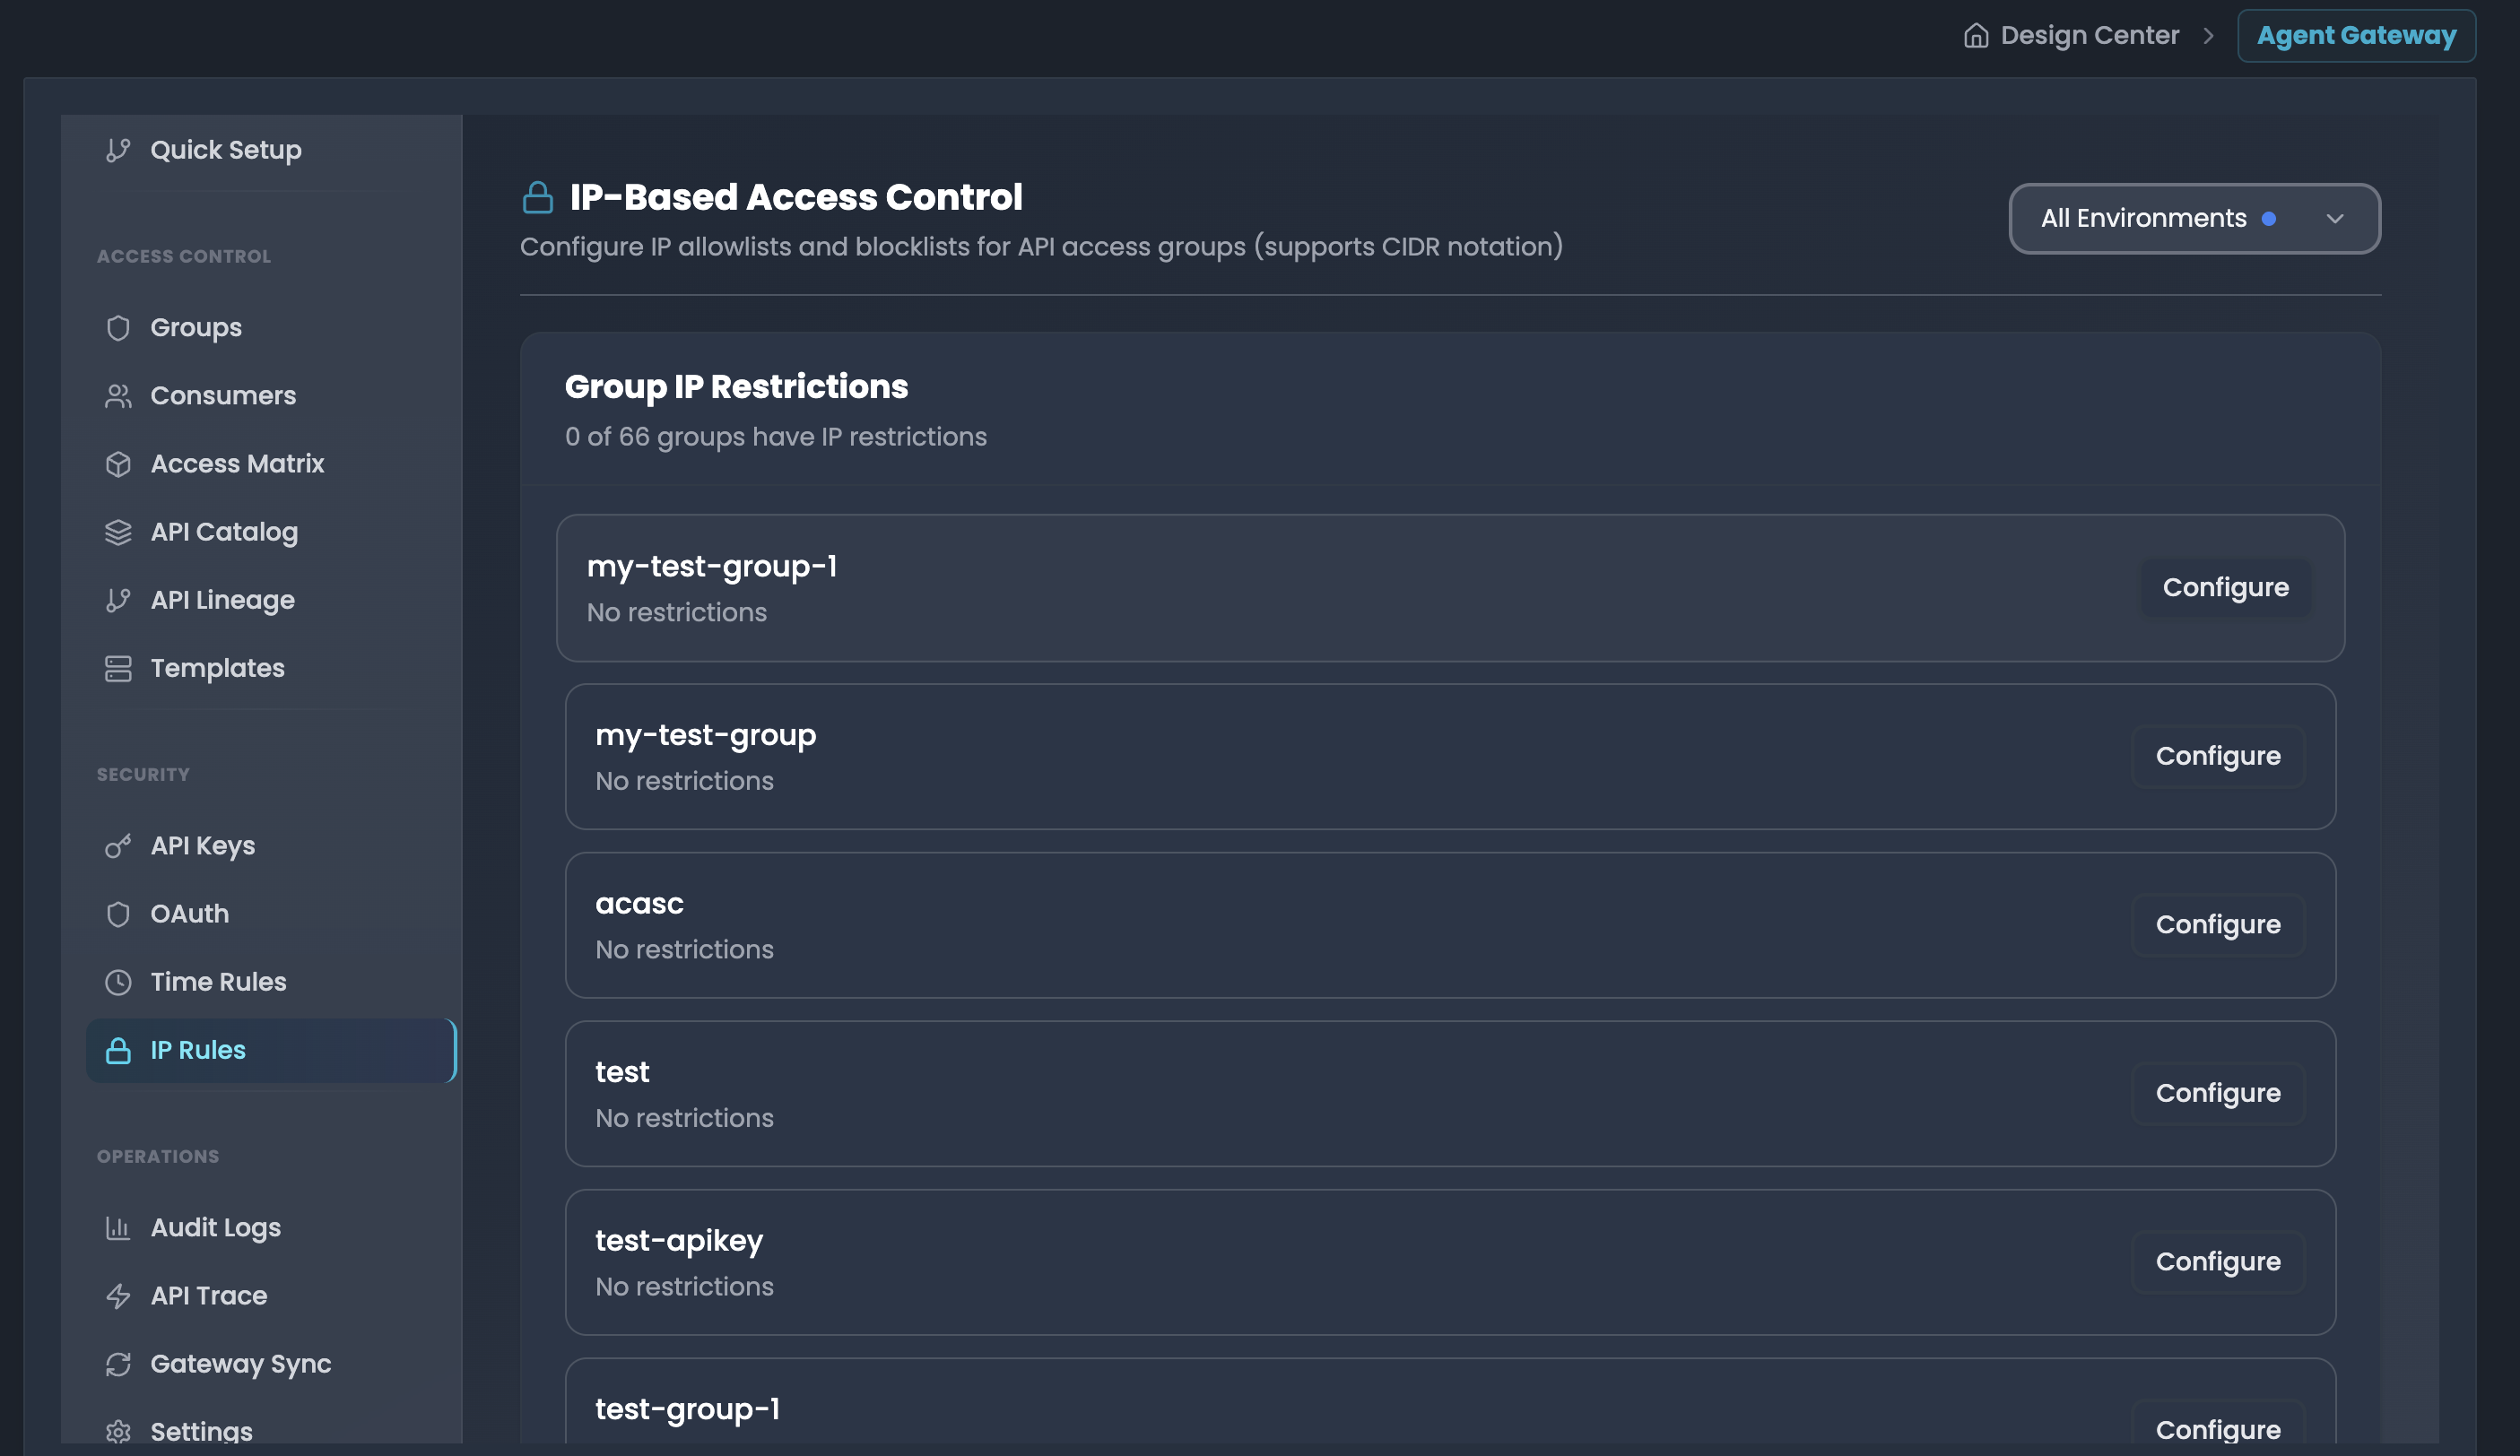
Configure IP allowlists and blocklists for API access groups (supports CIDR notation).
Accessing IP Rules
- Navigate to → IP Rules in the sidebar
- Select environment from the All Environments dropdown
- View the IP-Based Access Control dashboard
Group IP Restrictions List All groups are displayed with their current IP restriction status:
Groups without restrictions:
- Group name displayed
- Status: "No restrictions"
- Action: Configure button (blue outline)
Groups with restrictions:
- Group name displayed
- Status badge: Active (green)
- Description: "IP restrictions configured"
- Actions:
- Edit button (blue outline): Modify existing restrictions
- Delete icon (red): Remove IP restrictions
Configuring IP Restrictions
Step 1: Enable Restrictions
- Click Configure button for a group without restrictions, or Edit for existing restrictions
- A modal opens: "Configure IP Restrictions: [group-name]"
- Toggle Enable IP Restrictions switch
- Description: "When enabled, API access is limited to configured IP addresses"
- Switch turns blue when enabled
Step 2: Add IP Address or CIDR Rules When the toggle is enabled, you can add individual IP rules:
-
IP Address Input Field:
- Label: "Add IP Address or CIDR"
- Placeholder: "e.g., 192.168.1.0/24 or 10.0.0.1"
- Supported formats:
- Individual IPv4:
192.168.1.100,10.0.0.50 - CIDR ranges:
192.168.1.0/24,10.0.0.0/16 - Individual IPv6:
2001:db8::1 - IPv6 CIDR:
2001:db8::/32
- Individual IPv4:
-
Rule Type Dropdown:
- Select Allow to whitelist the IP/CIDR (only these IPs can access)
- Select Deny to blacklist the IP/CIDR (these IPs are blocked)
-
Add Rule:
- Click the + button to add the IP rule to the list
- Each IP/CIDR can have its own allow/deny rule
- Add multiple rules by repeating this process
How IP Restrictions Work
The modal displays helpful information about IP restriction behavior:
- Allowed IPs: Only these IPs can access (whitelist)
- Denied IPs: These IPs are blocked (blacklist)
- Supports CIDR notation for IP ranges (e.g., 192.168.1.0/24)
- Deny list takes precedence over allow list: If an IP is in both lists, it will be denied
Step 3: Save Configuration
- Click Save Restrictions button to apply all configured rules
- Click Cancel to discard changes
- Modal closes after saving
Use Cases
- Office-Only Access: Restrict API access to company IP ranges
- VPN Requirement: Allow only VPN IP addresses for remote workers
- Geographic Restrictions: Block or allow specific country IP ranges
- Partner Integration: Whitelist partner IP addresses for B2B APIs
- Security Threat Mitigation: Blacklist known malicious IPs or bot networks
- Compliance Requirements: Enforce data residency by IP geography
- Development Environment: Allow only developer IPs for staging APIs
API Gateway Synchronization
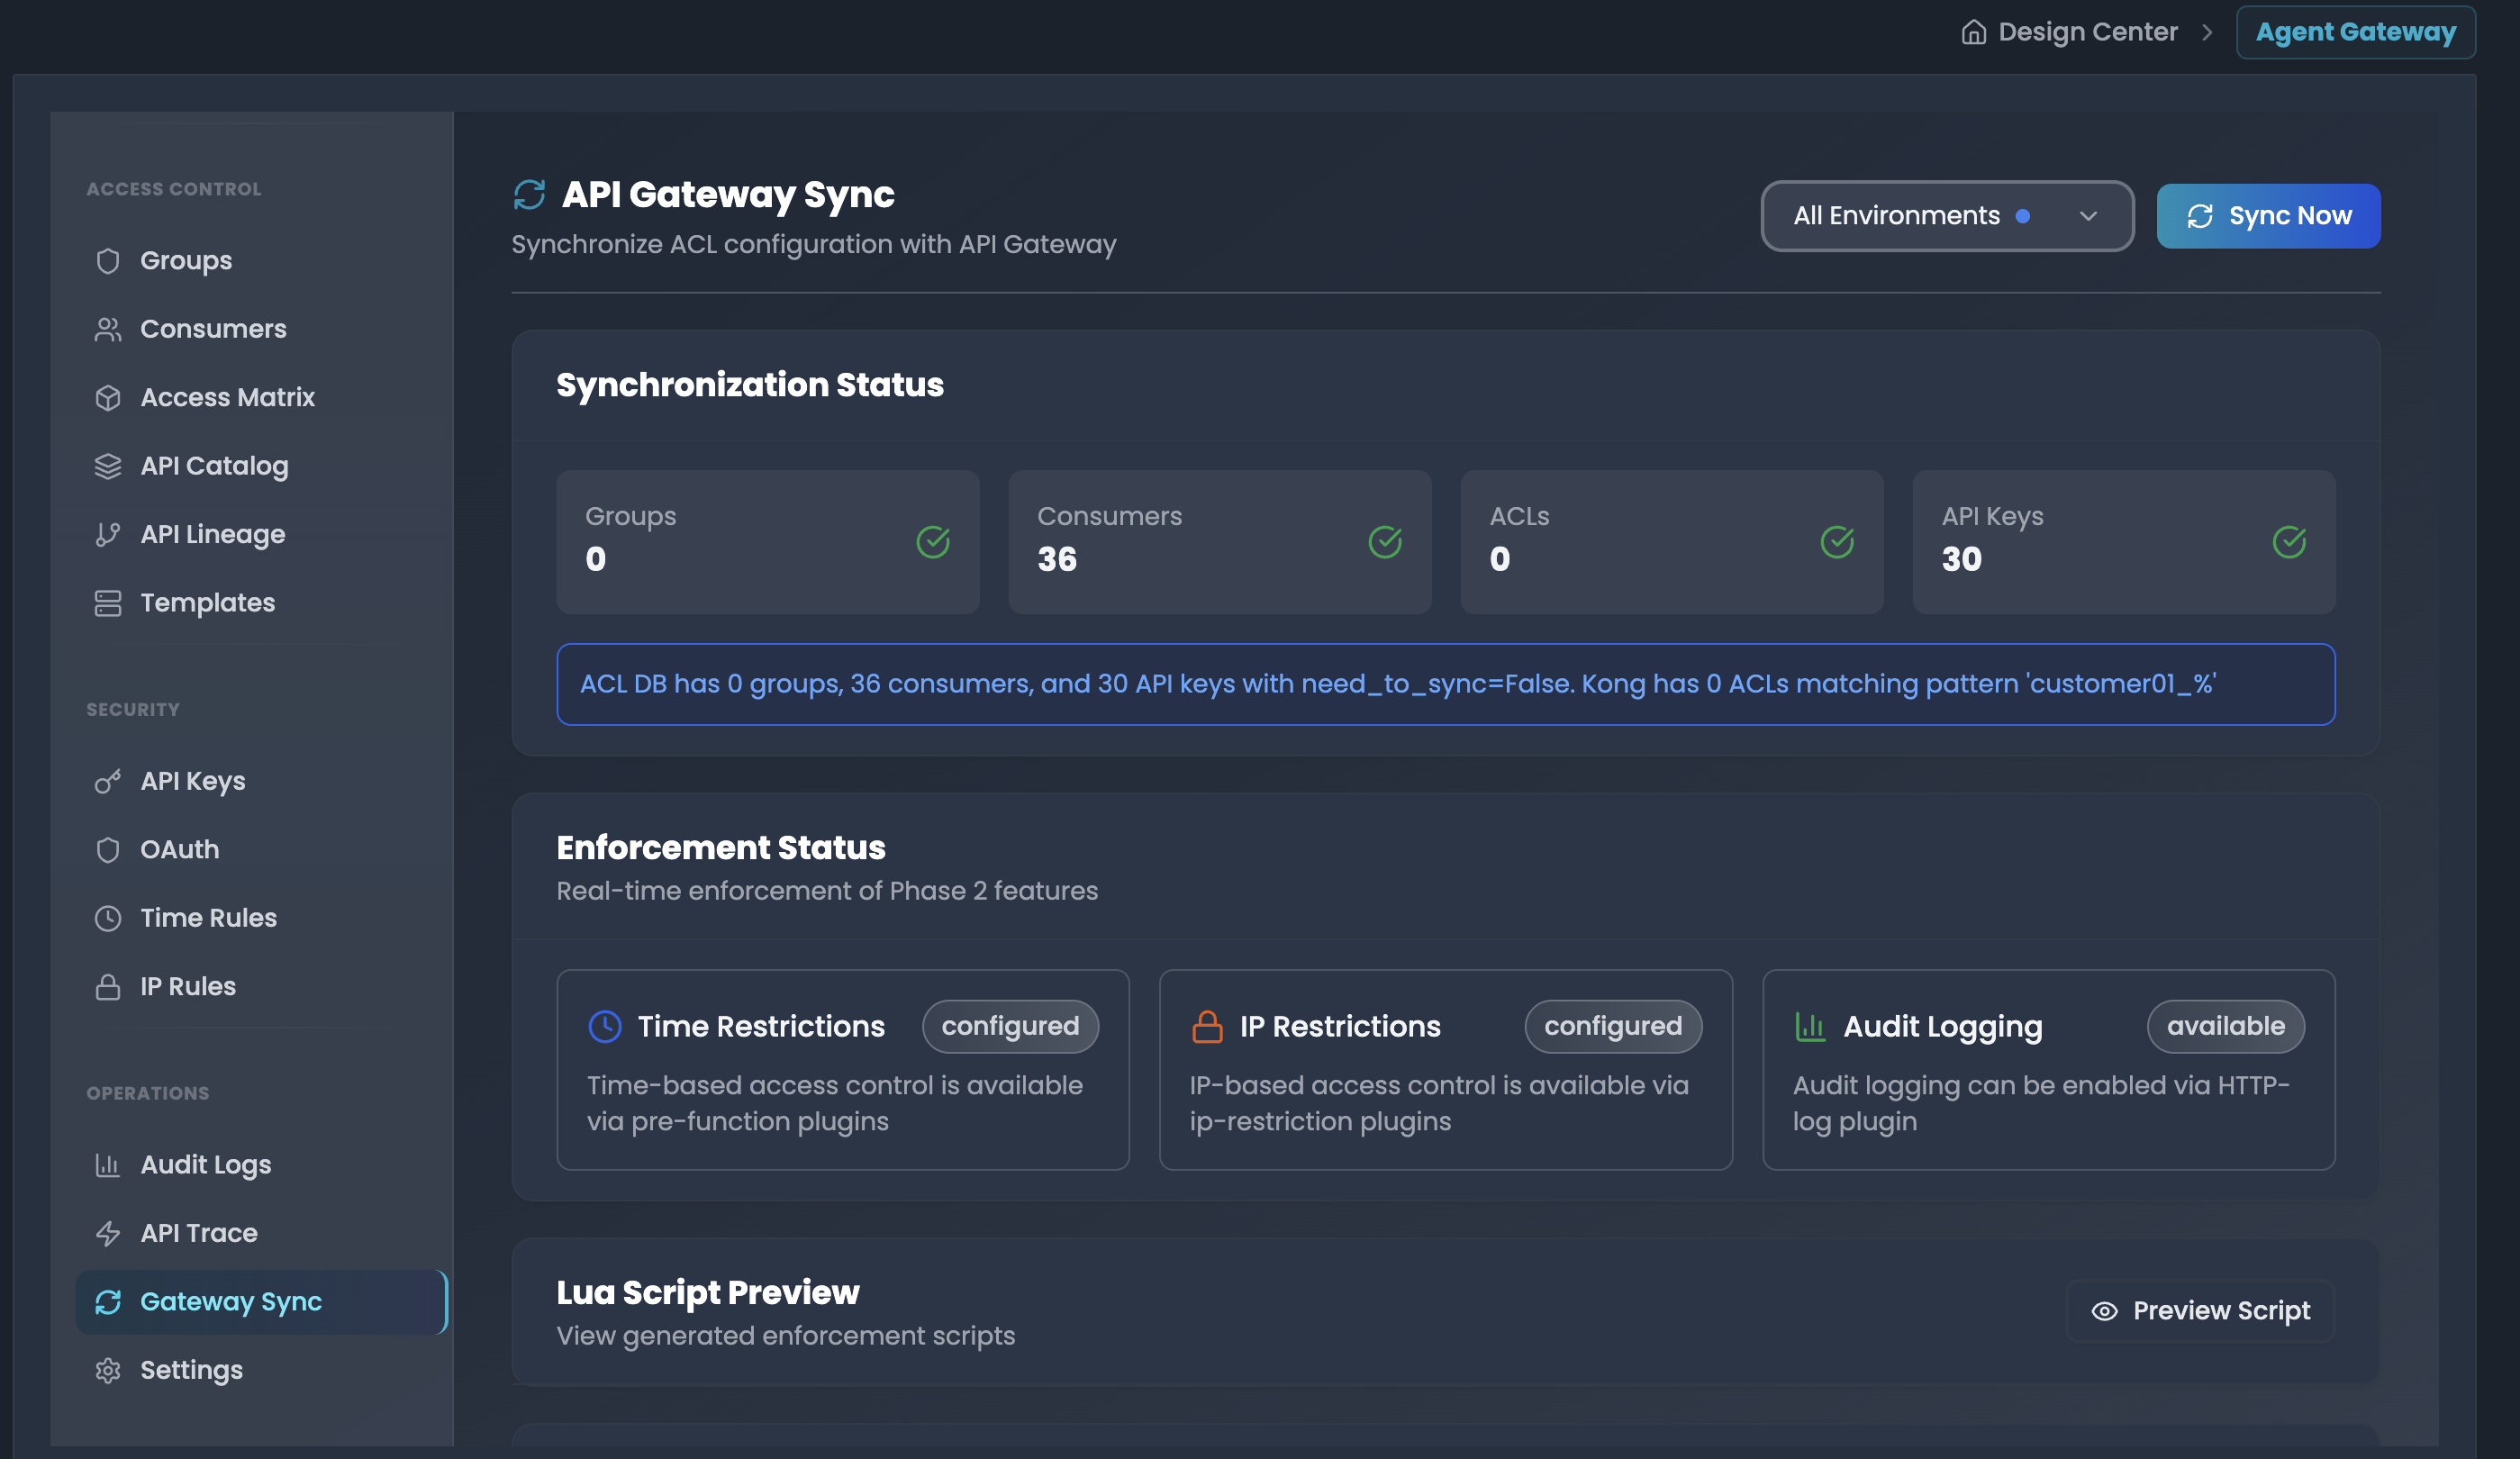
All ACL configurations including groups, consumers, allowed/denied routes, IP restrictions, Time restrictions, API keys, OAuth clients, and ACLs are synchronized to API Gateway for enforcement:
Accessing Gateway Sync
- Navigate to Gateway Sync in the sidebar
- Select environment from the All Environments dropdown
- View the synchronization dashboard
Synchronization Status The dashboard displays real-time sync status for:
- Groups: Total number of synced groups
- Consumers: Total number of synced consumers
- ACLs: Total number of ACL configurations in API Gateway
- API Keys: Total number of synced API keys
Manual Sync
- Click "Sync Now" to trigger immediate synchronization
- Synchronizes groups, consumers, allowed/denied routes, IP restrictions, Time restrictions, API keys, OAuth clients, and ACLs to API Gateway
- Useful after making critical permission changes
- View real-time updates in the synchronization status