Human in the Loop
Pause workflow execution for human review, approval, or data input with customizable forms and multi-channel notifications
The Human-in-the-Loop (HITL) node enables intelligent workflow pausing for human intervention, allowing you to collect decisions, approvals, or additional data through customizable forms delivered via email or other channels.
Smart Human Intervention
Pause workflows for approvals, reviews, or data collection with dynamic forms and automated follow-ups
Overview
The Human-in-the-Loop node bridges automated workflows with human decision-making. When your workflow reaches a point requiring human judgment, approval, or input, this node pauses execution and presents a custom form to designated users. Once completed, the workflow continues with the submitted data.
Key Capabilities
Dynamic Form Builder
Create custom forms with 7 field types, validation rules, conditional logic, and live preview to collect exactly the data you need.
Multi-Channel Notifications
Deliver tasks via Email, WhatsApp, Slack, Microsoft Teams, or custom webhooks with automated reminders and escalation.
Context-Aware Forms
Inject workflow data as context using expressions, pre-fill fields dynamically, and customize forms based on runtime conditions.
Template Management
Save form configurations as reusable templates, import existing templates, and share templates across your team.
Use Cases
- Approval Workflows: Purchase orders, expense reports, leave requests, or content publishing requiring managerial approval
- Quality Assurance: Human review of AI-generated content, data validation, or accuracy checks before proceeding
- Exception Handling: Flag unusual transactions or errors for manual investigation and decision-making
- Data Enrichment: Collect additional information that automated systems cannot obtain (customer feedback, clarifications)
- Compliance Reviews: Legal approval, regulatory compliance checks, or audit trail documentation
- Customer Service Escalation: Route complex customer issues to human agents with full context and structured response forms
Configuration Guide
1. Basic Task Information
Configure the fundamental details of your HITL task that appear in notifications and task management interfaces.
Task Title
- Short, descriptive title shown in task lists and notifications
- Supports dynamic expressions to include workflow data
- Example:
"Approve Purchase Order #{{workflow.order_id}}"
Task Description
- Detailed explanation of what the assignee needs to do
- Displayed prominently in the task form header
- Use to provide context, instructions, or background information
- Supports markdown formatting for better readability
2. Assignment Configuration
Specify who receives the task and how they're notified.
Assigned To
- Enter the email address or identifier of the task assignee
- Supports expressions for dynamic assignment:
{{workflow.manager_email}} - Can reference upstream node outputs:
{{node_output.approver}}
Assignment Type Select the notification channel for task delivery:
| Channel | Status | Description | Use Case |
|---|---|---|---|
| ✅ Available | Send task link via email | Standard approval workflows | |
| 🔜 Coming Soon | Send task notification to WhatsApp | Mobile-first teams | |
| Slack | 🔜 Coming Soon | Post task in Slack channel/DM | Developer and tech teams |
| Microsoft Teams | 🔜 Coming Soon | Send task to Teams chat | Enterprise environments |
| Webhook | 🔜 Coming Soon | POST task data to custom URL | Custom integrations |
Email Delivery Details
Email notifications include the task title, description, a direct link to the form, task ID, workflow ID, and priority badge. Recipients can complete the form through a secure web interface.
3. Timeout and Reminder Settings
Configure automatic reminders and timeouts to ensure timely responses.
Timeout Hours (1-168 hours, default: 24)
- Maximum time allowed for task completion
- After timeout, escalation rules are triggered (if configured)
- Countdown timer displayed on task form
Reminder Count (0-10, default: 2)
- Number of automatic reminder notifications to send
- Reminders distributed evenly across the timeout period
- Example: 24-hour timeout with 2 reminders = reminders at 8h and 16h
4. Escalation Configuration
Define what happens when tasks timeout or remain incomplete.
Escalation Email
- Email address to notify when task times out
- Typically a manager, team lead, or fallback approver
- Receives task details and can take over completion
Escalation Timeout (1-168 hours, default: 48)
- Additional time given to escalation assignee
- Starts counting after original timeout expires
- Should be shorter than original timeout for urgent tasks
Escalation Reminder Count (0-10, default: 1)
- Number of reminders for the escalation assignee
- Same distribution logic as original reminders
Escalation Best Practices
Always configure escalation for critical workflows. Set escalation timeout to 50-75% of the original timeout. Use shorter escalation times for time-sensitive approvals.
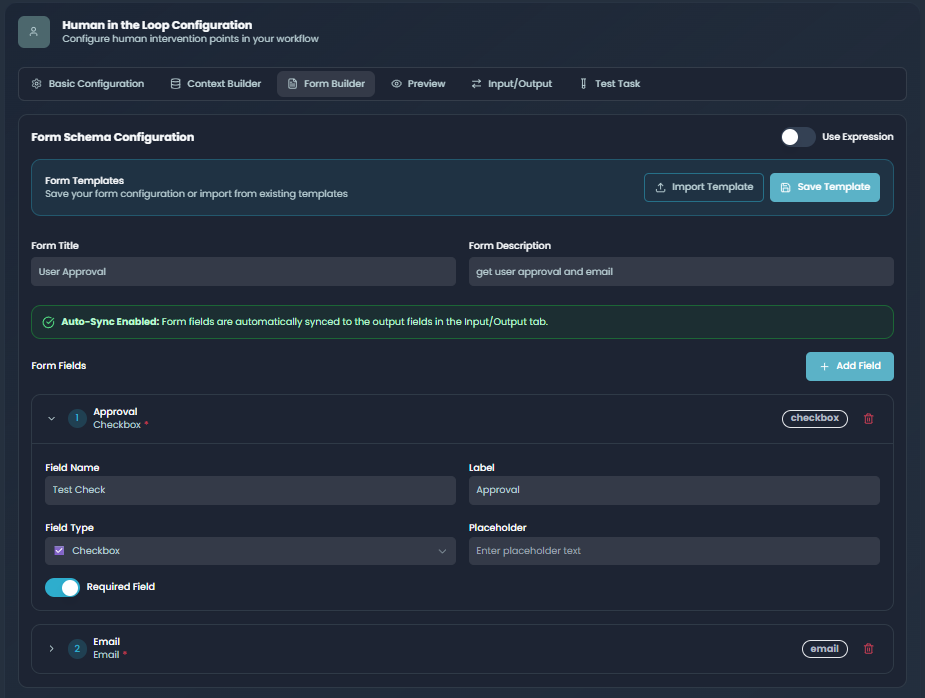
Form Builder
The form builder is the core of the HITL node, allowing you to design custom forms that collect exactly the data you need.
Form Schema
Form Title
- Main heading displayed at the top of the form
- Should clearly state what the form is for
- Example: "Purchase Order Approval Form"
Form Description
- Optional detailed instructions or context
- Appears below the form title
- Use to explain the purpose or provide guidance
Field Types
Build your form using seven different field types, each suited for different data collection needs:
| Field Type | Description | Best For | Validation |
|---|---|---|---|
| Text Input | Single-line text entry | Names, short answers, IDs | Min/max length |
| Email address with validation | Contact information, notifications | Email format | |
| Text Area | Multi-line text input | Comments, explanations, notes | Min/max length |
| Select Dropdown | Single choice from predefined options | Status, category, approval decision | Required selection |
| Number | Numeric input only | Amounts, quantities, ratings | Min/max value, step |
| Date | Date picker with calendar | Deadlines, scheduled dates | Date format, range |
| Checkbox | Boolean true/false toggle | Confirmations, opt-ins, flags | Required checked |
Adding and Configuring Fields
For each form field, configure the following properties:
Field Name (Required)
- Internal identifier used in workflow expressions
- Use snake_case format (e.g.,
approval_decision,reviewer_comments) - Must be unique within the form
- Cannot contain spaces or special characters
Label (Required)
- Display text shown to the user
- Should be clear and descriptive
- Example: "Approval Decision", "Reviewer Comments"
Field Type (Required)
- Select from the seven available field types
- Cannot be changed after field creation (delete and recreate if needed)
Placeholder (Optional)
- Gray text shown in empty fields
- Provides hints about expected input
- Example: "Enter your email address", "Select an option"
Required Field (Toggle)
- Mark fields as mandatory for form submission
- Required fields show a red asterisk (*)
- Form cannot be submitted until all required fields are filled
Validation Rules (Type-Specific)
- Text/Textarea: Min length, max length
- Number: Min value, max value
- Select: Options list (label and value pairs)
Select Field Options
When using select dropdowns, configure the available choices:
Option Label
- User-facing text shown in dropdown
- Example: "Approved", "Rejected", "Needs More Info"
Option Value
- Internal value stored in workflow data
- Use lowercase snake_case for consistency
- Example: "approved", "rejected", "needs_info"
Adding Options
- Enter label text and click "+" to add
- Edit existing options inline
- Remove options with the trash icon
- Reorder options by editing the field configuration
Context Data
Context data provides relevant workflow information to task assignees without requiring them to input it. This helps assignees make informed decisions by presenting upstream workflow data alongside the form.
Adding Context Items
Context data is displayed as key-value pairs at the top of the task form, before the input fields.
Context Key
- Label for the context information
- Example: "Customer Name", "Order Total", "Request Date"
Context Value
- The actual data value
- Can be static text or dynamic expressions
- Example:
{{workflow.customer_name}},${{workflow.order_total}}
Using Expressions in Context
Context values support expressions to inject live workflow data:
Key: Order ID
Value: {{workflow.order_id}}

Key: Customer Name
Value: {{workflow.customer.full_name}}

Key: Total Amount
Value: ${{workflow.order_total | number_format}}

Key: Request Date
Value: {{workflow.created_at | date_format}}
Expression Mode
Toggle the "Expression" button on a context item to enable advanced expression editing. This allows you to use filters, conditional logic, and complex data transformations.
Context Data Best Practices
- Provide Enough Context: Include all information needed for decision-making
- Use Clear Labels: Keys should be immediately understandable without explanation
- Format Values: Use filters to format currencies, dates, and numbers appropriately
- Prioritize Information: Place most important context items first
- Avoid Overload: Too much context can be overwhelming; include only relevant data
Advanced Features
Expression Mode for Schema
Instead of building forms manually, you can use expressions to generate form schemas dynamically at runtime.
When to Use
- Forms that vary based on workflow conditions
- Schemas stored in databases or external systems
- Complex conditional field logic
- A/B testing different form layouts
How to Enable
- Toggle "Use Expression for Schema" in the Form Builder section
- Enter a JavaScript expression that returns a form schema object
- Schema must follow the expected structure (see example below)
Example Expression
{
  title: "Dynamic Approval Form",
  description: `Approval for ${workflow.request_type}`,
  fields: {
    decision: {
      name: "decision",
      type: "select",
      label: "Decision",
      required: true,
      options: [
        { value: "approve", label: "Approve" },
        { value: "reject", label: "Reject" }
      ]
    },
    comments: {
      name: "comments",
      type: "textarea",
      label: "Comments",
      required: false,
      placeholder: "Enter your feedback"
    }
  }
}
Expression Mode for Context
Similarly, context data can be generated dynamically using expressions.
Example Expression
{
  "Order ID": workflow.order_id,
  "Customer": workflow.customer_name,
  "Total": `$${workflow.total.toFixed(2)}`,
  "Items": workflow.items.length,
  "Status": workflow.status.toUpperCase()
}
Template Management
Save time and ensure consistency by creating reusable form templates.
Saving Templates
- Configure your form fields, validation, and metadata
- Click "Save as Template" button
- Enter template name and description
- Choose visibility: Private (only you) or Public (team-wide)
- Click "Save Template"
Importing Templates
- Click "Import Template" button
- Search for templates by name or description
- Preview template fields before importing
- Select template and click "Import"
- Imported fields are added to your current configuration
Template Properties
- Template Name: Descriptive name for easy identification
- Description: Optional details about the template's purpose
- Visibility: Private (personal) or Public (shared with team)
- Fields: Complete field configuration including validation rules
- Metadata: Creation date, author, last modified
Template Use Cases
Create templates for common approval workflows (expense reports, leave requests), compliance reviews (SOX, HIPAA), or quality checks. Share public templates to standardize forms across your organization.
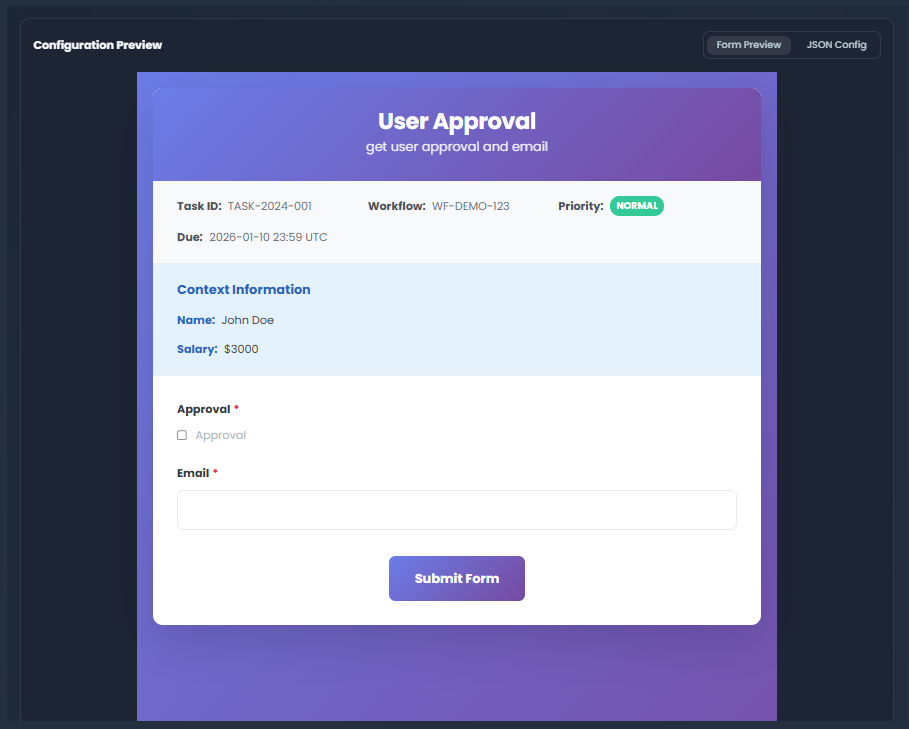
Form Preview and Testing
Live Form Preview
The Form Preview tab shows exactly how your form will appear to task assignees.
Preview Features
- Real-time updates as you modify fields
- Full visual styling matching the production form
- Mock task information (Task ID, Workflow ID, Priority, Due Date)
- Context data display with styling
- All field types rendered with proper controls
- Validation indicators (required field asterisks)
Preview Limitations
- Submit button is disabled in preview mode
- No actual data submission or validation testing
- Expression values show placeholders, not real data
- Reminders and escalation not simulated
Test Execution
Create real HITL tasks to test the complete end-to-end flow before deploying your workflow.
Running a Test
- Configure all task settings, form fields, and context data
- Click "Execute Test" button in the Test section
- System creates a real task with a unique Task ID
- Form URL is generated and displayed
- Email notification sent to the assigned email (if Email channel selected)
- Monitor task status in real-time
Test Results Display
- Task ID: Unique identifier for this test task
- Form URL: Direct link to the task form (click to open)
- Access Token: Security token for form authentication
- Status: Real-time task status (pending, in_progress, completed, expired)
- Created At: Timestamp of task creation
Testing the Form
- Open the generated form URL in a new tab
- Complete the form as an assignee would
- Submit the form
- Return to the node configuration to see updated status
- Verify submitted data appears in node outputs
Output Data
When a task is completed, the HITL node outputs structured data that can be used in downstream workflow nodes.
Output Schema
The node automatically generates output fields based on your form fields:
{
  "task_id": "TASK-2024-12345",
  "status": "completed",
  "submitted_at": "2024-01-15T14:30:00Z",
  "submitted_by": "user@example.com",

  // Form field outputs (match your field names)
  "approval_decision": "approved",
  "comments": "Budget approved for Q1 initiative",
  "approved_amount": 15000,
  "completion_date": "2024-02-01",

  // Metadata
  "completion_time_hours": 2.5,
  "reminder_count_sent": 1,
  "escalated": false
}
Using Output Data
Reference HITL output in downstream nodes using expressions:
// Check approval decision
hitl_node.approval_decision === "approved"

// Use submitted data in text
`The request was ${hitl_node.approval_decision} with comment: ${hitl_node.comments}`

// Conditional routing based on response
if (hitl_node.approval_decision === "approved") {
  // Route to approval branch
} else {
  // Route to rejection branch
}
Output Field Synchronization
The HITL node automatically syncs form fields to output schema:
- Add Field: Output schema adds corresponding field
- Remove Field: Output schema removes field
- Rename Field: Output schema updates field name
- Change Type: Output schema updates field type (string, number, boolean)
Auto-Sync Output Schema
Output fields are automatically synchronized when you modify form fields. This ensures downstream nodes always have accurate field references and prevents runtime errors.
Use Case Examples
Example 1: Purchase Order Approval
Scenario: Purchase orders over $5,000 require manager approval before processing.
Configuration:
Task Title: "Approve Purchase Order #{{workflow.po_number}}"
Description: "Review and approve the purchase order details below"
Assigned To: {{workflow.approver_email}}
Assignment Type: Email
Timeout: 48 hours
Reminders: 2
Escalation Email: {{workflow.director_email}}

Form Fields:
  1. Decision (Select):
     - Approve
     - Reject
     - Request More Info
  2. Comments (Textarea, required if rejected)
  3. Approved Amount (Number, required if approved)
  4. Budget Code (Text, required if approved)

Context Data:
  - PO Number: {{workflow.po_number}}
  - Vendor: {{workflow.vendor_name}}
  - Requested Amount: ${{workflow.amount}}
  - Requestor: {{workflow.requestor_name}}
  - Department: {{workflow.department}}
Workflow Integration:
- Workflow triggers when PO is created
- If amount > $5000, route to HITL node
- Manager receives email with form link
- Upon approval, workflow continues to payment processing
- Upon rejection, workflow sends rejection notice to requestor
Example 2: Content Moderation
Scenario: AI flags potentially inappropriate user-generated content for human review.
Configuration:
Task Title: "Content Moderation Review"
Description: "Review the flagged content and make a moderation decision"
Assigned To: {{workflow.moderator_email}}
Assignment Type: Email
Timeout: 4 hours
Reminders: 3

Form Fields:
  1. Moderation Decision (Select):
     - Approve Content
     - Remove Content
     - Request User Edit
     - Escalate to Senior Moderator
  2. Violation Type (Select, multi-select):
     - Hate Speech
     - Violence
     - Spam
     - Misinformation
     - Adult Content
  3. Moderator Notes (Textarea, required)
  4. User Warning (Checkbox): Issue warning to user

Context Data:
  - Content ID: {{workflow.content_id}}
  - User: {{workflow.username}}
  - AI Confidence: {{workflow.ai_flag_confidence}}%
  - Flag Reason: {{workflow.flag_reason}}
  - Content Preview: {{workflow.content_preview}}
Workflow Integration:
- AI content filter flags suspicious content
- HITL node pauses for human review
- Moderator reviews context and makes decision
- Based on decision, workflow either:
- Publishes content (approved)
- Removes content and notifies user (removed)
- Sends edit request to user (edit)
- Routes to senior moderator (escalate)
Example 3: Exception Handling in Order Processing
Scenario: Orders with inventory mismatches require warehouse manager intervention.
Configuration:
Task Title: "Resolve Inventory Mismatch - Order {{workflow.order_id}}"
Description: "Physical count doesn't match system inventory"
Assigned To: warehouse_manager@company.com
Assignment Type: Email
Timeout: 2 hours
Reminders: 1
Escalation: inventory_director@company.com
Escalation Timeout: 2 hours

Form Fields:
  1. Resolution (Select):
     - Update System Inventory
     - Cancel Order
     - Partial Fulfillment
     - Wait for Restock
  2. Actual Quantity Available (Number, required)
  3. Root Cause (Select):
     - Theft/Loss
     - Receiving Error
     - System Glitch
     - Damage/Defect
  4. Action Notes (Textarea, required)

Context Data:
  - Order ID: {{workflow.order_id}}
  - Product: {{workflow.product_name}}
  - System Qty: {{workflow.system_quantity}}
  - Physical Qty: {{workflow.physical_count}}
  - Customer: {{workflow.customer_name}}
  - Order Priority: {{workflow.priority}}
Workflow Integration:
- Inventory check finds mismatch
- HITL node pauses order processing
- Warehouse manager investigates and provides resolution
- Workflow continues based on resolution:
- Update inventory and fulfill order
- Cancel order and notify customer
- Process partial shipment
- Hold order until restock
Best Practices
Form Design
- Keep It Simple: Only request essential information; each field adds friction
- Use Appropriate Field Types: Select dropdowns for fixed choices, text areas for explanations
- Provide Clear Labels: Avoid jargon; write labels for non-technical users
- Add Help Text: Use placeholders and descriptions to guide users
- Logical Field Order: Place most important fields first, group related fields
- Test Before Deploy: Always run test execution to verify form layout and logic
Timeout Configuration
- Match Business Hours: Set timeouts considering business hours and time zones
- Buffer Time: Add 20-30% buffer to expected response time
- Urgent vs. Routine: 2-8 hours for urgent approvals, 24-72 hours for routine reviews
- Weekend Considerations: Extend timeouts if they might span weekends
- Escalation Path: Always configure escalation for critical workflows
Assignment Strategy
- Dynamic Assignment: Use expressions to route to the right person based on context
- Fallback Assignees: Configure escalation to ensure someone responds
- Load Balancing: Rotate assignments among team members to distribute workload
- Skill-Based Routing: Assign complex decisions to senior staff, routine tasks to juniors
- On-Call Support: Integrate with on-call systems for 24/7 workflows
Context Data Strategy
- Provide Enough Information: Include all data needed for informed decisions
- Highlight Critical Info: Use formatting to emphasize important values
- Visual Hierarchy: Order context items by importance
- Avoid Duplication: Don't repeat information that's in the form title/description
- Format Appropriately: Use filters for currencies, dates, percentages
Troubleshooting
| Issue | Possible Cause | Solution |
|---|---|---|
| Email not received | Email in spam, incorrect address, or email service issue | Check spam folder, verify email address, check email service status, use test execution to verify |
| Form shows "Invalid Token" | Token expired or form already submitted | Request new task link from workflow owner, check task timeout settings |
| Required fields not enforcing | Field marked required but validation not configured | Re-edit field and ensure "Required Field" toggle is enabled, test form submission |
| Context data shows expressions, not values | Expression syntax error or field path incorrect | Verify expression syntax, check upstream node output schema, test with simple static value first |
| Output fields not appearing in downstream nodes | Form fields not synced to output schema | Save form configuration, manually trigger sync, or refresh downstream node input configuration |
| Form preview doesn't match production | Browser caching or preview mode limitations | Clear browser cache, use test execution for accurate preview, check in incognito mode |
| Task escalation not triggering | Escalation timeout longer than workflow timeout or escalation email missing | Verify escalation email is configured, ensure escalation timeout is shorter than workflow timeout |
| Template import fails | Template schema incompatible or corrupted | Try importing different template, verify template was saved correctly, contact support if persists |
Security Considerations
Task Authentication
- All task forms require secure access tokens
- Tokens expire after timeout period
- One-time use: form cannot be resubmitted after completion
- Tokens are unique per task and cannot be reused
Data Privacy
- Task data encrypted in transit and at rest
- Form submissions logged with audit trail
- Assignee identity verified via email or authentication channel
- Sensitive data should use appropriate field types (password, encrypted fields)
Access Control
- Only assigned users can access task forms
- Escalation assignees get new unique tokens
- Workflow owners can view task status but not modify submissions
- Form templates respect environment and tenant permissions
Next Steps
- Workflow Orchestration: Combine HITL with Router Node for conditional branching based on approvals
- Notifications: Integrate with HTTP Request to send custom notifications
- Data Processing: Use approved data in Loop Node for batch operations
- Expressions Guide: Learn advanced expression syntax in Working with Data