Data Privacy
Data privacy protection with masking, encryption, and automated PII detection
The Data Privacy node provides comprehensive data protection capabilities for sensitive information in your workflows. This node automatically detects personally identifiable information (PII) and sensitive data, suggests appropriate privacy rules, and applies protection operations like masking and encryption to safeguard data throughout the workflow.
Why Use Data Privacy?
The Data Privacy node is ideal when you need to:
- Protect sensitive data - Automatically detect and protect PII and sensitive information
- Ensure compliance - Meet data protection regulations (GDPR, CCPA, HIPAA, etc.)
- Mask sensitive fields - Hide or obfuscate sensitive data while maintaining usability
- Encrypt data - Secure data with encryption operations
- Automated PII detection - Scan data for potential privacy violations
- Apply privacy rules - Configure field-specific protection operations
- Maintain data privacy - Ensure sensitive information doesn't leak through workflows
How It Works
The Data Privacy node operates through three main components:
- Automated PII Detection - Scans your data to identify sensitive fields automatically
- Privacy Analysis - Evaluates risk level and suggests appropriate privacy operations
- Privacy Operations - Applies configured protection rules (masking, encryption, etc.) to selected fields
- Schema Validation - Ensures operations are applied correctly to the defined schema
- Random Seed - Provides consistent operation results when needed
When to Use Data Privacy
Use Data Privacy when:
- Your workflow processes personal or sensitive information
- You need to comply with data protection regulations
- You want to protect customer data, financial information, or health records
- You need to mask data for non-production environments
- You're sharing data with third parties and need to protect sensitive fields
- You want automated detection of privacy risks in your data flows
Configuration Steps
Setting up the Data Privacy node involves defining your data schema, running privacy analysis, and configuring protection operations.
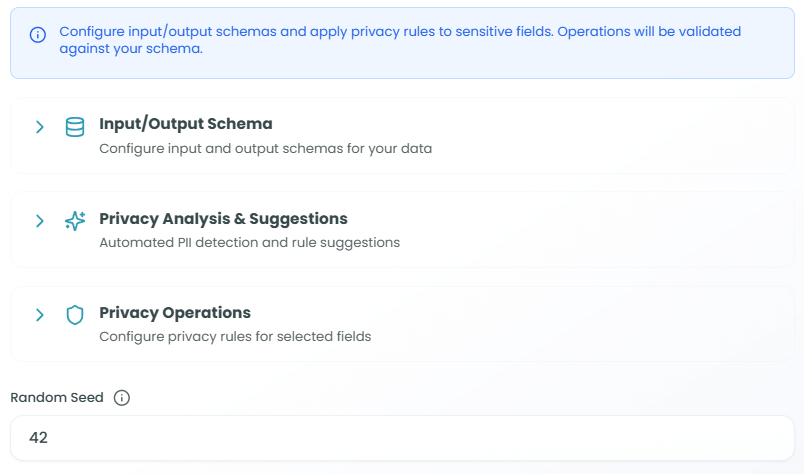
Configuration Overview:
The Data Privacy node provides three main configuration sections:
- Input/Output Schema - Configure input and output schemas for your data
- Privacy Analysis & Suggestions - Automated PII detection and rule suggestions
- Privacy Operations - Configure privacy rules for selected fields
Important Note: The configuration message states: "Configure input/output schemas and apply privacy rules to sensitive fields. Operations will be validated against your schema."
Random Seed
At the bottom of the configuration panel, you'll find the Random Seed field:
- Purpose: Ensures consistent results for certain privacy operations
- Default: 42
- Use: When operations need reproducibility (e.g., consistent masking patterns)
- Customization: Change the seed value to alter the randomization pattern
Step 1: Privacy Analysis & Suggestions
The Privacy Analysis section automatically scans your data to detect PII and suggest appropriate privacy rules.
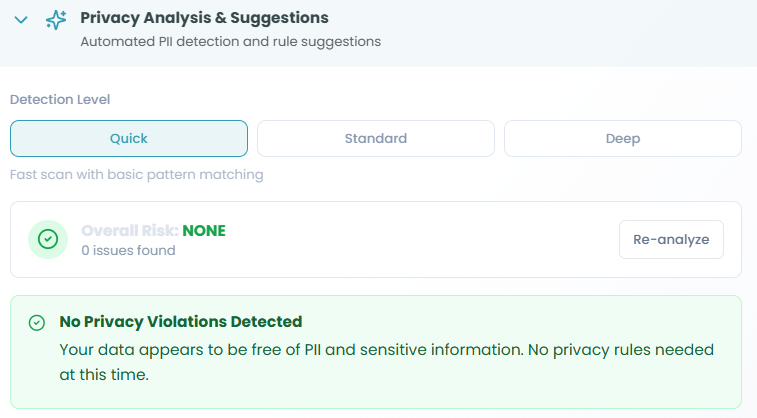
Detection Level:
Choose the scanning depth for PII detection:
-
Quick - Fast scan with basic pattern matching
- Fastest analysis
- Uses common PII patterns (email, phone, SSN, etc.)
- Suitable for most use cases
- Best for performance-sensitive workflows
-
Standard - Balanced scan with moderate thoroughness
- More comprehensive than Quick
- Checks additional patterns and formats
- Good balance of speed and accuracy
-
Deep - Thorough scan with advanced pattern recognition
- Most comprehensive analysis
- Checks for subtle PII indicators
- Best for high-security requirements
- Takes longer to complete
Risk Analysis Results:
After running detection, you'll see:
Overall Risk Indicator:
- Risk level: NONE, LOW, MEDIUM, HIGH
- Issue count: Number of privacy violations found
- Example: "Overall Risk: NONE - 0 issues found"
Re-analyze Button:
- Click to re-run PII detection
- Use after changing detection level or schema
- Updates risk assessment and suggestions
Detection Results:
The analysis provides clear feedback:
No Privacy Violations Detected:
"Your data appears to be free of PII and sensitive information.
No privacy rules needed at this time."- Green success indicator
- Confirms no sensitive data detected
- No immediate action required
When Issues Are Found:
- List of detected sensitive fields
- Suggested privacy operations for each field
- Risk level for each detection
- Recommended protection methods
Step 2: Input/Output Schema
Define the data structure that will be analyzed for privacy violations and protected with privacy operations.
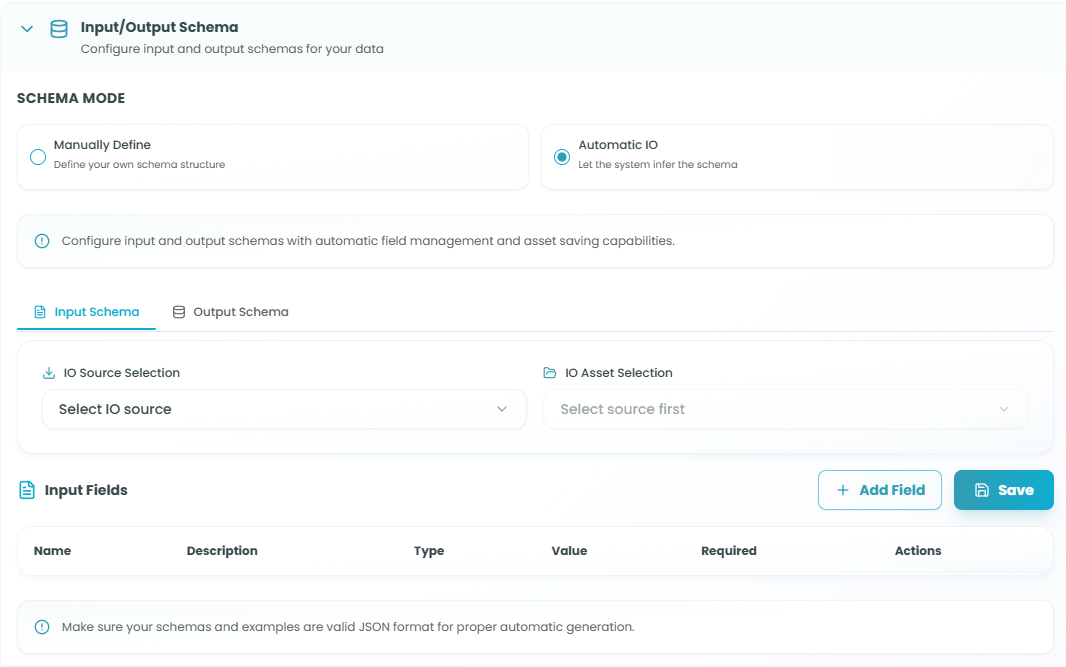
Schema Mode:
Choose how to define your data schema:
-
Manually Define - Define your own schema structure
- Full control over field definitions
- Manually create each field
- Best for custom data structures
-
Automatic IO - Let the system infer the schema
- Automatically generates schema from workflow context
- Saves configuration time
- Best for standard data flows
Input Schema Tab:
Configure the structure of incoming data:
IO Source Selection:
- Select where input data comes from
- Choose upstream nodes
- Import schema automatically
Input Fields:
Define fields that may contain sensitive data:
- Click Add Field to create field definitions
- Configure each field:
- Name - Field identifier
- Description - What the field contains
- Type - Data type (string, number, object, etc.)
- Value - Default value or expression
- Required - Whether field is mandatory
- Actions - Edit or remove field
Important Note: "Make sure your schemas and examples are valid JSON format for proper automatic generation."
Output Schema Tab:
Define the structure of protected data output:
IO Asset Selection:
- Select output structure source
- Define protected field format
- Specify how privacy operations affect output
The output schema typically mirrors the input schema but reflects any transformations applied by privacy operations (e.g., masked fields, encrypted values).
Step 3: Privacy Operations
Configure specific privacy protection rules for fields identified as sensitive.
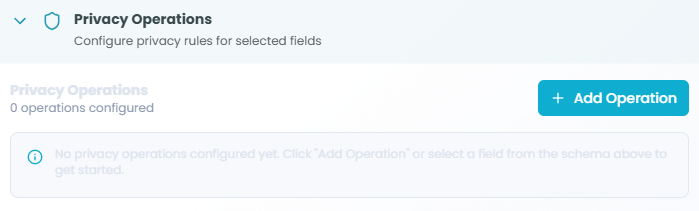
Privacy Operations Overview:
This section allows you to configure privacy rules for selected fields.
Status Display:
- Shows number of operations configured
- Example: "0 operations configured"
- Updates as you add privacy rules
Add Operation Button:
- Click Add Operation to create a new privacy rule
- Select fields from your schema
- Choose protection method (masking, encryption, etc.)
- Configure operation-specific settings
Getting Started:
When no operations are configured, you'll see:
"No privacy operations configured yet. Click 'Add Operation'
or select a field from the schema above to get started."
Configuring Operations:
For each privacy operation, you'll typically specify:
-
Target Field - Which field to protect (from your schema)
-
Operation Type - Protection method:
- Masking - Hide part or all of the data (e.g.,
****-**-1234for SSN) - Encryption - Encrypt the field value
- Hashing - One-way hash for irreversible protection
- Tokenization - Replace with tokens
- Redaction - Remove sensitive data entirely
- Masking - Hide part or all of the data (e.g.,
-
Operation Settings - Configuration specific to the operation type
- Masking pattern
- Encryption algorithm
- Partial masking rules
- Preservation rules (e.g., keep last 4 digits)
Using the Data Privacy Node in Your Workflow
After configuration:
- The Data Privacy node receives data from upstream nodes
- Privacy analysis scans for sensitive information (if configured)
- Detected PII is flagged and risk is assessed
- Configured privacy operations are applied to designated fields
- Protected data is output according to the output schema
- Downstream nodes receive data with privacy protections applied
Data Flow Example:
Upstream Data (with PII) →
Data Privacy Node →
Privacy Analysis (detect PII) →
Apply Operations (mask/encrypt) →
Protected Data → Downstream Nodes
Best Practices
Privacy Analysis
- Run analysis first - Always run PII detection before manually configuring operations
- Choose appropriate detection level - Use Quick for standard cases, Deep for high-security needs
- Re-analyze after schema changes - Run detection again if you modify input schema
- Review suggestions - Evaluate automated suggestions before applying
- Test with sample data - Verify detection works with representative data
Schema Configuration
- Define complete schema - Include all fields that may contain sensitive data
- Use descriptive names - Clear field names help with PII detection
- Validate JSON format - Ensure schemas are valid for automatic generation
- Document sensitive fields - Use descriptions to mark known sensitive data
- Plan for output structure - Consider how privacy operations affect output
Privacy Operations
- Apply minimal protection - Only protect fields that actually need it
- Choose appropriate methods - Masking for display, encryption for storage
- Test operations - Verify masked/encrypted data meets requirements
- Consider reversibility - Some operations (hashing) are irreversible
- Document operations - Keep record of what protection is applied where
- Use consistent seed - Set random seed for reproducible masking patterns
Compliance and Security
- Understand regulations - Know which data protection laws apply
- Classify data properly - Identify PII, PHI, PCI, and other sensitive categories
- Apply defense in depth - Use multiple protection layers when needed
- Audit protection rules - Regularly review privacy operations
- Monitor for new PII - Re-run analysis when data sources change
Common Use Cases
Customer Data Protection:
- Mask email addresses and phone numbers in logs
- Encrypt credit card information
- Hash customer IDs for analytics
- Protect addresses and names in non-production environments
Compliance Requirements:
- GDPR: Protect EU citizen personal data
- CCPA: Safeguard California resident information
- HIPAA: Protect health information
- PCI DSS: Secure payment card data
Data Sharing:
- Mask data before sharing with third parties
- Anonymize data for analytics teams
- Protect data in reports and exports
- Secure data for non-production use
Development and Testing:
- Generate masked test data from production
- Protect sensitive fields in staging environments
- Create privacy-safe data sets for development
- Ensure test data doesn't contain real PII
Logging and Monitoring:
- Redact sensitive information from logs
- Mask PII in error messages
- Protect data in monitoring dashboards
- Secure audit trail data
Troubleshooting
PII Not Detected:
- Verify schema is correctly defined
- Try higher detection level (Standard or Deep)
- Check field names and types match expectations
- Ensure sample data is representative
- Review data format and structure
False Positives:
- Detection may flag non-sensitive data that matches PII patterns
- Review detected fields individually
- Use lower detection level if too many false positives
- Manually configure operations instead of relying on suggestions
Operations Not Applied:
- Verify operations are configured for the correct fields
- Check field names match exactly (case-sensitive)
- Ensure input schema includes the fields
- Verify data is flowing through the node
- Review operation configuration settings
Output Data Issues:
- Check output schema matches privacy operation results
- Verify operations aren't removing required data
- Ensure downstream nodes can handle protected data format
- Test with sample data to verify transformation
Performance Concerns:
- Deep detection can be slower - use Quick for most cases
- Encryption operations add processing overhead
- Consider batching for large datasets
- Monitor node execution time
Monitoring Privacy Protection
Monitor your Data Privacy node:
- Review detection results - Check what PII is being found
- Verify operations - Ensure protection is applied correctly
- Track risk levels - Monitor overall privacy risk scores
- Audit protected fields - Confirm sensitive data is masked/encrypted
- Test downstream impact - Verify protected data works in rest of workflow
For more information on monitoring workflow executions, see the Traceability documentation.
Data Privacy vs Manual Protection
Use Data Privacy Node when:
- You need automated PII detection
- You want suggested privacy rules
- You need comprehensive privacy protection
- You're handling regulated data
- You want centralized privacy management
Use Manual Methods when:
- Privacy requirements are very simple
- You have only one or two fields to protect
- Custom protection logic is needed
- You need integration with external privacy tools
Next Steps
After setting up your Data Privacy node:
- Define your input/output schema
- Run Privacy Analysis to detect sensitive fields
- Review detected PII and risk assessment
- Configure privacy operations for sensitive fields
- Test with sample data to verify protection
- Deploy and monitor privacy rule effectiveness
The Data Privacy node provides essential data protection capabilities for FlowGenX workflows, ensuring that sensitive information is automatically detected and appropriately protected throughout your data processing pipelines.