Set Data
Map input and output data for workflows with flexible field transformations
The Set Data node provides powerful data mapping and transformation capabilities within your workflows. This node allows you to map fields from upstream nodes to defined output fields, transform data structures, combine multiple data sources, and prepare data for downstream processing. It acts as a data bridge, ensuring data flows correctly between different workflow components.
Why Use Set Data?
The Set Data node is ideal when you need to:
- Transform data structures - Reshape data from one format to another for downstream nodes
- Map fields between nodes - Connect output fields from multiple upstream nodes to specific output fields
- Combine data sources - Merge data from different nodes into a unified structure
- Prepare API payloads - Format data to match API requirements or schemas
- Clean and organize data - Select and structure only the data you need for subsequent processing
- Normalize data formats - Standardize data coming from different sources
How It Works
The Set Data node operates as a data transformation layer:
- Field Mapping - Map fields from upstream nodes to output fields
- Data Selection - Choose specific fields from source nodes
- Structure Definition - Define the output schema your workflow needs
- Type Preservation - Maintain data types during transformation
- Multi-Source Support - Combine data from multiple upstream nodes
When to Use Set Data
Use Set Data when:
- You need to reshape data between workflow steps
- Multiple upstream nodes need to be combined into a single output
- Downstream nodes expect a specific data structure
- You want to clean up or simplify complex nested data
- You need to prepare data for external APIs or systems
- You want to create a clear data contract between workflow segments
Configuration Steps
Setting up the Set Data node involves defining the schema mode and creating field mappings from source nodes to output fields.
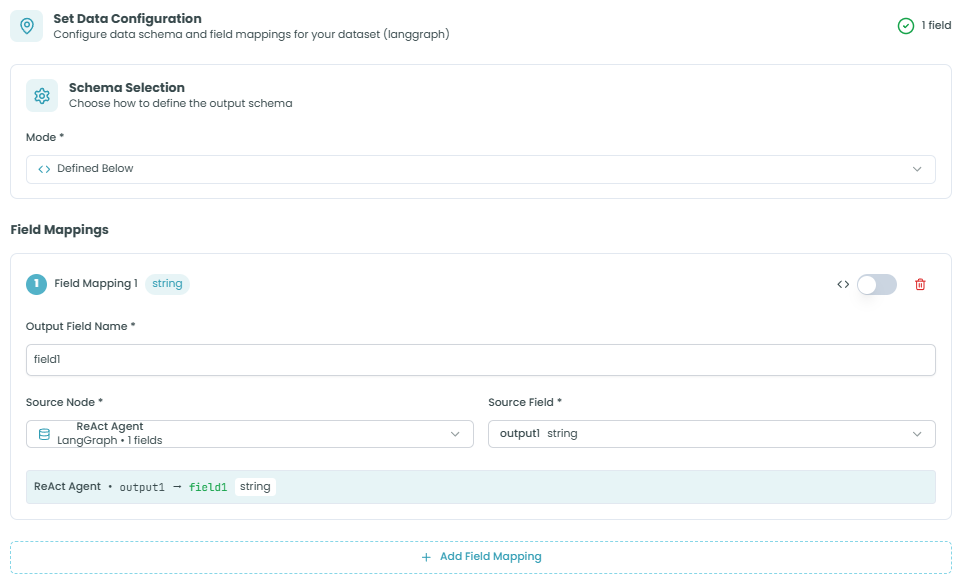
Step 1: Schema Selection
Choose how you want to define your output schema.
Schema Selection:
The Schema Selection section lets you choose the mode for defining your output structure:
- Mode - How to define the output schema
- Defined Below - Manually define field mappings in this node (default and recommended)
- Allows explicit field-by-field mapping
- Provides full control over output structure
- Best for most use cases
Purpose:
- Determines how the output schema is created
- "Defined Below" mode gives you full control to map fields exactly as needed
- Each mapping explicitly connects source data to output fields
Step 2: Field Mappings
Create mappings from source node fields to your output fields.
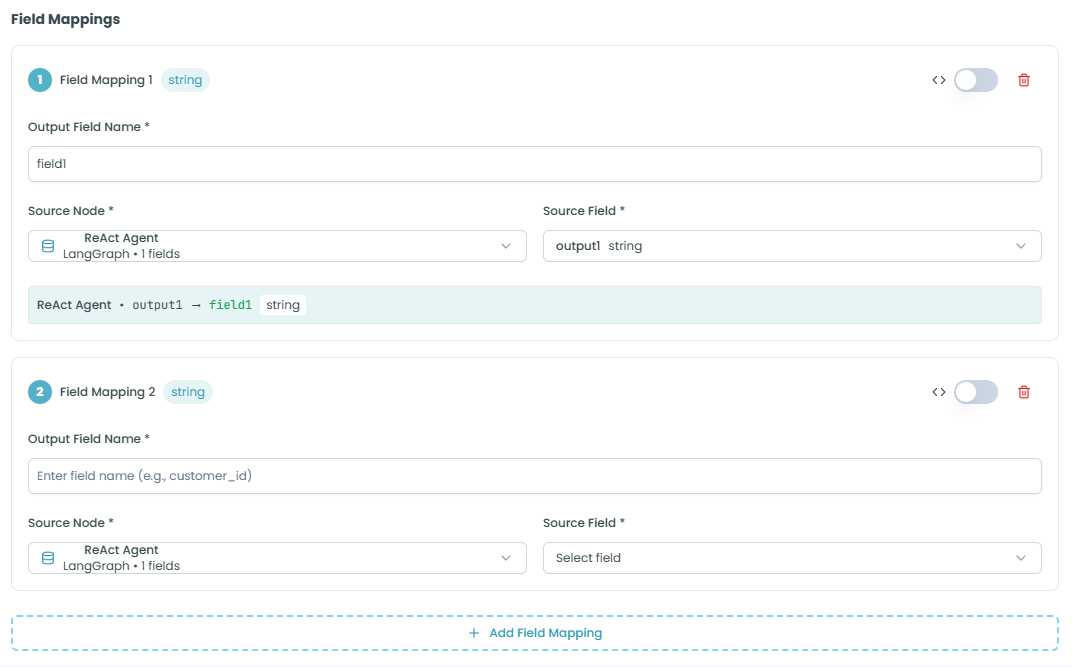
Field Mapping Structure:
Each field mapping consists of:
Field Mapping Header:
- Field Mapping Number - Sequential identifier (e.g., "Field Mapping 1")
- Type Badge - Shows the data type (e.g., "string", "number", "object")
- Expression Toggle - Switch between direct mapping and expression mode
- Delete Button - Remove this field mapping
Output Field Name:
- Purpose: The name of the output field to create
- Required: Yes
- Format: Field name (e.g., "field1", "user_name", "totalAmount")
- Use: This is the field name that downstream nodes will use to access this data
Source Node:
- Purpose: Select which upstream node to pull data from
- Format: Dropdown showing available upstream nodes
- Display: Shows node name and available field count
- Example: "ReAct Agent - LangGraph > 1 fields"
- Use: Identifies where the data originates
Source Field:
- Purpose: Select which field from the source node to map
- Format: Dropdown showing available fields from the selected source node
- Display: Shows field name and type
- Example: "output1 string"
- Use: Specifies exactly which data to map to the output field
Mapping Preview:
Below each mapping, you'll see a visual representation:
ReAct Agent • output1 → field1 stringThis shows:
- Source node name (e.g., "ReAct Agent")
- Source field (e.g., "output1")
- Arrow indicating the mapping direction
- Output field name (e.g., "field1")
- Output field type (e.g., "string")
Adding More Mappings:
Click Add Field Mapping to create additional field mappings. You can:
- Map multiple fields from the same source node
- Map fields from different source nodes
- Create as many mappings as needed
- Each mapping operates independently
Field Mapping Examples:
Example 1: Simple Field Mapping
Output Field Name: customer_name
Source Node: HTTP Request
Source Field: name
Result: customer_name = HTTP Request.name
Example 2: Multiple Source Nodes
Mapping 1:
  Output Field Name: user_id
  Source Node: Database Query
  Source Field: id

Mapping 2:
  Output Field Name: user_profile
  Source Node: API Call
  Source Field: profile_data
Example 3: Data Combination
Mapping 1:
  Output Field Name: order_id
  Source Node: Order Service
  Source Field: orderId

Mapping 2:
  Output Field Name: customer_info
  Source Node: Customer Service
  Source Field: customerData

Mapping 3:
  Output Field Name: total_amount
  Source Node: Payment Service
  Source Field: amount
Step 3: Input/Output Schema
Define and review the complete input and output structure for your data mappings.
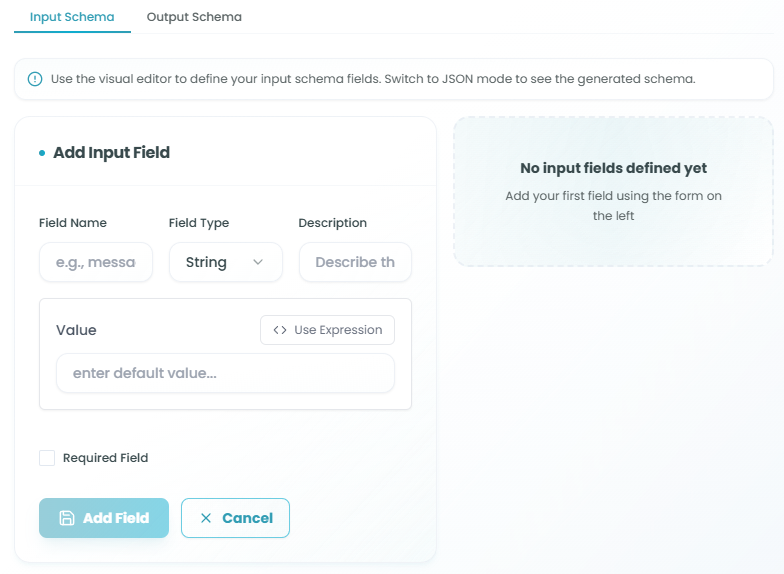
The Input/Output Schema section works similarly to the React Agent schema configuration, providing two tabs for managing data structure:
Input Schema Tab
Purpose: Define what data the Set Data node expects to receive
Configuration Options:
IO Source Selection:
- Select where input data comes from
- Options may include:
- Import from upstream - Automatically detect fields from connected nodes
- Manual definition - Define expected input fields manually
- Select source - Choose specific upstream nodes
Input Fields:
Define the structure of incoming data:
- Click Add Field to create an input field definition
- Configure each field:
- Field Name - Unique identifier for the input field
- Field Type - Data type (String, Number, Boolean, Object, Array, etc.)
- Description - Explanation of what this field contains
- Value - Default value or expression
- Required Field - Whether this field must be provided
Benefits:
- Documents expected input structure
- Validates incoming data
- Provides clear interface contract
- Helps with debugging and workflow understanding
Output Schema Tab
Purpose: Define what data the Set Data node will output
Configuration Options:
IO Asset Selection:
- Select how to define output structure
- The output schema is typically built from your field mappings
- Can be explicitly defined for validation
Output Fields:
The output fields are automatically created based on your field mappings in Step 2:
- Each field mapping creates a corresponding output field
- Output field names match those defined in "Output Field Name"
- Types are inherited from source fields or explicitly set
- The complete output structure is available to downstream nodes
Validation:
- Ensures field mappings are valid
- Verifies no conflicts in output field names
- Confirms data types are compatible
- Provides warnings for potential issues
Visual and JSON Modes:
Like the React Agent schema, you can toggle between:
- Visual Mode - User-friendly interface for field management
- JSON Mode - Direct schema editing for advanced users
Using Expressions
Click the expression toggle (code icon) on any field mapping to enable expression mode:
Expression Capabilities:
-
Data Transformation - Apply functions and transformations
- Example:
{{source.name | upper}}- Convert to uppercase - Example:
{{source.price * 1.1}}- Calculate with tax
- Example:
-
Conditional Logic - Set values based on conditions
- Example:
{{source.status === 'active' ? 'enabled' : 'disabled'}}
- Example:
-
Data Combination - Merge multiple fields
- Example:
{{source.firstName}} {{source.lastName}}
- Example:
-
Nested Access - Navigate complex objects
- Example:
{{source.user.profile.email}}
- Example:
-
Array Operations - Work with collections
- Example:
{{source.items | filter(item => item.active)}}
- Example:
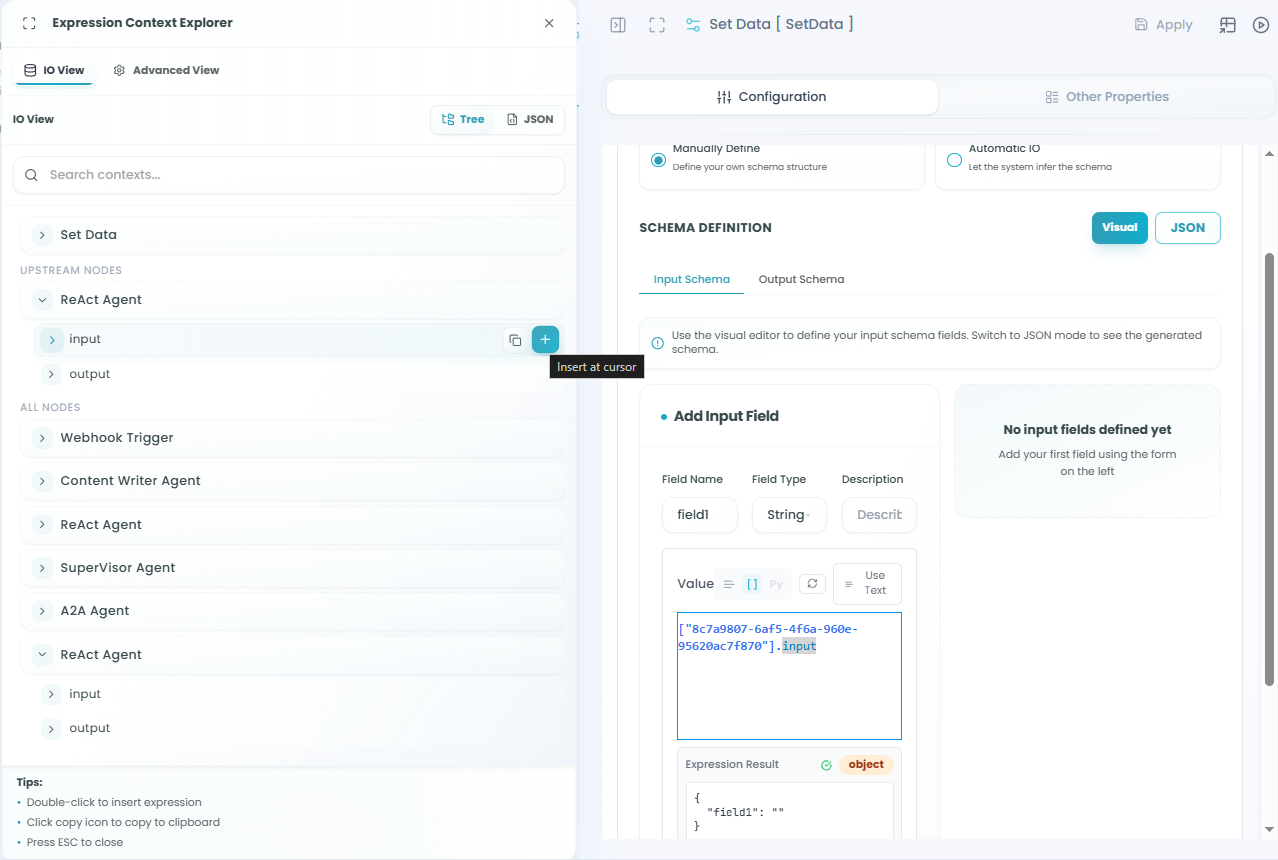
Expression Context Explorer:
When using expressions, access the Expression Context Explorer to:
- Browse available fields from all upstream nodes
- View field types and structures
- Select fields to insert into expressions
- Filter by upstream nodes or view all available data
For detailed information on expression syntax and capabilities, see the React Agent - Schema Configuration documentation.
Using the Set Data Node in Your Workflow
After configuration is complete:
- The Set Data node receives data from connected upstream nodes
- Field mappings are applied to transform the data
- Output fields are created according to your mappings
- The structured output is available to downstream nodes
- Data flows through the workflow with the new structure
Data Flow Example:
Upstream Nodes (API, Database, Agent) →
Set Data Node (Field Mappings) →
Structured Output →
Downstream Nodes (Use mapped fields)
Best Practices
Field Mapping Strategy
- Be explicit with names - Use clear, descriptive output field names
- Match downstream expectations - Structure output for how it will be used
- Document mappings - Use descriptions to explain complex transformations
- Keep it simple - Don't over-complicate mappings unless necessary
- Test incrementally - Add mappings one at a time and verify
Data Structure Design
- Normalize field names - Use consistent naming conventions
- Group related data - Structure logically related fields together
- Preserve important types - Maintain data types through mappings
- Avoid duplication - Don't map the same source field multiple times unless needed
- Plan for downstream - Consider how the data will be consumed
Performance Considerations
- Minimize transformations - Only map fields you actually need
- Avoid deep nesting - Keep output structures reasonably flat
- Use expressions wisely - Complex expressions can impact performance
- Pre-filter data - Filter upstream when possible instead of mapping all fields
Error Handling
- Validate source fields - Ensure source fields exist before mapping
- Handle missing data - Provide defaults for optional fields
- Type compatibility - Verify source and output types match
- Test edge cases - Try empty data, null values, unexpected types
Common Use Cases
API Response Transformation:
- Map API response fields to internal workflow field names
- Extract specific fields from complex API responses
- Prepare data for external API calls
Multi-Source Data Combination:
- Combine user data from authentication service
- Add order details from order service
- Include payment info from payment service
- Create unified customer record
Data Normalization:
- Standardize field names from different sources
- Convert between data formats
- Unify data structures from multiple APIs
Workflow Data Preparation:
- Extract relevant fields from large datasets
- Restructure data for specific downstream node requirements
- Create clean, focused data contracts between workflow segments
Agent Output Formatting:
- Map agent outputs to expected schema
- Combine outputs from multiple agents
- Prepare agent data for final workflow output
Troubleshooting
Field Not Available:
- Verify the source node is connected and executed
- Check that the source field name is correct
- Ensure the source node has completed execution
- Review upstream node output structure
Type Mismatch Errors:
- Check source field type matches expected output type
- Use expressions to convert between types
- Verify data is in expected format
- Review source node output data
Mapping Not Working:
- Confirm source node is properly selected
- Verify source field exists in node output
- Check for typos in output field names
- Ensure Set Data node is in the data flow path
Missing Output Data:
- Verify all field mappings are saved
- Check that source nodes have data
- Confirm Set Data node executed successfully
- Review workflow execution logs
Expression Errors:
- Validate expression syntax
- Test expressions with sample data
- Check field references are correct
- Use Expression Context Explorer to verify available fields
Monitoring and Debugging
Monitor your Set Data node:
- Review field mappings - Ensure all mappings are configured correctly
- Check output structure - Verify output matches expectations
- Validate data types - Confirm types are preserved or converted properly
- Test with sample data - Use known inputs to verify mappings
- Monitor execution logs - Track data transformation issues
For more information on monitoring workflow executions, see the Traceability documentation.
Set Data vs Direct Node Connections
Use Set Data when:
- You need to transform data structure
- Multiple source nodes must be combined
- Downstream nodes expect specific field names
- You want explicit data contracts between workflow segments
- Complex data mapping is required
Use Direct Node Connections when:
- Data structure is already correct
- Simple, direct field access is sufficient
- No transformation is needed
- Workflow is simple and linear
Next Steps
After setting up your Set Data node:
- Define your output schema based on downstream requirements
- Create field mappings from source nodes
- Configure input/output schema for validation
- Test mappings with sample data
- Verify downstream nodes receive correct structure
- Deploy and monitor data flow
The Set Data node is essential for building clean, maintainable workflows with clear data contracts between components. By explicitly defining data transformations, you create workflows that are easier to understand, debug, and modify.