React Agent
Intelligent agent that autonomously plans and executes multi-step workflows
The React Agent node provides intelligent, autonomous workflow execution capabilities powered by large language models (LLMs). This agent uses advanced reasoning to understand tasks, plan actions, and execute complex multi-step operations within your workflows. The React Agent can make decisions, process data, and interact with other workflow components using natural language instructions.
Why Use React Agent?
The React Agent is ideal when you need to:
- Process unstructured data - Analyze and extract insights from text, documents, or complex data structures
- Make intelligent decisions - Use AI reasoning to evaluate conditions and choose appropriate actions
- Execute multi-step tasks - Complete complex workflows that require sequential reasoning and planning
- Transform and generate content - Create summaries, reports, responses, or structured data from inputs
- Integrate AI capabilities - Add natural language understanding and generation to your workflows
Configuration Steps
Setting up the React Agent involves 4 main configuration areas accessible through tabs. The configuration panel guides you through Models, Prompts, Memory, and Schema setup.

Step 1: Models Configuration
The Models tab allows you to select and configure the AI model that will power your agent's intelligence.
Adding a Model:
- Click Select Model to choose an AI model
- Select your desired model from the available options
- Configure the model settings
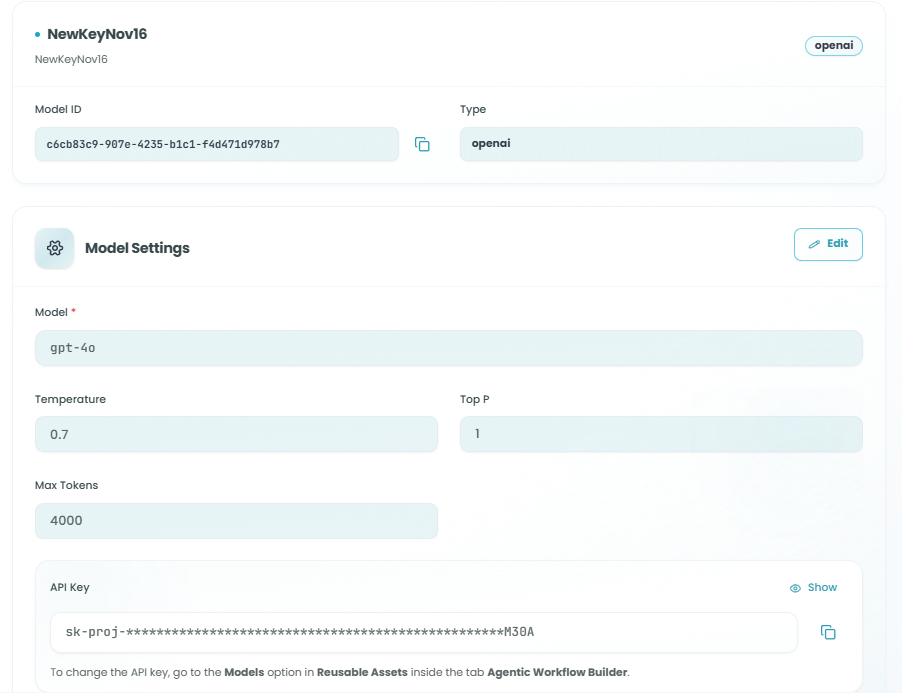
LLM Model Information:
Once a model is added, you'll see:
- Model Name - Display name for the model
- Model ID - Unique identifier for the model
- Type - Model provider (e.g., OpenAI, Anthropic)
Model Settings:
Configure the following parameters to control the model's behavior:
-
Model - The specific model version (e.g., gpt-4o, gpt-3.5-turbo)
- Different models have different capabilities and costs
- Choose based on your task complexity and requirements
-
Temperature (0.0 - 2.0) - Controls randomness in responses
- Lower values (0.0 - 0.3): More focused and deterministic outputs
- Medium values (0.4 - 0.7): Balanced creativity and consistency
- Higher values (0.8 - 2.0): More creative and varied outputs
- Default: 0.7
-
Top P (0.0 - 1.0) - Controls diversity via nucleus sampling
- Lower values: More focused responses
- Higher values: More diverse outputs
- Default: 1
-
Max Tokens - Maximum length of the generated response
- Controls how long the agent's response can be
- Higher values allow longer, more detailed responses
- Consider cost implications with higher token counts
- Default: 4000
-
API Key - Authentication key for the model provider
- Securely stored and used for API calls
- Can be configured in Reusable Assets for reuse across workflows
- Note: To change the API key, go to the Models option in Reusable Assets inside the Agentic Workflow Builder
Switching Models:

Click Switch Model to change to a different AI model while preserving your other configuration settings.
Step 2: Prompts Configuration
The Prompts tab is where you define the instructions that guide the agent's behavior and decision-making.
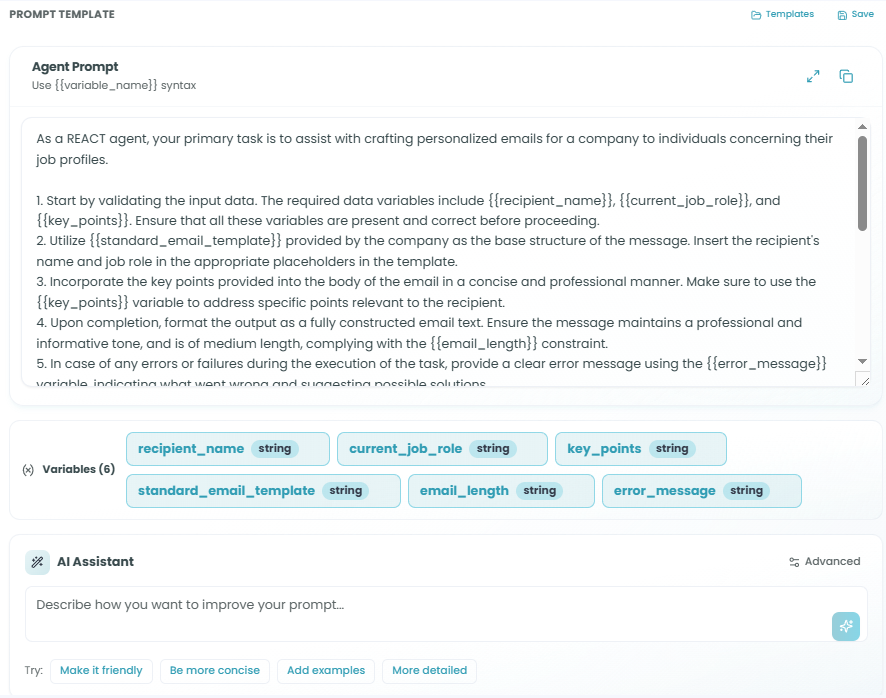
Writing Your Prompt:
The Agent Prompt is the core instruction set that tells the agent what to do:
- Write clear, specific instructions in the prompt text area
- Use natural language to describe the task
- Define the expected behavior and output format
- Include any constraints or requirements
Using Variables:
You can create dynamic prompts using variables with the {{variable_name}} syntax:
- Variables allow you to pass dynamic data into the prompt
- Example:
"Analyze the following text: {{input_text}}" - Variables must be defined in the Schema tab (Input Fields)
Variables List:
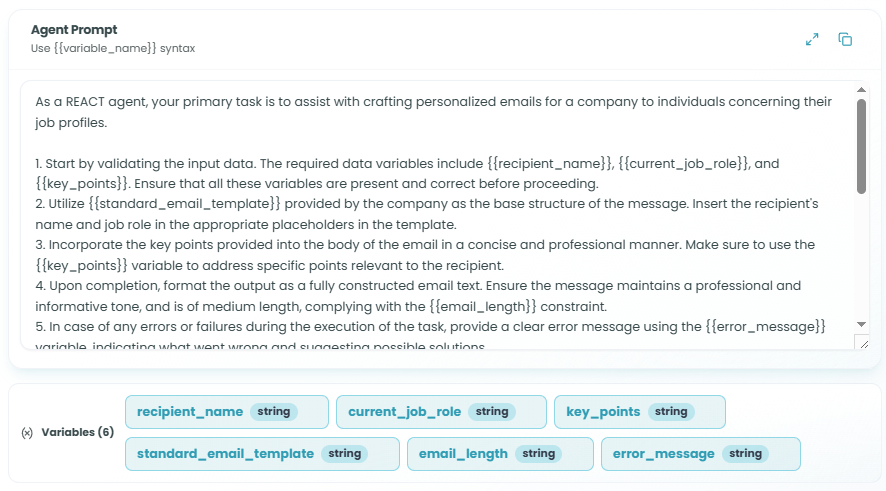
After using {{variable_name}} syntax in your prompt, the variables list appears below the prompt text area:
- Shows all variables detected in your prompt
- Click on a variable to edit its configuration
- Variables are automatically linked to input schema fields
AI Assistant for Prompt Improvement:
The AI Assistant helps you refine and improve your prompts:
Quick Actions:
- Make it friendly - Adjust tone to be more conversational and approachable
- Be more concise - Shorten and simplify the prompt
- Add examples - Include example inputs and outputs for clarity
- More detailed - Expand with additional context and specificity
Custom Improvements:
- Type any instruction in the AI Assistant field
- Example: "Add error handling instructions" or "Make it more technical"
- Click the assistant button to apply the improvement
- The AI will modify your prompt based on your instruction
Templates:
Save frequently used prompts as templates for reuse across different agents and workflows.
Step 3: Memory Configuration
The Memory tab allows you to configure how the agent remembers and uses information across executions.
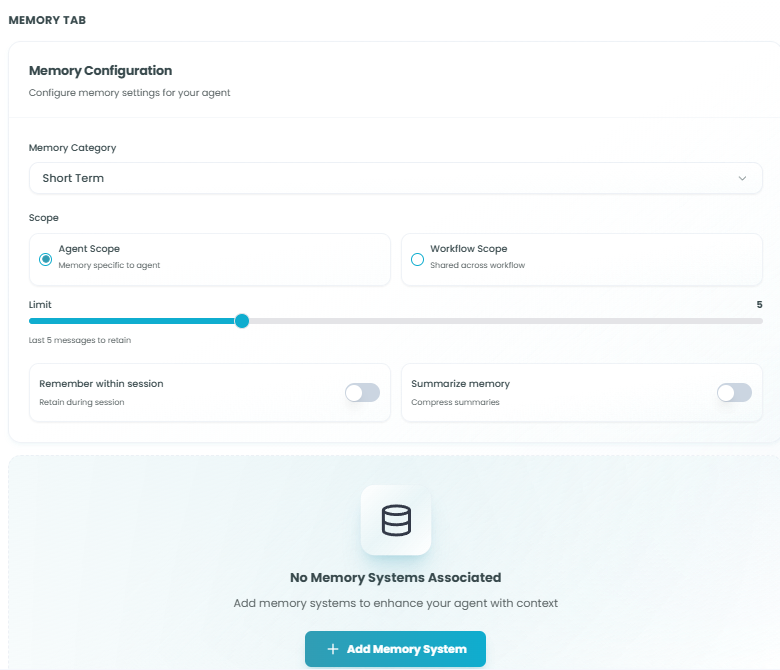
Memory Settings:
- Memory Category - Select the type of memory storage
- Short Term - Temporary memory for the current session or workflow run
- Long Term - Persistent memory across multiple workflow executions
Scope Options:
Choose how memory is shared within your workflow:
-
Agent Scope - Memory is specific to this agent only
- Information is private to this agent instance
- Other agents in the workflow cannot access this memory
- Use for agent-specific context and state
-
Workflow Scope - Memory is shared across the entire workflow
- All agents and nodes can access this memory
- Use for shared context and cross-agent communication
- Enables coordination between multiple agents
Memory Retention:
- Limit - Control how many messages to retain
- Use the slider to set the number of messages
- Default: Last 5 messages
- Higher limits provide more context but use more memory
Memory Options:
-
Remember within session - Toggle to enable/disable
- When enabled: Retains memory during the workflow execution session
- When disabled: Memory is cleared between interactions
- Useful for maintaining conversation context
-
Summarize memory - Toggle to enable/disable
- When enabled: Compresses older messages into summaries
- Helps manage memory usage while retaining important information
- Useful for long-running conversations or workflows
Associated Memory Systems:
View and manage connected memory systems in the table:
- Enabled - Toggle to activate/deactivate the memory system
- Memory System - Name of the memory storage system
- Type - Technology used (e.g., Redis, PostgreSQL)
- Category - Short-term or long-term classification
- Status - Current state (active, inactive)
- Actions - Edit or remove memory systems
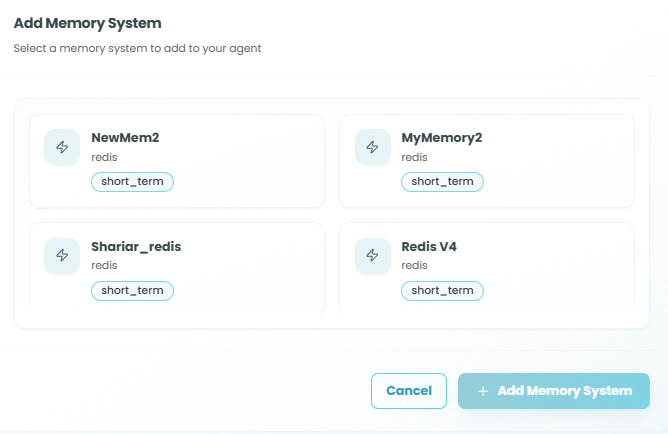
Adding Memory Systems:
Click Add Memory to connect additional memory storage systems to your agent. This opens a selection dialog showing available memory systems configured in your FlowGenX environment.
Step 4: Schema Configuration
The Schema tab defines the input and output structure for your agent, controlling what data flows in and out.
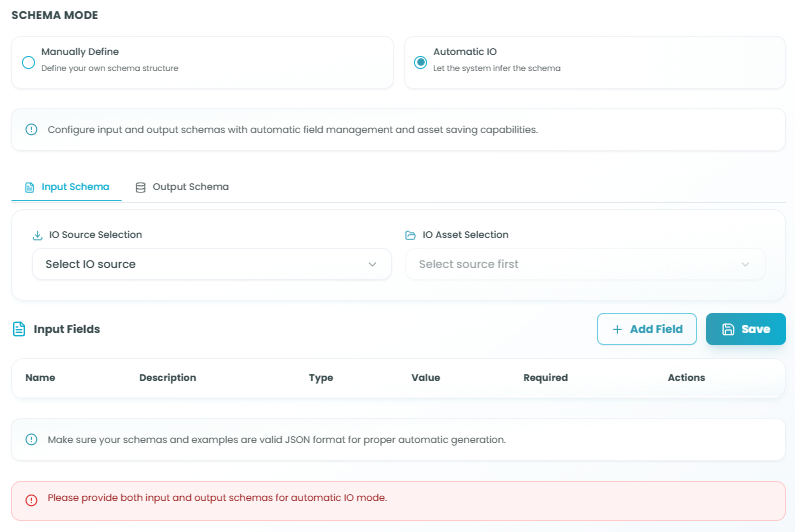
Schema Modes:
Choose how you want to define your agent's input and output structure:
-
Manually Define - Define your own schema structure
- Full control over input and output fields
- Create custom field definitions
- Best for specific data structures
-
Automatic IO - Let the system infer the schema
- Automatically generates schema from upstream nodes
- Saves time with intelligent field detection
- Best for standard data flows
Automatic IO Mode

In Automatic IO mode, the system automatically manages schema based on workflow connections:
Input Schema:
- Click on IO Source Selection dropdown
- Select Import from upstream to use data from previous nodes
- Choose the upstream node you want to import from
- The system automatically detects available fields
Output Schema:
- Click on IO Asset Selection dropdown
- Select the source for output field definitions
- Define output fields that downstream nodes can use
- The system handles field mapping automatically
Benefits of Automatic IO:
- Faster configuration
- Automatic field detection
- Reduced errors from manual entry
- Easy integration with upstream nodes
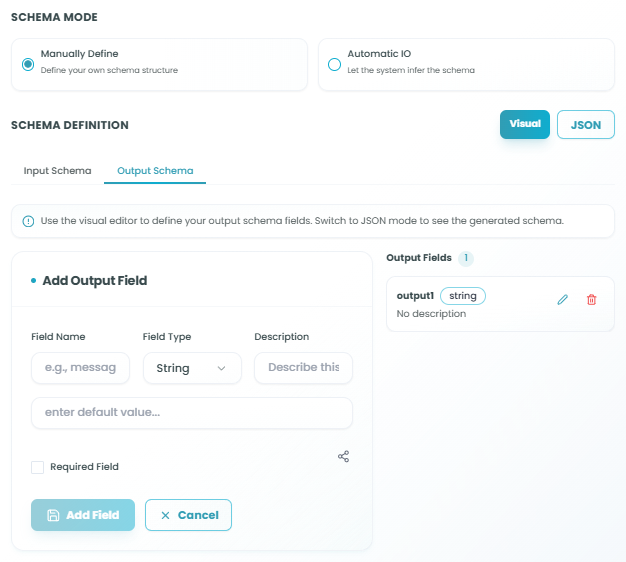
Manually Define Mode
In Manually Define mode, you have full control to create custom schema structures:
Visual and JSON Modes:
Toggle between two editing modes:
- Visual - User-friendly interface for adding fields
- JSON - Direct JSON schema editing for advanced users
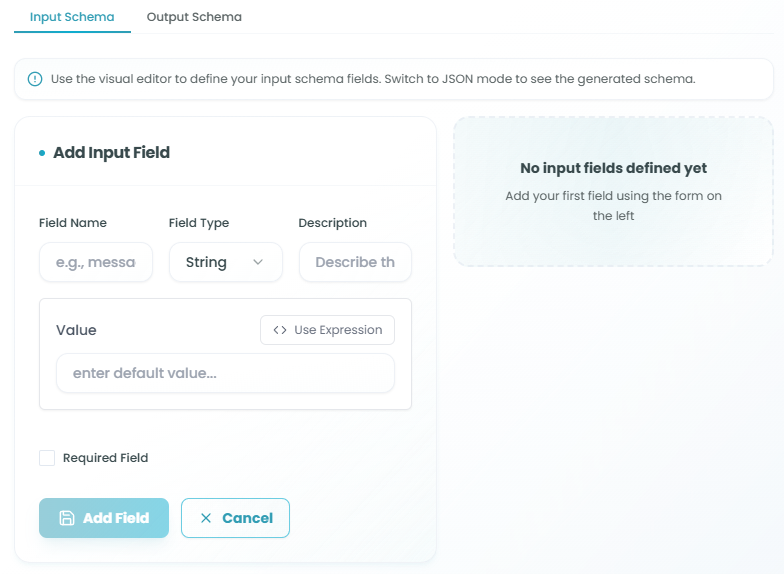
Adding Input Fields:
Click Add Field in the Input Fields section to create a new input:
-
Field Name - Unique identifier for the field
- Use descriptive names (e.g., "message", "user_id", "document")
- Must follow naming conventions (no spaces, special characters)
-
Field Type - Data type for the field
- String, Number, Boolean, Object, Array, etc.
- Choose based on the data you expect to receive
-
Description - Explanation of what this field contains
- Helps document your schema
- Useful for team collaboration
-
Value - Default value or expression for the field
- Enter a static default value
- Or click Use Expression to create dynamic values
-
Required Field - Checkbox to mark field as mandatory
- When checked, the field must be provided
- When unchecked, the field is optional
Adding Output Fields:
The same process applies for output fields. Define the structure of data your agent will produce.
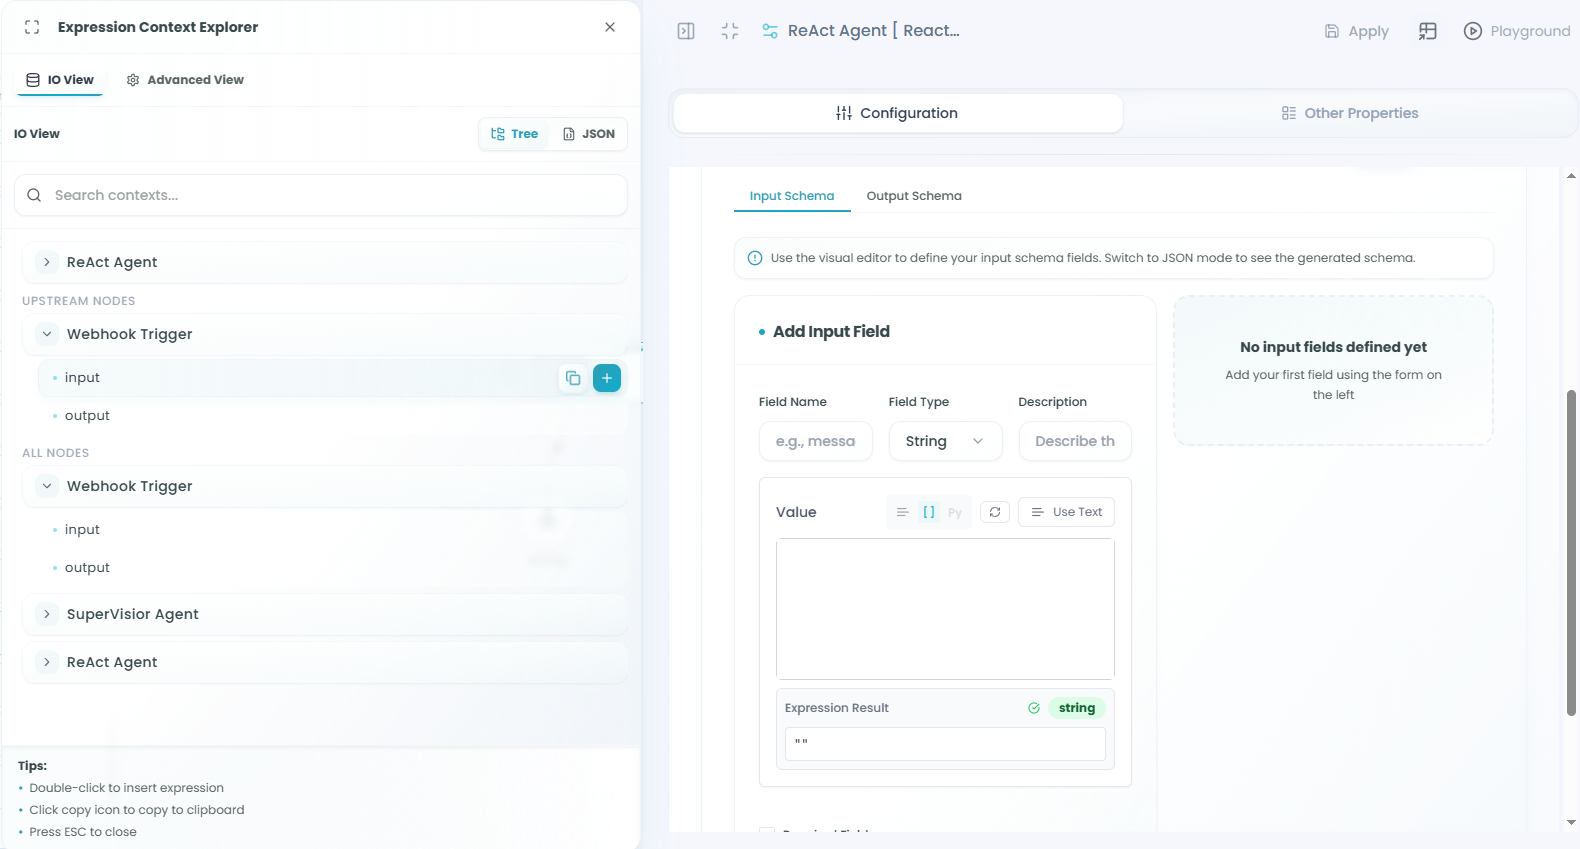
Using Expressions:
Click Use Expression in the Value field to open the Expression Context Explorer:
Expression Context Explorer Features:
-
Browse Available Fields - See all available data from your workflow
- Input fields from current node
- Output fields from upstream nodes
- System variables and functions
-
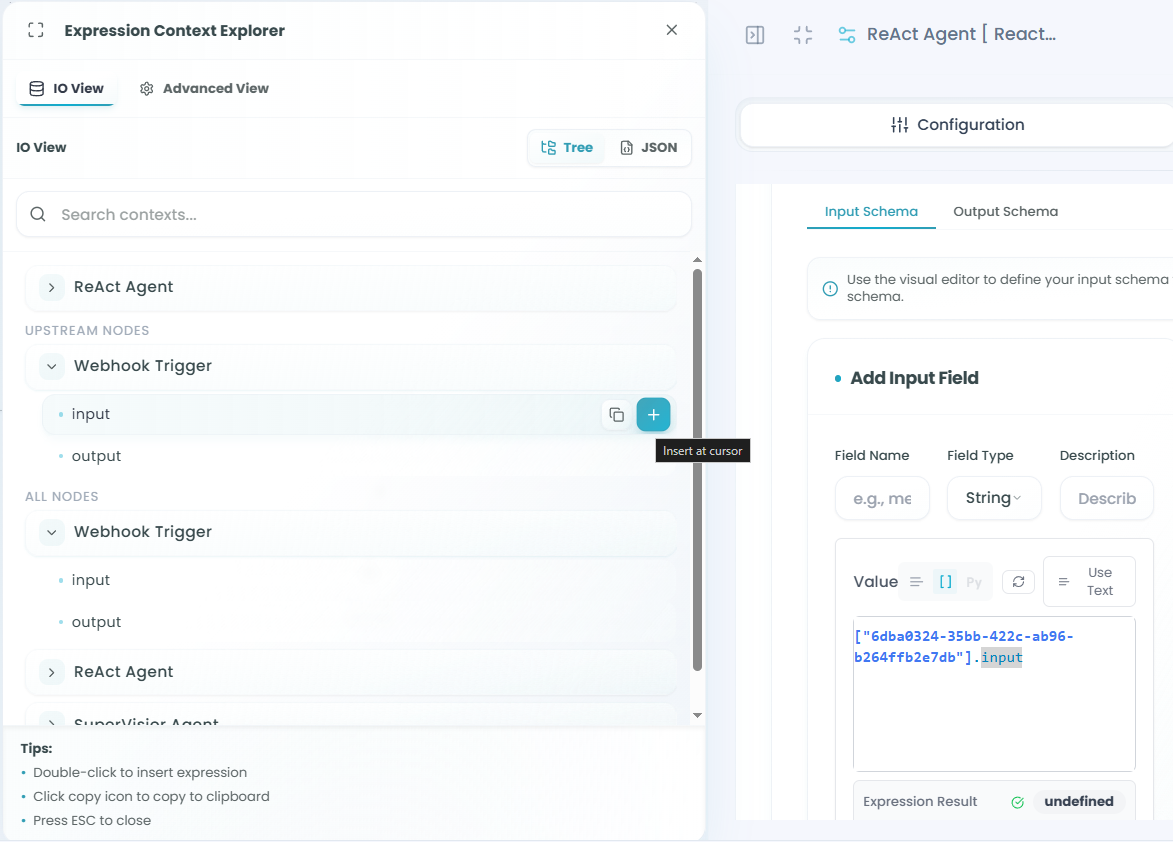
Select Fields - Click on any field to use it in your expression
- Automatically inserts the correct reference
- Supports nested object navigation
- Access array elements and properties
-
Filter Options:
- Upstream Nodes - Shows only nodes before the current agent
- All Nodes - Shows all nodes in the workflow
- Helps you find the exact data you need
Expression Examples:
- Reference upstream node:
{{webhook_trigger.body.message}} - Use input variable:
{{input_text}} - Combine values:
{{user.firstName}} {{user.lastName}}
MCP Integration
The React Agent can be extended with MCP (Model Context Protocol) tools and servers:
MCP Tool Node:
- Add specific MCP tools to enhance agent capabilities
- Tools provide specialized functions the agent can use
- Examples: web search, file operations, API calls
MCP Server Node:
- Connect to MCP servers for broader functionality
- Servers provide collections of related tools
- Enable complex integrations and external services
For detailed information on configuring MCP tools and servers, see:
- MCP Tool Node documentation
- MCP Server Node documentation
Using the React Agent in Your Workflow
After configuration is complete:
- The React Agent processes inputs based on your schema definition
- The agent uses the configured prompt to understand its task
- The AI model generates responses or performs operations
- Memory systems store context for future interactions
- Output is structured according to your schema definition
- Downstream nodes receive the agent's output
Best Practices
Prompt Engineering
- Be specific - Clearly define what you want the agent to do
- Provide examples - Include sample inputs and expected outputs
- Set constraints - Define boundaries and limitations
- Use structured formats - Request outputs in specific formats (JSON, lists, etc.)
- Iterate and refine - Use the AI Assistant to improve prompts based on results
Model Selection
- Choose appropriate models - Balance cost, speed, and capability
- Adjust temperature - Lower for consistent outputs, higher for creative tasks
- Set token limits - Prevent excessive costs while allowing adequate response length
- Test different models - Compare results to find the best fit for your use case
Memory Configuration
- Use appropriate scope - Agent scope for isolated tasks, workflow scope for coordination
- Set reasonable limits - Balance context retention with performance
- Enable summarization - For long-running processes to manage memory efficiently
- Match category to need - Short-term for sessions, long-term for persistent knowledge
Schema Design
- Use Automatic IO when possible - Faster and less error-prone for standard flows
- Manually Define for specific needs - When you need precise control over data structure
- Validate required fields - Mark essential fields as required
- Provide clear descriptions - Document your schema for maintainability
- Use expressions wisely - Leverage upstream data effectively
Common Use Cases
Content Generation:
- Summarize documents or articles
- Generate reports from structured data
- Create personalized messages or responses
- Transform data formats
Data Analysis:
- Extract insights from unstructured text
- Classify and categorize information
- Sentiment analysis and opinion mining
- Pattern recognition in data
Decision Making:
- Evaluate conditions and choose actions
- Route workflows based on content analysis
- Prioritize tasks or requests
- Make recommendations
Automation:
- Process customer inquiries
- Generate automated responses
- Transform and enrich data
- Orchestrate multi-step workflows
Troubleshooting
Agent Not Responding:
- Verify model configuration and API key
- Check that the model is available and accessible
- Ensure sufficient token limits are set
- Review prompt for clarity and completeness
Unexpected Outputs:
- Adjust temperature for more consistent results
- Refine prompt with more specific instructions
- Add examples to guide the model
- Check input data is correctly formatted
Memory Issues:
- Verify memory system is active and configured
- Check scope settings match your use case
- Adjust retention limits if memory is full
- Enable summarization for better memory management
Schema Errors:
- Ensure required fields are provided
- Validate JSON format in manual mode
- Check upstream node connections in automatic mode
- Verify field types match expected data
Monitoring and Testing
Monitor your React Agent's performance:
- Use the Playground feature to test agent responses before deployment
- Review execution logs in the Flow Management interface
- Track token usage and costs
- Analyze response times and quality
- Iterate on prompts based on real-world performance
For more information on monitoring workflow executions, see the Traceability documentation.
Next Steps
After setting up your React Agent:
- Test the agent with sample inputs in the Playground
- Refine your prompt based on test results
- Connect downstream nodes to process agent output
- Deploy your workflow to production
- Monitor performance and iterate on configuration
The React Agent brings powerful AI capabilities to your FlowGenX workflows, enabling intelligent automation and sophisticated data processing that would be difficult or impossible with traditional workflow nodes.