HTTP Listener Trigger
Expose API endpoints for external agents with AI-powered contract design
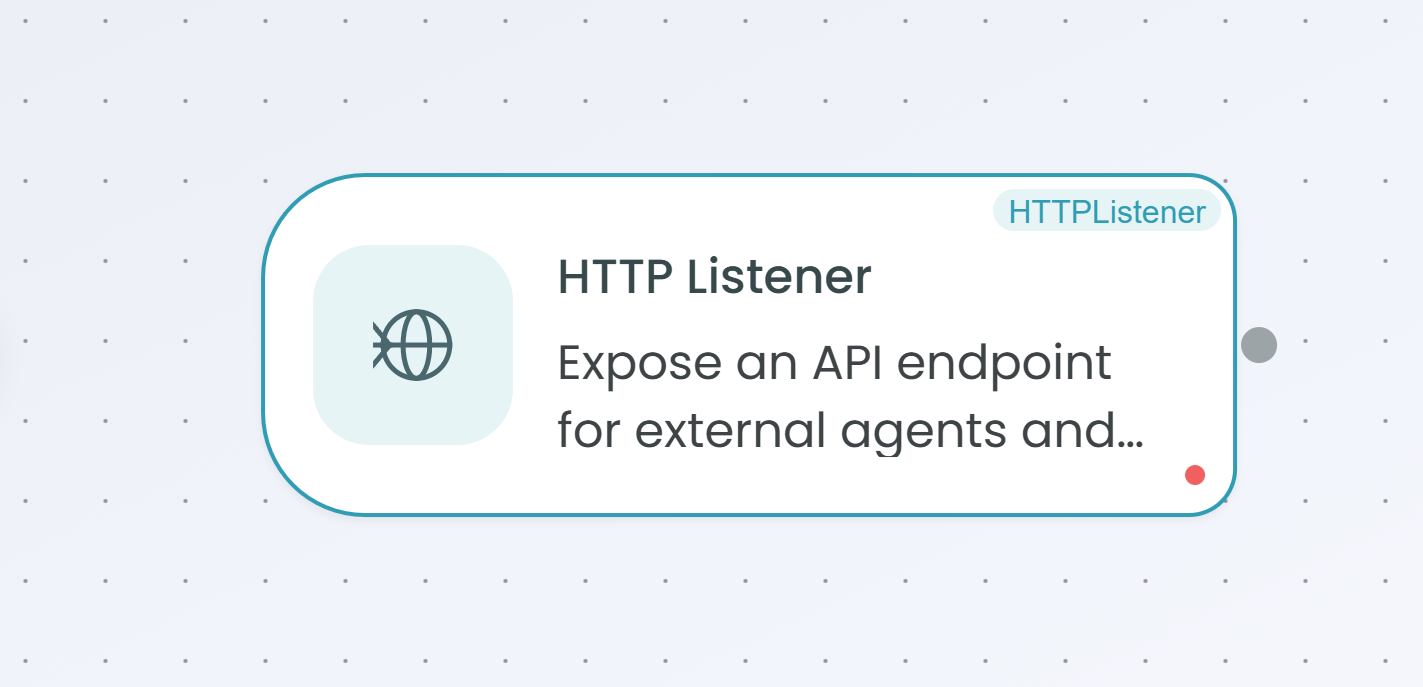
The HTTP Listener Trigger node enables you to expose API endpoints that external agents and systems can interact with. This powerful trigger combines the flexibility of custom HTTP endpoints with AI-assisted API contract design, making it easy to create professional, well-structured APIs for your workflows.
Why Use HTTP Listener Trigger?
The HTTP Listener Trigger is ideal when you need to:
- Build production-grade APIs - Create professionally structured REST APIs with comprehensive request/response contracts
- Leverage AI for API design - Use natural language to describe your API requirements and let AI generate the contract
- Maintain API standards - Work with OpenAPI 3.0 specifications for industry-standard API documentation
- Rapid prototyping - Quickly iterate on API designs with visual editing and AI assistance
- Validate contracts - Catch errors early with real-time validation and intelligent fix suggestions
Use Cases
Common scenarios for using the HTTP Listener Trigger include:
- Building REST APIs for mobile and web applications
- Creating microservices endpoints with well-defined contracts
- Exposing workflow automation as API services
- Developing integration endpoints with third-party systems
- Prototyping and testing API designs before implementation
Key Features
AI-Powered Contract Design
The HTTP Listener Trigger features an integrated AI Copilot that revolutionizes how you design APIs:
- Natural language to API contract - Describe your API in plain English and get a complete OpenAPI specification
- Intelligent error fixing - Automatically detect and fix validation errors in your API contract
- Dual-mode editing - Switch seamlessly between visual editor and OpenAPI code view
- Real-time validation - Get instant feedback with VS Code-like error highlighting
- Quick Fix integration - Click on errors to automatically generate AI prompts for fixes
This makes API design accessible to everyone, from developers to business analysts.
Configuration Steps
Setting up the HTTP Listener Trigger involves 5 steps. The configuration panel guides you through each step, showing your progress at the top.

Step 1: Endpoint Configuration
Define how external systems will access your HTTP endpoint.
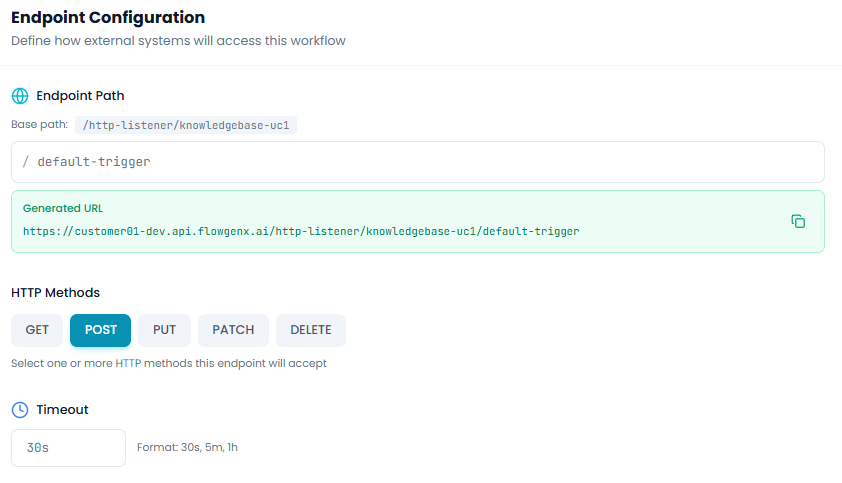
Endpoint Path
Base path - Auto-generated based on your tenant and environment
Example: /http-listener/knowledgebase-uc1
This base path is read-only and automatically created by the system.
Path segment - The unique identifier for this endpoint
Enter a custom path segment that describes your endpoint's purpose. This will be appended to the base path.
Example: / default-trigger
Generated URL - The complete endpoint URL
The system automatically constructs your full endpoint URL by combining the base path and path segment.
Example: https://customer01-dev.api.flowgenx.ai/http-listener/knowledgebase-uc1/default-trigger
Click the copy icon to easily copy the URL for use in external systems.
HTTP Methods
Select which HTTP methods your endpoint will accept:
- GET - Retrieve data
- POST - Create new resources
- PUT - Update entire resources
- PATCH - Partially update resources
- DELETE - Remove resources
You can select one or more HTTP methods this endpoint will accept. The interface shows which methods are currently enabled with highlighted buttons.
Tip: Choose methods that align with RESTful best practices for the operation your endpoint performs.
Timeout
Maximum time to wait for a response - Configure how long requests can run before timing out
Default: 30s
Accepted formats: 30s, 5m, 1h
This prevents long-running requests from consuming resources indefinitely.
Click Next to proceed to security configuration.
Step 2: Security Settings
Configure authentication and access control for your HTTP endpoint.

The security configuration for HTTP Listener follows the same pattern as other trigger nodes, allowing you to:
- Enable or disable authentication requirements
- Choose authentication methods (API Key, Bearer Token, OAuth 2.0)
- Configure rate limiting to prevent abuse
- Enable CORS for browser-based requests
For detailed information on each security option, see the Webhook Trigger security documentation.
Click Next to configure your API contract.
Step 3: API Contract
This is where the HTTP Listener Trigger truly shines. The Contract step provides a powerful, AI-assisted interface for designing your API's request and response structure.
Understanding the Contract Interface
The Contract step offers two powerful editing modes:
Visual Editor - Graphical interface for defining API structure
- Add fields with drag-and-drop simplicity
- Configure field types, requirements, and validations
- Organize complex nested objects and arrays
- Perfect for visual thinkers and rapid prototyping
OpenAPI Spec - Code-based OpenAPI 3.0 specification editor
- Full OpenAPI 3.0 standard compliance
- Syntax highlighting and code folding
- Direct access to all OpenAPI features
- Ideal for developers who prefer code-first approaches
Both modes stay in perfect sync - changes in one automatically update the other.
Endpoint Path Configuration
At the top of the contract editor, you can refine your endpoint path:
Base path - Your auto-generated base path Path segment - Customize the endpoint identifier
Use {paramName} syntax for path parameters (no leading /).
Example: default-trigger or users/{userId}/orders
The Generated URL displays your complete endpoint with all path segments.
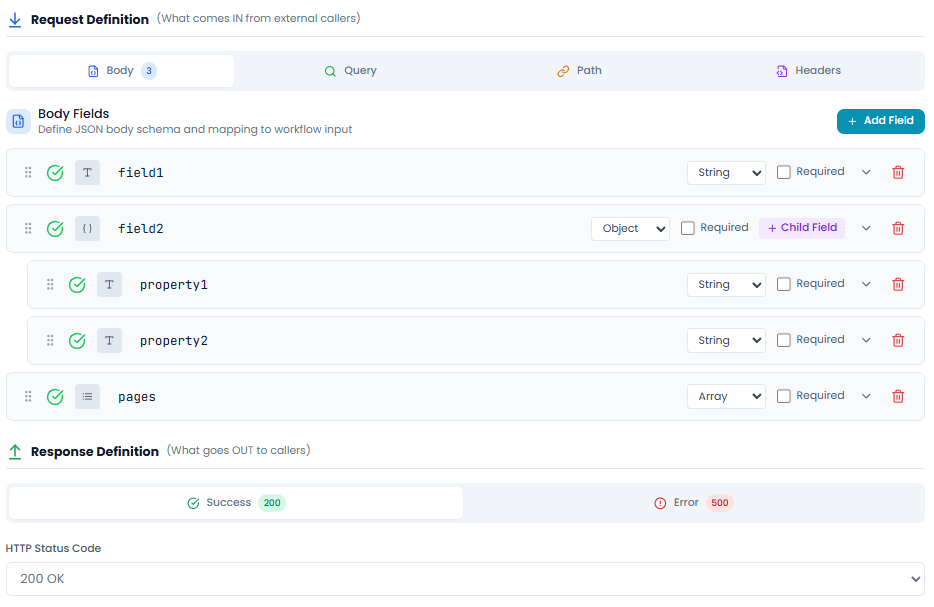
Request Definition
Define what data your API expects to receive from callers.
The Request Definition section includes four tabs:
Body - Define the JSON request body schema
- Add fields with the + Add Field button
- Specify field names, types, and requirements
- Create nested objects with + Child Field
- Support for all JSON data types: String, Number, Boolean, Object, Array
Query - Define URL query parameters
- Configure optional and required query params
- Specify data types and validation rules
Path - Define path parameters
- Extract variables from the URL path
- Type validation for path segments
Headers - Define expected HTTP headers
- Custom header requirements
- Standard headers (Authorization, Content-Type, etc.)
Example: Adding Body Fields
In the visual editor, you can see fields like:
field1(String)field2(Object) with nested properties:property1(String)property2(String)
Each field shows:
- Validation status (green checkmark)
- Field type icon (T for text, for object)
- Type dropdown (String, Object, Number, etc.)
- Required checkbox
- Delete button
Response Definition
Define what your API will return to callers.
The Response Definition section includes:
Success (200) - Define successful response structure
- HTTP Status Code: 200 OK (default)
- Response Fields with types and structure
Error (500) - Define error response structure
- HTTP Status Code: 500 (or customize)
- Error message format and fields
Response Fields
- Add fields for successful responses
- Define error response formats
- Specify field types and requirements
The interface shows "No response fields defined" when you haven't added any fields yet. Click + Add Field to start building your response contract.
OpenAPI Spec Mode
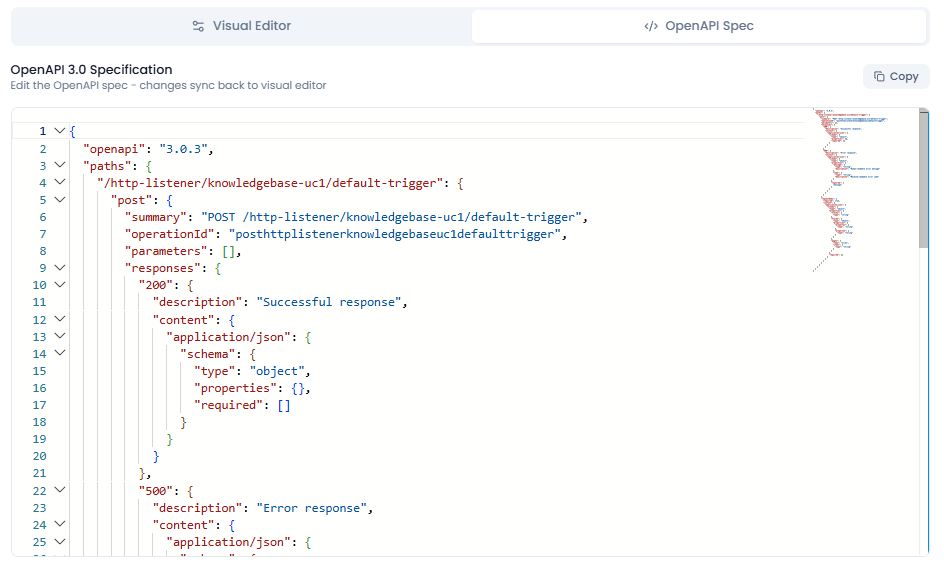
Switch to OpenAPI Spec tab to see the complete OpenAPI 3.0 specification in code format.
Features:
- Syntax highlighting - Color-coded JSON for easy reading
- Code folding - Collapse/expand sections with chevron icons
- Line numbers - Easy reference and navigation
- Real-time sync - Changes sync automatically with Visual Editor
- Copy button - Export the complete specification
- Minimap - Visual overview of the entire document (shown on right side)
OpenAPI 3.0 Specification Structure:
{
  "openapi": "3.0.3",
  "paths": {
    "/http-listener/knowledgebase-uc1/default-trigger": {
      "post": {
        "summary": "POST /http-listener/knowledgebase-uc1/default-trigger",
        "operationId": "posthttplistenerknowledgebaseuc1defaulttrigger",
        "parameters": [],
        "responses": {
          "200": {
            "description": "Successful response",
            "content": {
              "application/json": {
                "schema": {
                  "type": "object",
                  "properties": {}
                }
              }
            }
          }
        }
      }
    }
  }
}
Note: Edit the OpenAPI spec - changes sync back to visual editor. This bidirectional synchronization ensures consistency between both editing modes.
AI Copilot: Your API Design Assistant
The AI Copilot is the standout feature of the HTTP Listener Trigger, making API design accessible and efficient.

Opening the AI Copilot
Click the AI Copilot button in the top-right corner of the Contract section. A panel slides in from the left, giving you access to AI-powered contract generation.
How to Use AI Copilot
1. Describe your API in natural language
The AI Copilot provides example prompts to get you started:
- "User registration"
- "Create order"
- "Search API"
- "File upload"
Simply type what you want your API to do in plain English.
Example prompt:
Create an API for user registration that accepts email, password,
and optional phone number, and returns a user ID and success message
2. Get AI-generated contract
The AI analyzes your description and generates:
- Complete request body schema
- Response structure
- Appropriate field types and validations
- Nested objects where needed
- Required vs optional field designations
3. Review the generated contract
The AI Copilot displays the generated contract in a collapsible preview:
Generated Contract (3 fields)
Request Body
  field1: string
  field2: object
    property1: string
    property2: string
  pages: array (NEW)
    items: string
New fields are marked with a NEW badge for easy identification.
4. Apply changes
You have multiple options for applying AI-generated contracts based on the new changes generated by ai copilot:
- Apply All
- Apply Body
- Apply Response
- Apply Params
- Apply Header
Click your preferred option, and the changes instantly appear in both the Visual Editor and OpenAPI Spec views.
AI-Powered Error Detection and Fixing
The HTTP Listener Trigger includes sophisticated error detection that rivals professional IDEs.
Real-time Validation
As you edit in OpenAPI Spec mode, the system continuously validates your specification:
Error indicators:
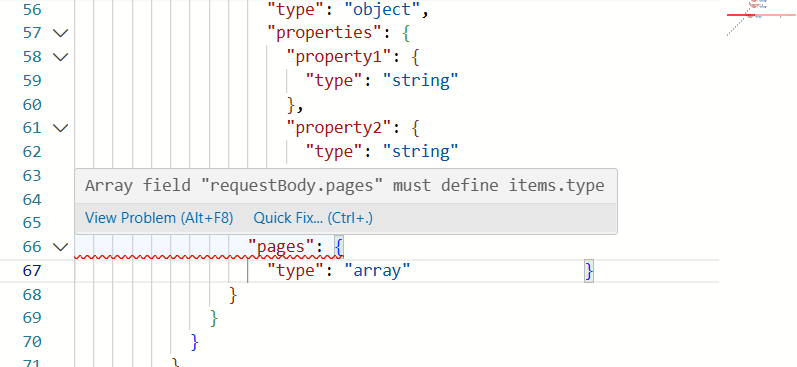
- Red underlines - Just like VS Code, errors are underlined in red
- Error count badge - "1 error to fix" badge shows total issues
- Hover tooltips - Hover over errors to see detailed descriptions
- Minimap markers - Errors show as red marks in the minimap
Example error:
Array field "requestBody.pages" must define items.typeQuick Fix Feature
When errors are detected, you can click Quick Fix to automatically generate an AI prompt for resolution.
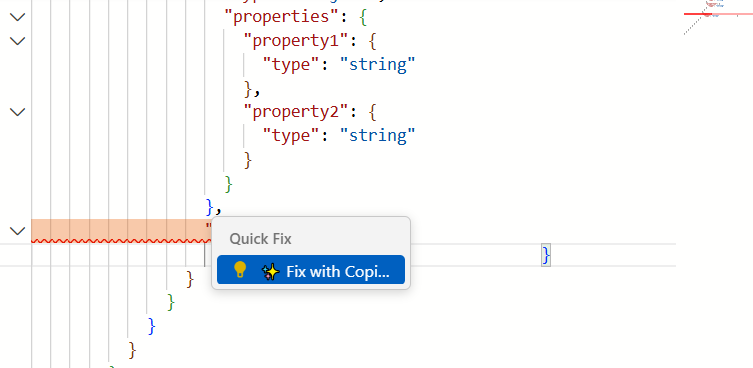
What happens when you click Quick Fix:
- The AI Copilot panel automatically opens (if not already open)
- A context-aware prompt is auto-generated and populated in the input field
- The prompt includes the specific error context
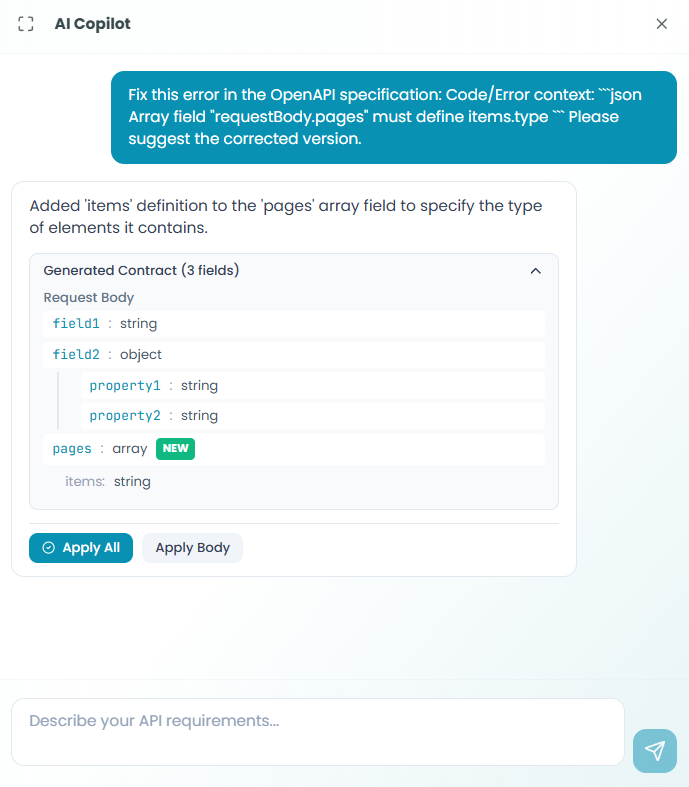
Example auto-generated prompt:
Fix this error in the OpenAPI specification:

Code/Error context:
`json
Array field 'requestBody.pages' must define items.type
...

Please suggest the corrected version.
The AI understands the error and generates a precise fix.
Applying AI-Generated Fixes
After the AI processes the error:
1. Review the fix
The AI Copilot displays:
- Clear explanation of the issue
- The corrected contract structure
- What was added or changed
Example AI response:
Added 'items' definition to the 'pages' array field to specify
the type of items it contains.

Generated Contract (3 fields)
Request Body
  field1: string
  field2: object
    property1: string
    property2: string
  pages: array
    items: string
2. Apply the fix
Click Apply All to apply the corrected contract. The fix is instantly applied to both:
- Visual Editor (fields update visually)
- OpenAPI Spec (code is corrected automatically)
3. Verification
After applying:
- Red error underlines disappear
- Error count badge is removed
- The contract passes validation
- Both editing modes show the corrected structure
AI Copilot Best Practices
Be specific in descriptions
- Include field names and types you want
- Specify which fields are required vs optional
- Mention any validation requirements
- Describe nested structures clearly
Iterate with AI
- Start with a basic description
- Review the generated contract
- Refine with follow-up prompts
- Build complex APIs incrementally
Leverage Quick Fix
- Don't manually debug OpenAPI errors
- Click Quick Fix for intelligent error resolution
- Let AI explain what's wrong and how to fix it
- Learn OpenAPI best practices through AI suggestions
Combine manual and AI editing
- Use AI for initial contract generation
- Fine-tune details in Visual Editor
- Verify in OpenAPI Spec mode
- Add AI-generated improvements as needed
Contract Validation
The system performs comprehensive validation on your API contract:
Visual Editor validation:
- Field type consistency
- Required field completeness
- Nested structure validity
- Data type compatibility
OpenAPI Spec validation:
- Schema compliance with OpenAPI 3.0
- Required property definitions
- Format and structure correctness
- Referenced component validity
Common validation errors:
- Missing required properties
- Invalid data type definitions
- Incomplete array item specifications
- Malformed nested objects
- Invalid OpenAPI syntax
All errors are highlighted in real-time, allowing you to fix issues before deploying.
Preview and Export
Preview - Click the Preview button to see how your API documentation will appear
Export OpenAPI - Click Export OpenAPI to download the complete OpenAPI 3.0 specification file
This exported file can be:
- Imported into API documentation tools (Swagger UI, Redoc)
- Shared with API consumers
- Used for API testing tools (Postman, Insomnia)
- Stored in version control
The field count (e.g., "4 fields") helps you track contract complexity at a glance.
Click Next to configure response mode.
Step 4: Response Mode
Configure how your HTTP endpoint responds to incoming requests. The response mode determines the interaction pattern between the caller and your workflow.
Response mode options include:
Synchronous Response - Wait for workflow completion before responding
- Returns final workflow results to the caller
- Best for quick operations under timeout limit
- Provides immediate feedback with results
Asynchronous Response - Acknowledge immediately, process in background
- Returns 202 Accepted status immediately
- Workflow continues processing after response
- Ideal for long-running operations
Custom Response Handling - Use ResponseToWebhook nodes in your workflow
- Full control over when and what to respond
- Support complex response scenarios
- Advanced use cases with conditional responses
Choose the response mode that best fits your API's requirements and expected execution time.
Click Next to proceed to testing.
Step 5: Test & Deploy
Verify your HTTP Listener configuration and deploy your API endpoint.
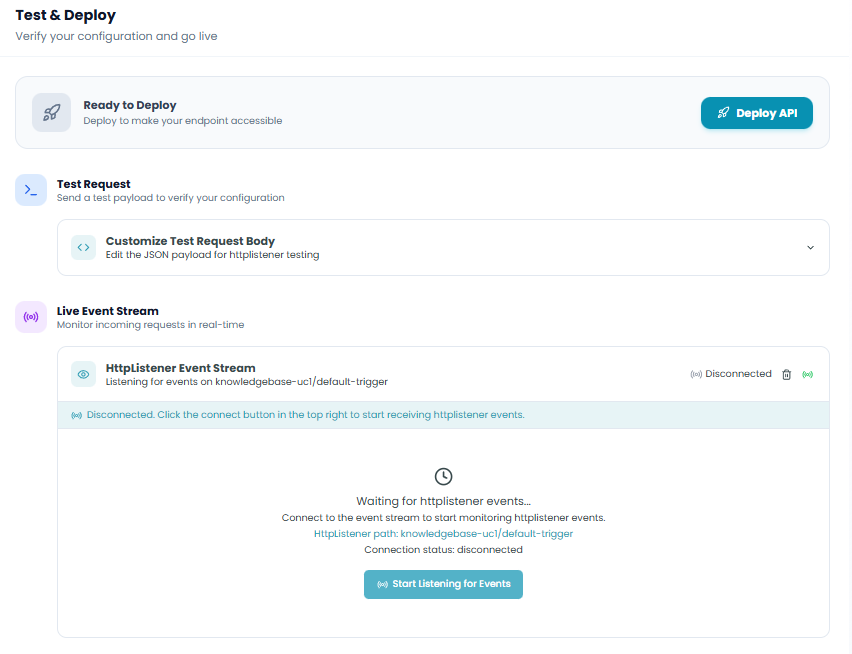
Ready to Deploy
Deploy to make your endpoint accessible
Click the Deploy API button to:
- Register the endpoint with the API gateway
- Activate authentication and security rules
- Make the endpoint accessible to external systems
- Enable request routing to your workflow
The deployment process configures all the settings you defined in previous steps.
Test Request
Send a test payload to verify your configuration
The Test Request section allows you to:
Customize Test Request Body
- Click to expand the test request panel
- Edit the JSON payload for httplistener testing
- Ensure the payload matches your contract definition
- Include all required fields from your request schema
Send test requests to verify:
- Request validation works correctly
- Response structure matches your contract
- Authentication is properly configured
- Workflow execution completes as expected
Live Event Stream
Monitor incoming requests in real-time
The Live Event Stream provides real-time monitoring:
HttpListener Event Stream
- Shows connection status (Disconnected/Connected)
- Displays the listening endpoint path
- Real-time event notifications
Connection controls:
- Trash icon - Clear event log
- Connection toggle - Start/stop listening
- Audio notifications toggle
When disconnected:
- Message: "Disconnected. Click the connect button in the top right to start receiving httplistener events."
- Shows the HttpListener path being monitored
- Displays connection status
Waiting for events:
- Loading indicator appears
- Message: "Waiting for httplistener events..."
- Instructions to connect to the event stream
- Current path:
knowledgebase-uc1/default-trigger - Connection status: disconnected
Start listening:
Click Start Listening for Events button to:
- Establish SSE (Server-Sent Events) connection
- Begin receiving real-time event notifications
- Monitor incoming HTTP requests
- View request and response data
What you'll see when events arrive:
- Event type (request, response, error)
- Timestamp for each event
- Expandable event details
- Request payload data
- Response status and data
This live monitoring helps you:
- Verify requests are reaching your endpoint
- Debug request/response issues
- Monitor API usage in real-time
- Validate contract compliance
- Test end-to-end integration
Click Complete to finish configuration.
Using the HTTP Listener in Your Workflow
After configuration is complete:
- The HTTP Listener Trigger node appears at the start of your workflow
- Deploy your workflow and the API endpoint
- External systems can send HTTP requests to your endpoint
- Each valid request triggers workflow execution
- Request data is validated against your contract
- Response is returned according to your contract definition
Accessing Request Data
The HTTP Listener makes request data available to downstream nodes:
Available data includes:
- Body - Parsed JSON request body (validated against contract)
- Query parameters - URL query string values
- Path parameters - Variables extracted from URL path
- Headers - HTTP request headers
- Metadata - Request timestamp, correlation ID, etc.
All data is typed and validated according to your API contract, ensuring data quality throughout your workflow.
Best Practices
API Contract Design
- Start with AI - Use AI Copilot to generate initial contract structure
- Validate early - Fix errors as they appear using Quick Fix
- Be explicit - Define all required fields clearly in your contract
- Use meaningful names - Choose descriptive field names that indicate purpose
- Document your API - Use the OpenAPI description fields for documentation
- Version your contracts - Consider versioning strategy for API evolution
AI Copilot Usage
- Be specific - Provide detailed descriptions for better AI-generated contracts
- Iterate - Refine AI suggestions with follow-up prompts
- Review before applying - Always review AI-generated contracts before applying
- Learn from AI - Study AI-generated OpenAPI specs to learn best practices
- Use Quick Fix liberally - Let AI help you resolve validation errors
- Combine approaches - Mix AI generation with manual refinement
Contract Validation
- Test both modes - Verify your contract in both Visual Editor and OpenAPI Spec
- Use Preview - Check how your API documentation will appear
- Export and review - Export OpenAPI spec for external validation
- Validate data types - Ensure field types match your workflow needs
- Define error responses - Don't forget to specify error response schemas
Security and Performance
- Always use authentication - Never deploy public APIs without authentication
- Set appropriate timeouts - Match timeout to expected execution time
- Rate limit - Protect your endpoint from abuse with rate limiting
- Validate input - Rely on your contract validation to ensure data quality
- Monitor usage - Use Live Event Stream to watch for unusual patterns
Testing Strategy
- Test with contract-compliant data - Ensure test payloads match your schema
- Test validation - Send invalid data to verify contract enforcement
- Test all HTTP methods - Verify each enabled method works correctly
- Monitor event stream - Watch requests in real-time during testing
- Test error scenarios - Verify error responses match your contract
Advanced Features
Complex Data Structures
The Visual Editor and AI Copilot support sophisticated data structures:
Nested Objects
- Create hierarchical data models
- Define object properties at any depth
- Use "+ Child Field" for nested properties
Arrays
- Define array fields with item types
- Support arrays of primitives or objects
- Specify array item schemas
Mixed Types
- Combine strings, numbers, booleans, objects, and arrays
- Create complex request/response contracts
- Model real-world data structures
OpenAPI 3.0 Compliance
The HTTP Listener generates fully compliant OpenAPI 3.0 specifications:
- Standard format - Compatible with all OpenAPI tools
- Complete documentation - Includes descriptions, examples, schemas
- Extensible - Add custom OpenAPI extensions
- Portable - Export and use in any OpenAPI-compatible system
Bidirectional Synchronization
The Visual Editor and OpenAPI Spec stay perfectly synchronized:
- Edit visually - Changes appear instantly in OpenAPI Spec
- Edit code - Changes reflect immediately in Visual Editor
- No conflicts - Synchronization is automatic and seamless
- Choose your preference - Work in the mode that suits you best
Troubleshooting
Contract Validation Errors
Problem: Red underlines in OpenAPI Spec
Solutions:
- Hover over the error to see the description
- Click Quick Fix to auto-generate an AI prompt
- Let AI Copilot suggest the correction
- Apply the fix with Apply All
Problem: Fields not showing in Visual Editor
Solutions:
- Check OpenAPI Spec for syntax errors
- Ensure proper JSON structure
- Verify field definitions are complete
- Switch to OpenAPI Spec to identify issues
AI Copilot Issues
Problem: AI generates incorrect contract
Solutions:
- Provide more specific description
- Include field names and types explicitly
- Use follow-up prompts to refine
- Manually adjust in Visual Editor after applying
Problem: Quick Fix doesn't work
Solutions:
- Ensure error is selected correctly
- Check that AI Copilot panel opened
- Manually copy error context if needed
- Review generated prompt before sending
Deployment Issues
Problem: API not accessible after deployment
Solutions:
- Verify workflow is published
- Check "Deploy API" was clicked
- Confirm endpoint URL is correct
- Review security settings for authentication
Problem: Requests fail validation
Solutions:
- Compare request payload to contract schema
- Check required fields are present
- Verify data types match contract
- Review error messages for specifics
Testing Issues
Problem: Test request fails
Solutions:
- Ensure test payload matches contract
- Check required fields are included
- Verify authentication credentials
- Review Live Event Stream for errors
Problem: Event stream not showing events
Solutions:
- Click "Start Listening for Events" button
- Verify endpoint is deployed
- Check workflow is published
- Ensure requests are reaching the endpoint
Monitoring and Debugging
Contract Validation
- Visual indicators - Green checkmarks show valid fields
- Error highlighting - Red underlines mark issues
- Error count - Badge shows total errors to fix
- Quick Fix - One-click error resolution
Request Monitoring
- Live Event Stream - Real-time request/response monitoring
- Event details - Expandable event information
- Timestamps - Track when requests occur
- Connection status - Know when monitoring is active
API Documentation
- Preview - See formatted API documentation
- Export OpenAPI - Generate complete specification file
- Field count - Track contract complexity
- Version tracking - Monitor contract changes
For comprehensive execution monitoring, see the Traceability documentation.
Next Steps
After setting up your HTTP Listener Trigger:
- Design your API contract - Use AI Copilot to create a professional contract
- Validate thoroughly - Fix any errors using Quick Fix and AI assistance
- Add processing nodes - Build your workflow to handle requests
- Test with real data - Send test requests and monitor the event stream
- Export documentation - Generate OpenAPI spec for API consumers
- Deploy to production - Publish workflow and deploy the API endpoint
- Monitor usage - Track requests and optimize performance
The HTTP Listener Trigger combines the power of professional API design with the simplicity of AI-assisted development, enabling you to build production-grade APIs in minutes rather than hours.