Webhook Trigger
Trigger workflows via HTTP webhook endpoints with custom authentication and response handling
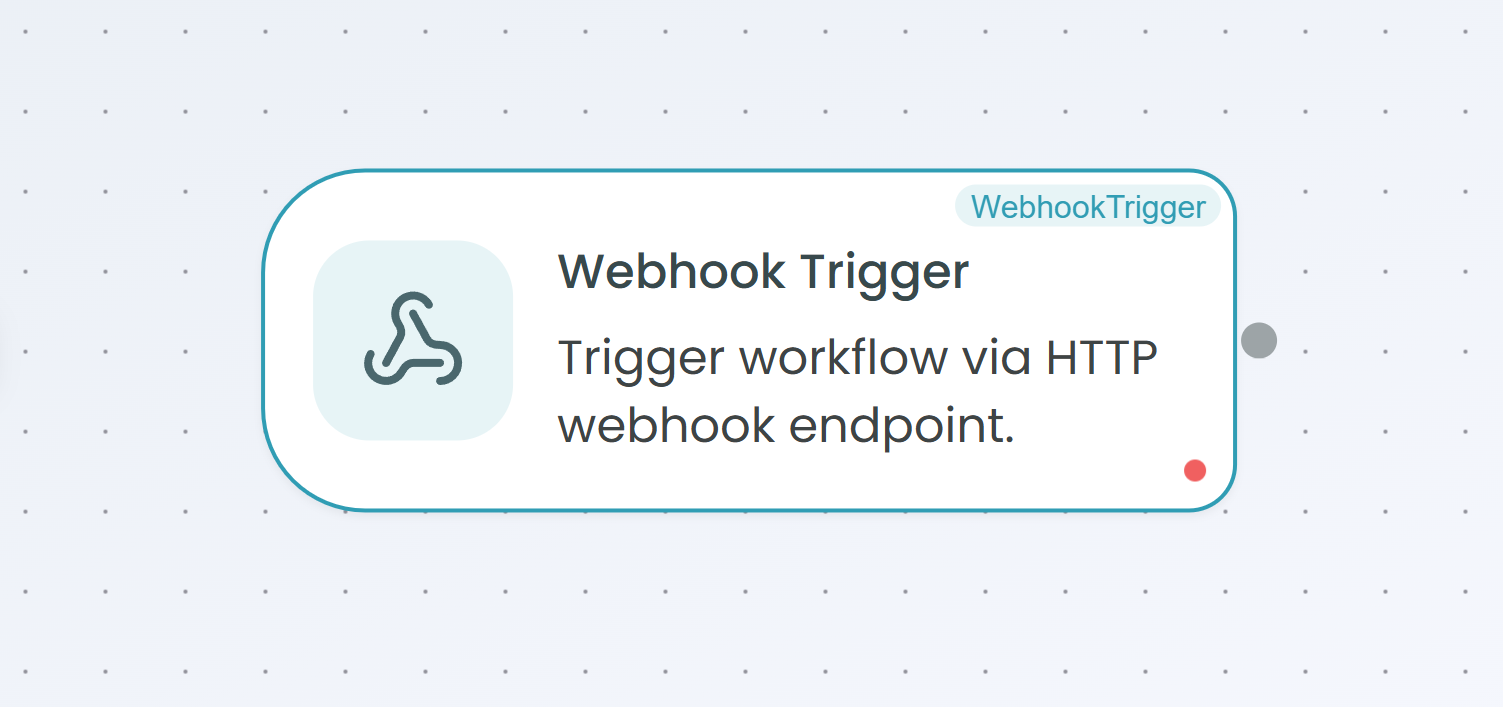
The Webhook Trigger node allows you to expose HTTP endpoints that can trigger your workflows. This node creates a customizable REST API endpoint that accepts incoming HTTP requests, enabling seamless integration with any external system or service that can make HTTP calls.
Why Use Webhook Trigger?
The Webhook Trigger is ideal when you need to:
- Create custom API endpoints - Build your own REST APIs that trigger workflow automation
- Integrate with any system - Accept HTTP requests from any service, tool, or application
- Control authentication - Secure your endpoints with API keys, Bearer tokens, or OAuth 2.0
- Handle diverse data formats - Process incoming requests with flexible input/output schemas
- Customize response behavior - Choose how and when to respond to incoming requests
Use Cases
Common scenarios for using the Webhook Trigger include:
- Building internal APIs for microservices architecture
- Creating webhook endpoints for third-party integrations
- Developing custom automation endpoints for external tools
- Implementing event-driven architectures
- Exposing data processing pipelines as HTTP services
Configuration Steps
Setting up the Webhook Trigger involves 5 comprehensive steps. The configuration panel guides you through each step, showing your progress at the top.
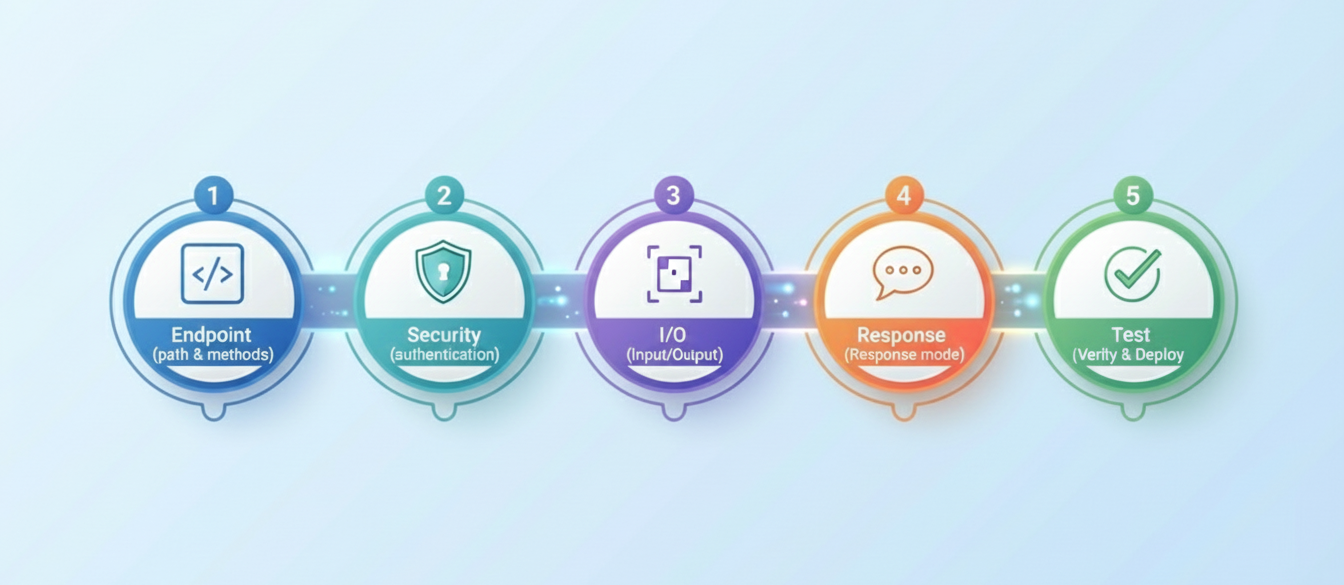
Step 1: Endpoint Configuration
The first step defines how external systems will access your webhook endpoint.
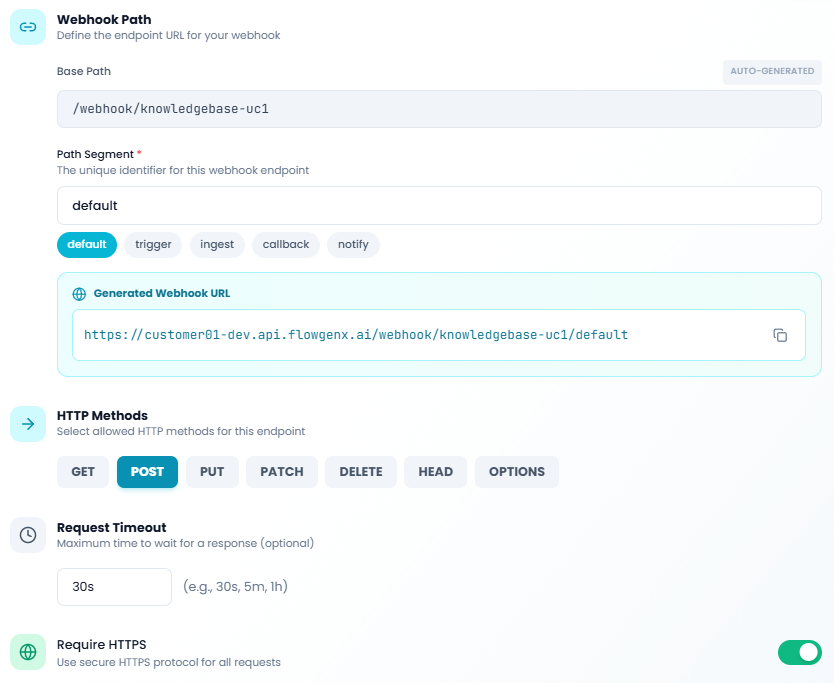
Webhook Path
Base Path - Auto-generated based on your tenant, environment, and workflow name. This path is read-only and provides the foundation for your webhook URL.
Example: /webhook/knowledgebase-uc1
Path Segment - The unique identifier for this webhook endpoint. You can choose from predefined options or create a custom path:
default- Standard webhook endpointtrigger- Trigger-specific endpointingest- Data ingestion endpointcallback- Callback handler endpointnotify- Notification endpoint- Custom value - Enter any valid path segment
Generated Webhook URL - The complete endpoint URL that external systems will use to trigger your workflow. This URL is automatically constructed from the base path and path segment.
Example: https://customer01-dev.api.flowgenx.ai/webhook/knowledgebase-uc1/default
HTTP Methods
Select which HTTP methods your endpoint will accept. You can enable multiple methods:
- GET - Retrieve or query data
- POST - Submit new data (most common for webhooks)
- PUT - Update or replace existing data
- PATCH - Partially update data
- DELETE - Remove data
- HEAD - Retrieve headers only
- OPTIONS - Query supported methods
Tip: For most webhook scenarios, POST is the primary method used. Enable only the methods you actually need to improve security.
Request Timeout
Maximum time to wait for a response - Specify how long the endpoint should wait before timing out (optional).
Default: 30s
Accepted formats: 30s, 5m, 1h
This setting prevents requests from hanging indefinitely and ensures your workflow responds in a timely manner.
Require HTTPS
Use secure HTTPS protocol for all requests - When enabled, all requests must use HTTPS for enhanced security. This is strongly recommended for production environments.
Toggle this option on to enforce secure connections.
Click Next to proceed to security configuration.
Step 2: Security Settings
Configure authentication and access control for your webhook endpoint to ensure only authorized clients can trigger your workflow.
Require Authentication
Protect this endpoint with authentication - Toggle this on to require authentication for all incoming requests. When enabled, requests without valid credentials will be rejected.
Important: Always enable authentication for production webhooks to prevent unauthorized access.
Authentication Method
Choose how clients will authenticate with your webhook:
API Key - Authenticate via X-API-Key header
- Simple and straightforward authentication method
- Client sends API key in the
X-API-Keyheader - Ideal for server-to-server integrations
- Easy to implement and manage
Bearer Token - JWT or Bearer token authentication
- Token-based authentication using the
Authorization: Bearer <token>header - Supports JWT tokens for stateless authentication
- Common in OAuth flows and modern APIs
OAuth 2.0 - OAuth 2.0 with scopes
- Full OAuth 2.0 authentication flow
- Supports scope-based access control
- Most secure option for third-party integrations
- Requires OAuth provider configuration
Select the authentication method that matches your security requirements and client capabilities.
Rate Limiting
Limit requests per minute - Prevent abuse by limiting how many requests can be made to your endpoint within a time window.
Enter the maximum number of requests allowed per minute, or leave blank for no limit.
Example: 60 requests/minute
Best practice: Set rate limits based on your expected traffic patterns and system capacity. This protects your workflow from accidental or malicious overload.
Enable CORS
Allow cross-origin requests from browsers - When enabled, your webhook will include CORS headers, allowing web browsers to make direct requests to your endpoint.
Toggle this on if:
- Your webhook will be called from web applications
- You need to support client-side JavaScript requests
- You're building a browser-based integration
Note: CORS is typically not needed for server-to-server integrations.
Click Next to configure input and output mapping.
Step 3: Input/Output Mapping
Define how incoming request data should be processed and what data structure your workflow will work with.
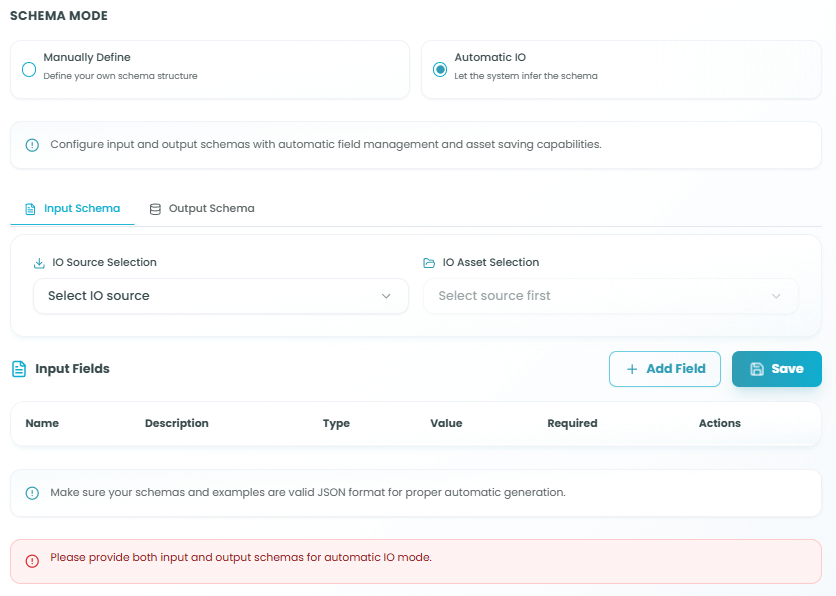
Schema Mode
Choose how you want to define the data structure for your webhook:
Manually Define - Define your own schema structure
- Full control over input and output schemas
- Create custom field definitions
- Specify data types, validation rules, and requirements
- Best for well-defined data contracts
Automatic IO - Let the system infer the schema
- System automatically generates schemas based on incoming requests
- Flexible and adaptable to varying data structures
- Automatic field management and asset saving capabilities
- Ideal for dynamic or evolving data formats
Note: Configure input and output schemas with automatic field management and asset saving capabilities. Make sure your schemas and examples are valid JSON format for proper automatic generation.
Input Schema
The Input Schema tab allows you to define what data your webhook expects to receive.
IO Source Selection - Choose where the input data comes from:
- Select from predefined sources
- Configure custom data sources
- Map to existing data models
Input Fields Table - Define individual fields in your input schema:
| Column | Description |
|---|---|
| Name | Field identifier (e.g., userId, email, timestamp) |
| Description | Human-readable explanation of the field's purpose |
| Type | Data type (string, number, boolean, object, array, etc.) |
| Value | Default or example value for testing |
| Required | Whether the field must be present in requests |
| Actions | Add, edit, or remove field definitions |
Click + Add Field to add new fields to your schema.
Output Schema
The Output Schema tab defines what data structure your workflow will output. This is particularly important when using synchronous response modes where the caller expects structured data back.
IO Asset Selection - Choose the output data destination or format.
Configure output fields similarly to input fields, defining the structure of data that will be returned to the webhook caller.
Validation
Important: Please provide both input and output schemas for automatic IO mode. The system validates that schemas are in proper JSON format for automatic generation.
Common validation messages:
- "Please provide both input and output schemas for automatic IO mode"
- "Make sure your schemas and examples are valid JSON format"
Click Next to configure response handling.
Step 4: Response Mode
Configure how your webhook responds to incoming requests. This step is crucial for defining the interaction pattern between the caller and your workflow.
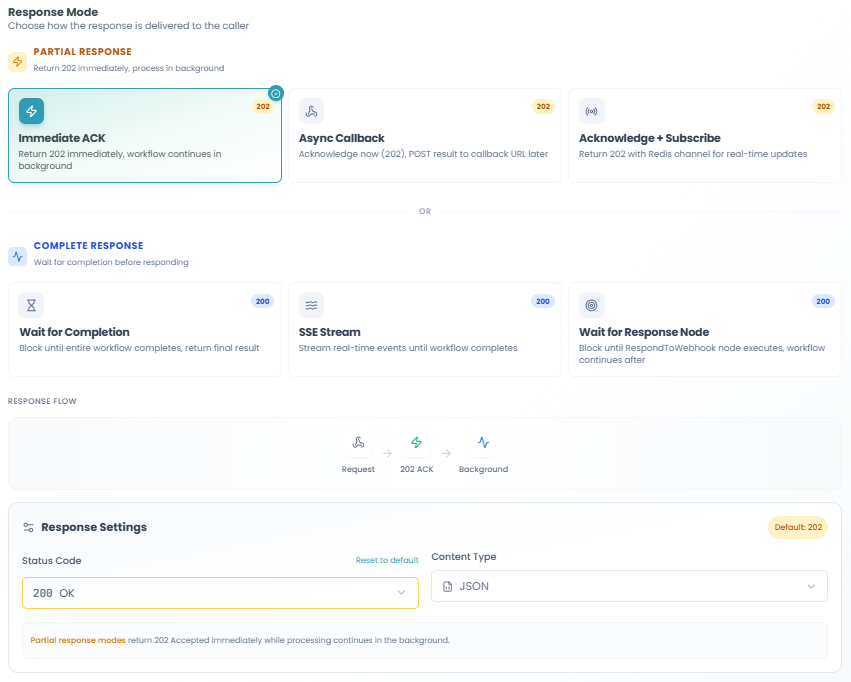
Response Mode Categories
Choose how the response is delivered to the caller:
PARTIAL RESPONSE - Return 202 immediately, process in background
- Workflow continues processing after sending initial response
- Ideal for long-running operations
- Prevents client timeout issues
COMPLETE RESPONSE - Wait for completion before responding
- Workflow completes entirely before returning response
- Returns final result to the caller
- Best for synchronous operations
Partial Response Options
Immediate ACK (202 status code)
- Return 202 immediately, workflow continues in background
- Fastest response time
- No result data returned to caller
- Use when caller doesn't need workflow results
Async Callback (202 status code)
- Acknowledge now (202), POST result to callback URL later
- Caller provides callback URL in request
- Workflow posts results when complete
- Ideal for asynchronous integrations
Acknowledge + Subscribe (202 status code)
- Return 202 with Redis channel for real-time updates
- Caller can subscribe to receive progress updates
- Supports real-time monitoring of workflow execution
- Advanced option for event-driven architectures
Complete Response Options
Wait for Completion (200 status code)
- Block until entire workflow completes, return final result
- Caller waits for full workflow execution
- Returns complete workflow output
- Best for short-running workflows
SSE Stream (200 status code)
- Stream real-time responses until workflow completes
- Server-Sent Events for progressive updates
- Caller receives updates as workflow progresses
- Ideal for long operations with intermediate results
Wait for Response Node (200 status code)
- Block until ResponseToWebhook node executes, workflow continues after
- Workflow controls exactly when to respond
- Allows custom response timing and content
- Maximum flexibility for complex response scenarios
Response Flow
The interface displays a visual representation of the response flow:
Request → 202 ACK → BackgroundThis diagram shows how the request is acknowledged and then processed asynchronously.
Response Settings
Configure the HTTP response details:
Status Code - HTTP status code to return (default: varies by response mode)
200 OK- Successful request (complete response modes)202 Accepted- Request accepted for processing (partial response modes)204 No Content- Success with no response body- Custom codes as needed
Click "Reset to default" to restore the recommended status code for your selected response mode.
Content Type - Format of the response body
JSON- Application/json (most common)XML- Application/xmlPlain Text- Text/plainHTML- Text/html- Other MIME types
Note: Partial response modes return 202 Accepted immediately while processing continues in the background.
Custom Response Headers
Add custom HTTP headers to your webhook responses:
Pre-configured Headers:
- X-Correlation-ID - Unique identifier for request tracing
- X-Request-ID - Request-specific identifier
- X-Timestamp - Response timestamp
Toggle each header on/off as needed.
Adding Custom Headers:
Click + Add Header to add custom response headers. This is useful for:
- Adding tracking identifiers
- Setting cache control policies
- Including API version information
- Custom application headers
Tip: Use correlation IDs to track requests across distributed systems and troubleshoot issues more effectively.
Click Next to proceed to testing.
Step 5: Test & Deploy
The final step allows you to verify your webhook configuration and test it before deploying to production.
Workflow Status
Check if workflow is published for live testing
The workflow status panel displays whether your workflow is ready for testing:
Not Published - Workflow must be published before testing
- Shows warning banner
- Displays message: "Testing will fail until workflow is published"
- Explains that the webhook endpoint may exist in Kong, but the workflow engine will return a "workflow not found" error
Important: The webhook endpoint may exist in Kong, but the workflow engine will return a 'workflow not found' error because the workflow hasn't been deployed.
Use the Publish button in the canvas toolbar to deploy your workflow.
Ready to Deploy
Deploy to make your endpoint accessible
Once your workflow is configured, you can deploy it to activate the webhook endpoint.
Click Deploy API to:
- Register the webhook endpoint with the API gateway (Kong)
- Activate authentication and security rules
- Make the endpoint accessible to external systems
- Enable request routing to your workflow
This deployment is separate from workflow publishing and specifically handles the API gateway configuration.
Test Credentials
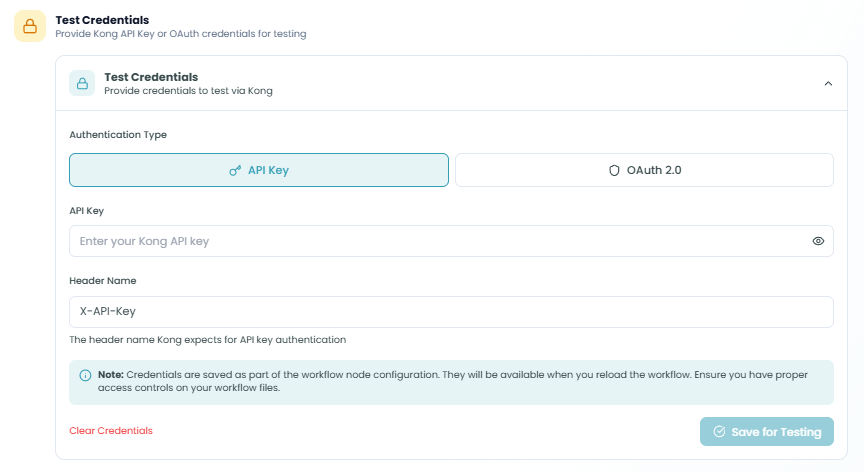
Provide Kong API Key or OAuth credentials for testing
Before you can send test requests, configure authentication credentials:
Authentication Type
Choose the authentication method that matches your Step 2 configuration:
- API Key - Use X-API-Key header authentication
- OAuth 2.0 - Use OAuth token authentication
For API Key Authentication:
-
API Key - Enter your Kong API key
- This is the key that will be sent in the
X-API-Keyheader - Click the eye icon to show/hide the key value
- This is the key that will be sent in the
-
Header Name - Specify the header name Kong expects (default:
X-API-Key)- The header name Kong expects for API key authentication
- Usually
X-API-Keyunless customized
Important Note: Credentials are saved as part of the workflow node configuration. They will be available when you reload the workflow. Ensure you have proper access controls on your workflow files.
Click Save for Testing to store your credentials and enable the test request feature.
Click Clear Credentials to remove saved authentication details.
Test Request
Send a test request through Kong gateway
Once credentials are configured, you can test your webhook endpoint:
Test Endpoint - Displays the full webhook URL that will receive your test request
Example: POST https://customer01-dev.api.flowgenx.ai/webhook/knowledgebase-uc1/default
Click the copy icon to copy the endpoint URL.
Request Body - Expand this section to configure the test payload
Define the JSON body that will be sent with your test request. This should match the input schema you defined in Step 3.
Send Test Request - Click this button to send your test request
The button will:
- Send an HTTP request to your webhook endpoint
- Include your authentication credentials
- Use the configured request body
- Display the response below
Note: You must configure test credentials before this button becomes enabled.
Live Event Stream
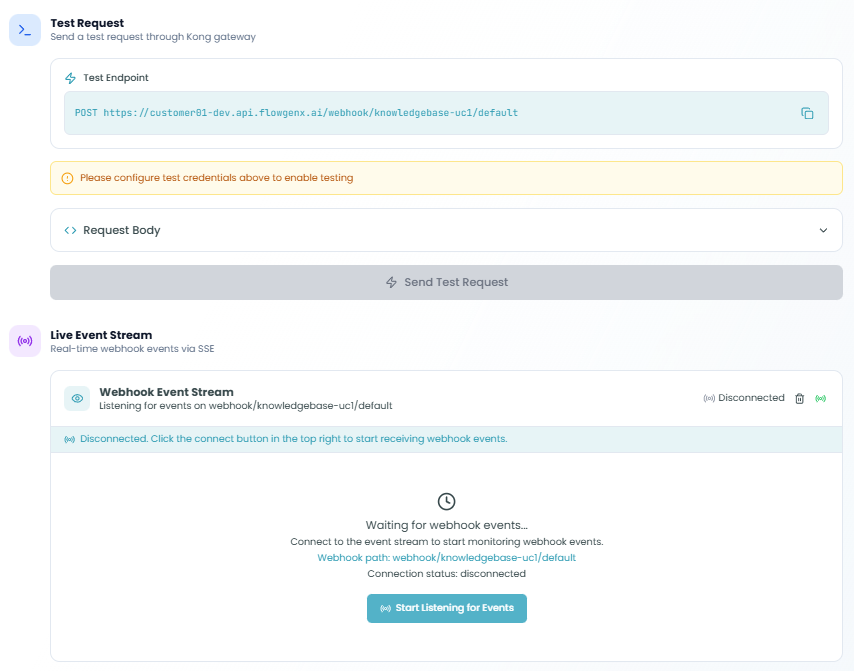
Real-time webhook events via SSE
The Live Event Stream provides real-time monitoring of webhook requests:
Webhook Event Stream
Status indicators:
- Disconnected - Not currently listening for events
- Connected - Actively monitoring webhook traffic
Connection Controls:
- Trash icon - Clear the event log
- Microphone icon - Audio notifications toggle
- Connection status badge
When disconnected, you'll see:
- Message: "Disconnected. Click the connect button in the top right to start receiving webhook events."
- Webhook path being monitored
- Connection status
Waiting for Events:
After connecting, the stream displays:
- Loading indicator
- "Waiting for webhook events..." message
- Instructions: "Connect to the event stream to start monitoring webhook events"
- Current webhook path
- Connection status: disconnected
Connecting to the Stream:
Click the connection button to:
- Establish SSE connection
- Start receiving real-time events
- Monitor incoming webhook requests
- View request and response data
Example Event Display:
Once connected and receiving events, you'll see:
- Event type (connected, request, response)
- Timestamp for each event
- Event details (expandable)
- Connection duration
- Event count statistics
This live monitoring helps you:
- Verify webhook requests are being received
- Inspect request payloads in real-time
- Debug authentication issues
- Validate response behavior
- Monitor webhook health
Click Complete to finish configuration and close the drawer.
Using the Webhook Trigger in Your Workflow
After configuration is complete:
- The Webhook Trigger node will appear at the start of your workflow
- Deploy your workflow to activate the endpoint
- External systems can send HTTP requests to your webhook URL
- Each request will trigger workflow execution
- Request data will be available to all subsequent nodes
- Response will be sent according to your configured response mode
Accessing Request Data
The webhook request data is available in downstream nodes through the Webhook Trigger node's output:
Available data includes:
- Request body (parsed based on Content-Type)
- Request headers
- Query parameters
- Path parameters
- Request metadata (timestamp, correlation ID, etc.)
Reference this data in subsequent nodes using the standard node output syntax.
Best Practices
Endpoint Design
- Use meaningful path segments - Choose descriptive paths that indicate the endpoint's purpose
- Follow REST conventions - Use appropriate HTTP methods (POST for creating, GET for retrieving, etc.)
- Version your APIs - Include version information in the path or headers for future compatibility
- Keep paths simple - Avoid overly complex URL structures
Security
- Always require authentication - Never expose public webhooks without authentication in production
- Use HTTPS in production - Enforce secure connections to protect data in transit
- Implement rate limiting - Protect your workflows from abuse and accidental overload
- Rotate credentials regularly - Update API keys and tokens periodically
- Use least privilege - Grant only necessary permissions to webhook consumers
- Validate input data - Always validate and sanitize incoming request data
Response Strategy
- Choose appropriate response modes - Use partial responses for long-running workflows, complete responses for quick operations
- Set realistic timeouts - Configure timeout values based on actual workflow execution time
- Return meaningful status codes - Use standard HTTP status codes correctly
- Include correlation IDs - Add tracking headers for request tracing and debugging
- Document your API - Provide clear documentation for webhook consumers
Schema Management
- Define clear schemas - Use well-defined input/output schemas for better validation
- Use automatic IO for flexibility - When data structures vary, leverage automatic schema inference
- Validate JSON format - Ensure schemas are valid JSON before saving
- Document required fields - Clearly mark which fields are mandatory
- Provide examples - Include example payloads in your documentation
Testing
- Test before deployment - Always verify webhook behavior in the Test step
- Use realistic test data - Test with data that matches production scenarios
- Verify authentication - Ensure authentication works correctly before going live
- Monitor the event stream - Watch for incoming requests during testing
- Test error scenarios - Verify how your webhook handles invalid requests and errors
- Check response payloads - Validate that responses contain expected data
Performance
- Use partial responses for long workflows - Don't make clients wait for lengthy operations
- Implement caching - Cache responses when appropriate to reduce load
- Monitor rate limits - Track request patterns to optimize rate limit settings
- Optimize workflow logic - Keep webhook-triggered workflows efficient
Common Integration Patterns
Asynchronous Processing
For long-running workflows:
- Use Immediate ACK response mode
- Return 202 Accepted immediately
- Process workflow in background
- Optionally notify completion via callback
Synchronous API
For real-time data processing:
- Use Wait for Completion response mode
- Keep workflow execution under timeout limit
- Return processed data directly
- Use appropriate HTTP status codes
Event Streaming
For progressive updates:
- Use SSE Stream response mode
- Stream updates as workflow progresses
- Close connection when complete
- Client handles server-sent events
Callback Pattern
For decoupled integrations:
- Use Async Callback response mode
- Client provides callback URL
- Workflow posts results when complete
- Supports fire-and-forget patterns
Troubleshooting
Connection Issues
Problem: Cannot connect to webhook endpoint
- Solution: Verify the endpoint URL is correct
- Solution: Check that the workflow is published and deployed
- Solution: Ensure network connectivity to the FlowGenX platform
Problem: SSL/TLS errors
- Solution: Verify HTTPS is properly configured
- Solution: Check certificate validity
- Solution: Ensure client supports required TLS version
Authentication Issues
Problem: 401 Unauthorized errors
- Solution: Verify API key or token is correct
- Solution: Check that authentication is configured in Step 2
- Solution: Ensure header name matches configuration (e.g.,
X-API-Key)
Problem: 403 Forbidden errors
- Solution: Verify credentials have necessary permissions
- Solution: Check rate limiting settings
- Solution: Ensure CORS is enabled if calling from browser
Request Failures
Problem: 404 Not Found errors
- Solution: Verify the webhook path is correct
- Solution: Ensure API is deployed via "Deploy API" button
- Solution: Check that path segment matches configuration
Problem: 408 Request Timeout errors
- Solution: Increase request timeout value
- Solution: Optimize workflow to execute faster
- Solution: Consider using partial response mode
Problem: 500 Internal Server Error
- Solution: Check workflow execution logs for errors
- Solution: Verify input data matches expected schema
- Solution: Review workflow node configurations
Data Issues
Problem: Missing or incorrect data
- Solution: Verify request body matches input schema
- Solution: Check Content-Type header is set correctly
- Solution: Review field mapping in I/O configuration
Problem: Schema validation errors
- Solution: Ensure JSON format is valid
- Solution: Check required fields are present
- Solution: Verify data types match schema definition
Testing Issues
Problem: Test credentials not working
- Solution: Verify credentials are saved ("Save for Testing")
- Solution: Check authentication type matches Step 2 configuration
- Solution: Ensure API key has necessary permissions
Problem: Event stream not showing events
- Solution: Click connect button to establish SSE connection
- Solution: Verify workflow is published
- Solution: Check browser console for connection errors
Monitoring and Debugging
Execution Monitoring
Once your workflow is deployed, monitor webhook executions:
- Navigate to Flow Management → Event Driven Workflows
- View all workflow runs triggered by webhook requests
- Click individual runs for detailed execution logs
- Review request/response data for each execution
- Use correlation IDs to trace requests across systems
Debugging Tools
Live Event Stream - Real-time monitoring of webhook requests
- View incoming requests as they arrive
- Inspect request headers and body
- See response status and timing
- Track connection status
Test Request - Controlled testing environment
- Send custom test payloads
- Verify authentication configuration
- Check response format and content
- Debug schema mapping issues
Workflow Execution Logs - Detailed execution history
- See complete workflow execution path
- Review node-by-node data flow
- Identify errors and bottlenecks
- Replay executions for analysis
For more information on monitoring and debugging, see the Traceability documentation.
Advanced Configuration
Custom Response Timing
Use the Wait for Response Node mode with a ResponseToWebhook node in your workflow to:
- Control exactly when the response is sent
- Build custom response payloads dynamically
- Implement conditional response logic
- Support complex multi-step response patterns
Multi-Method Endpoints
Enable multiple HTTP methods on a single endpoint to:
- Support different operations (GET for query, POST for creation)
- Implement RESTful resource patterns
- Share authentication and rate limiting across methods
- Maintain consistent endpoint URLs
Dynamic Schema Processing
Use Automatic IO mode to:
- Handle varying request structures
- Adapt to evolving data formats
- Reduce configuration maintenance
- Support flexible integrations
Security Considerations
API Key Management
- Store API keys securely, never in source code
- Use environment-specific keys (dev, staging, production)
- Rotate keys on a regular schedule
- Revoke compromised keys immediately
- Monitor API key usage patterns
OAuth 2.0 Best Practices
- Use appropriate scopes for access control
- Implement token refresh logic
- Validate tokens on every request
- Set reasonable token expiration times
- Audit OAuth client registrations
Rate Limiting Strategy
- Set conservative limits initially
- Monitor actual usage patterns
- Adjust limits based on legitimate traffic
- Implement graduated rate limiting for different clients
- Provide clear rate limit feedback in responses
CORS Configuration
- Only enable CORS when necessary
- Restrict allowed origins to specific domains
- Validate origin headers server-side
- Be cautious with credentials in CORS requests
- Document CORS requirements for consumers
Next Steps
After setting up your Webhook Trigger:
- Add processing nodes - Connect action nodes to process incoming webhook data
- Map data fields - Use webhook output data in subsequent workflow steps
- Implement error handling - Add error handling nodes for robust operation
- Test thoroughly - Verify all response modes and error scenarios
- Document your endpoint - Create API documentation for webhook consumers
- Monitor performance - Track execution metrics and optimize as needed
- Deploy to production - Publish your workflow and activate the endpoint
The Webhook Trigger transforms FlowGenX into a powerful API platform, enabling you to build custom integrations and expose your workflow automation as HTTP services that any system can consume.