Scheduler Trigger
Trigger workflows automatically based on cron schedules and time-based patterns
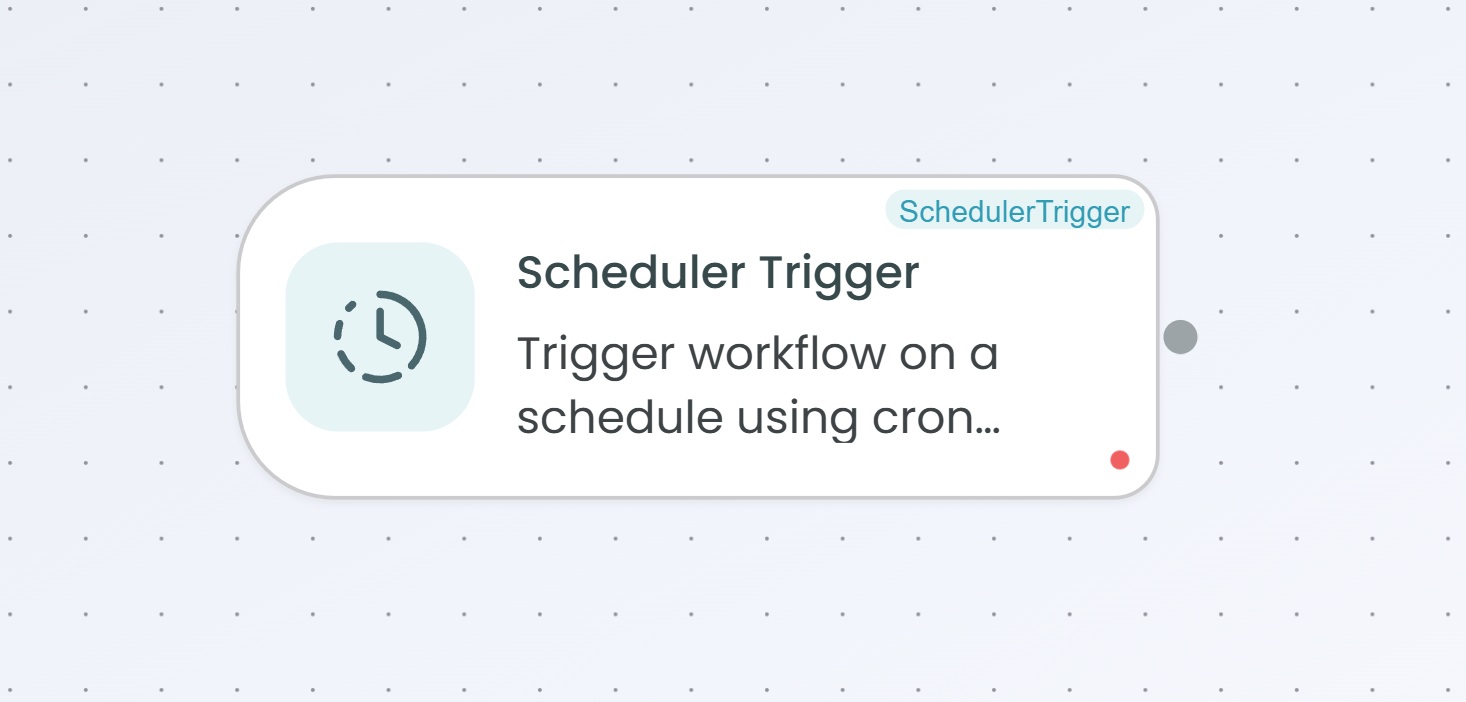
The Scheduler Trigger node allows you to execute workflows automatically based on time-based schedules. This trigger uses cron expressions to define when your workflow should run, enabling powerful automation for recurring tasks, periodic data processing, scheduled reports, and time-based business processes.
Why Use Scheduler Trigger?
The Scheduler Trigger is ideal when you need to:
- Automate recurring tasks - Run workflows daily, weekly, monthly, or at custom intervals without manual intervention
- Schedule reports and exports - Generate and send reports at specific times or intervals
- Perform periodic maintenance - Execute cleanup tasks, data synchronization, or system health checks on a schedule
- Process time-sensitive data - Handle batch processing, data aggregation, or scheduled backups
- Coordinate business processes - Trigger workflows at specific business hours or on specific days
Configuration Steps
Setting up the Scheduler Trigger involves 3 simple steps. The configuration panel guides you through each step, showing your progress at the top.

Step 1: Schedule Configuration
In this first step, you define when and how often your workflow should run. This includes setting the timezone, creating schedule names, and configuring the cron expression.
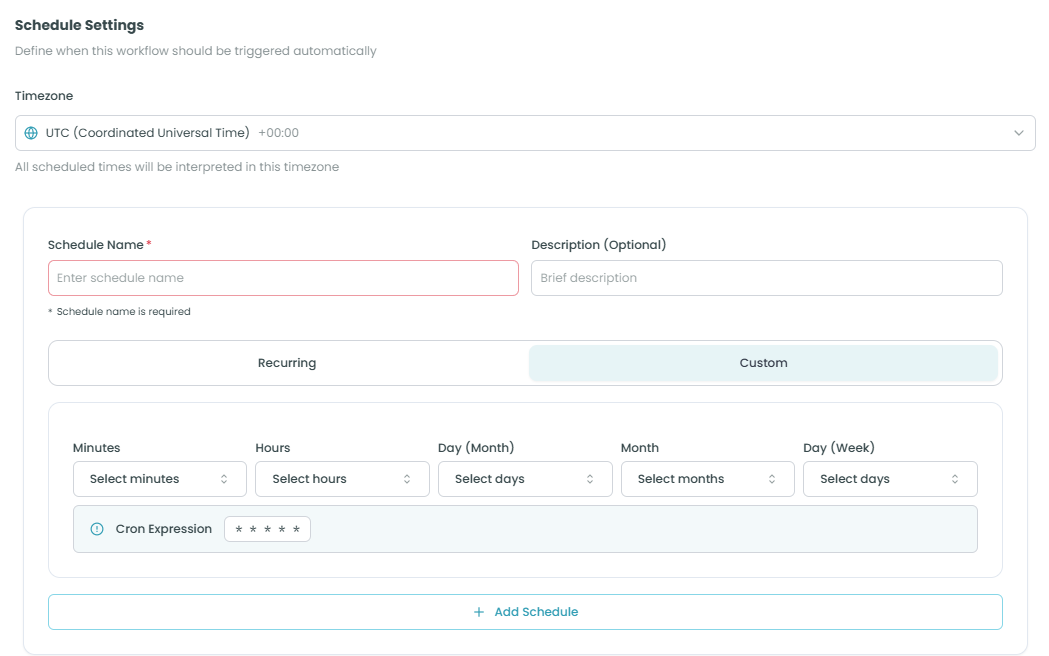
Timezone Settings:
- Timezone - Select the timezone for your scheduled executions
- Default is UTC (Coordinated Universal Time)
- All scheduled times will be interpreted in this timezone
- Use the dropdown to search and select from available timezones
- The current offset is displayed (e.g., +00:00 for UTC)
Schedule Settings:
-
Schedule Name (Required) - A descriptive name for this schedule
- Enter a meaningful name to identify the schedule's purpose
- Example: "Daily Report Generation", "Weekly Cleanup", "Hourly Sync"
-
Description (Optional) - Brief description of what this schedule does
- Helps document the purpose of the schedule for team members
- Example: "Generates customer activity reports every morning"
Schedule Type:
Choose between two scheduling modes:
-
Recurring - Run the workflow at regular, repeating intervals
- Ideal for daily, weekly, or monthly tasks
- Use the visual cron builder to set the schedule
-
Custom - Define a custom cron expression manually
- For advanced scheduling patterns
- Requires knowledge of cron syntax
Cron Expression Builder:
When using the Recurring mode, configure the schedule using these fields:
-
Minutes - Select which minute(s) of the hour to run (0-59)
- Select multiple minutes for multiple executions per hour
- Example: Select "0" and "30" to run twice per hour
-
Hours - Select which hour(s) of the day to run (0-23)
- Use 24-hour format
- Example: Select "9" for 9:00 AM, "14" for 2:00 PM
-
Day (Month) - Select which day(s) of the month to run (1-31)
- Choose specific dates
- Example: Select "1" and "15" to run on the 1st and 15th of each month
-
Month - Select which month(s) to run
- Choose one or multiple months
- Example: Select "1", "4", "7", "10" for quarterly execution
-
Day (Week) - Select which day(s) of the week to run
- Monday through Sunday
- Example: Select "Monday" through "Friday" for weekday execution
Cron Expression Display:
Below the schedule fields, you'll see the generated cron expression (e.g., * * * * *). This shows the exact cron pattern that will be used to schedule your workflow.
Add Schedule:
Click the Add Schedule button to create the schedule. You can add multiple schedules to run the workflow at different times or intervals.
Important Notes:
- At least one schedule is required to proceed
- You can create multiple schedules for the same workflow
- Each schedule runs independently according to its configuration
Click Next to proceed to execution settings.
Step 2: Execution Settings
This step configures how the scheduled workflow executions should behave, including concurrency, retry logic, and failure handling.
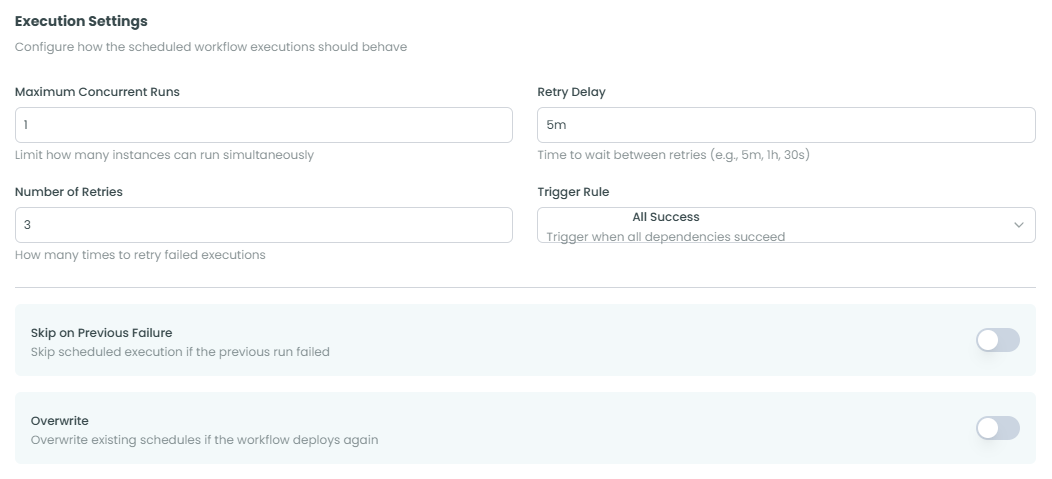
Execution Control:
-
Maximum Concurrent Runs - Limit how many instances can run simultaneously
- Default: 1 (one instance at a time)
- Prevents multiple workflow instances from running concurrently
- Useful when workflows modify shared resources or data
- Example: Set to 1 to ensure sequential execution
-
Number of Retries - How many times to retry failed executions
- Default: 3 retries
- Automatically retries if a workflow execution fails
- Set to 0 to disable automatic retries
- Example: Set to 3 for resilient execution
-
Retry Delay - Time to wait between retries
- Format: Duration string (e.g., "5m", "1h", "30s")
- Default: 5m (5 minutes)
- Applied between each retry attempt
- Example: "5m" waits 5 minutes before retrying
Trigger Rules:
- Trigger Rule - Condition for triggering the workflow
- All Success - Trigger when all dependencies succeed
- Configure when the workflow should be triggered based on previous runs or dependencies
Advanced Options:
-
Skip on Previous Failure - Toggle to enable/disable
- When enabled: Skips scheduled execution if the previous run failed
- When disabled: Runs on schedule regardless of previous execution status
- Useful to prevent cascading failures
- Default: Disabled (toggle off)
-
Overwrite - Toggle to enable/disable
- When enabled: Overwrites existing schedules if the workflow deploys again
- When disabled: Keeps existing schedules when redeploying
- Useful for updating schedules during deployment
- Default: Disabled (toggle off)
Configuration Guidelines:
- Set concurrency to 1 for workflows that should not overlap
- Use higher retry counts for critical workflows
- Adjust retry delay based on the expected recovery time
- Enable "Skip on Previous Failure" to prevent queueing of executions during outages
Click Next to proceed to preview and test.
Step 3: Preview & Test
The final step displays a comprehensive preview of your scheduler configuration, allowing you to review all settings before completing the setup.
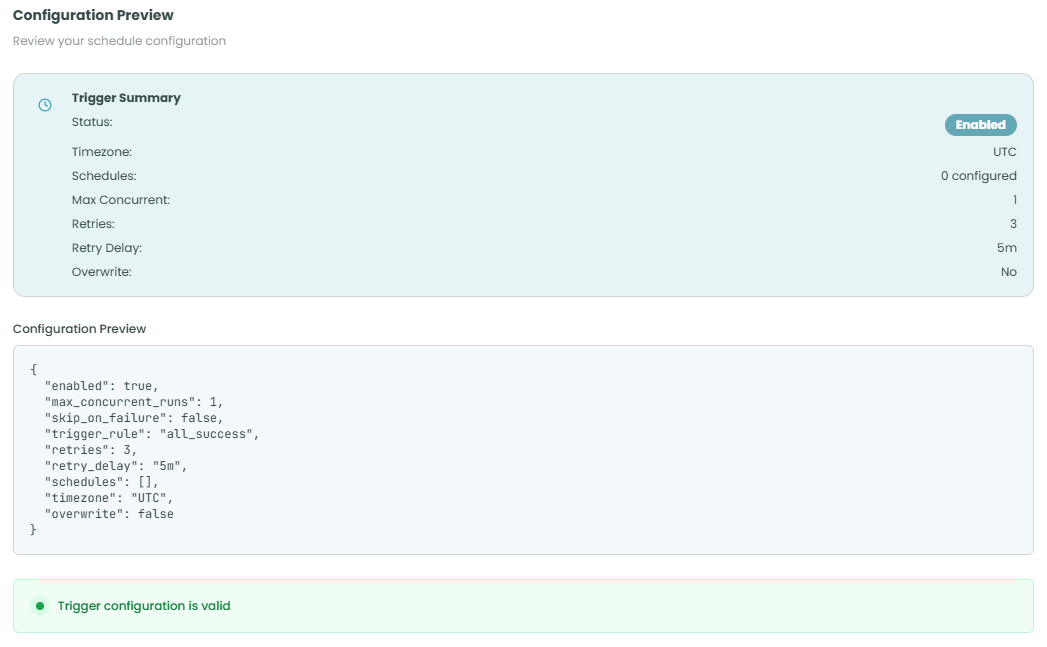
Trigger Summary:
The summary panel displays key configuration details at a glance:
- Status - Shows whether the trigger is Enabled or Disabled
- Timezone - The timezone configured for scheduled executions
- Schedules - Number of schedules configured (e.g., "0 configured")
- Max Concurrent - Maximum concurrent runs allowed
- Retries - Number of retry attempts configured
- Retry Delay - Time between retry attempts
- Overwrite - Whether schedule overwriting is enabled
Configuration Preview:
The JSON configuration preview shows the complete trigger configuration:
{
  "enabled": true,
  "max_concurrent_runs": 1,
  "skip_on_failure": false,
  "trigger_rule": "all_success",
  "retries": 3,
  "retry_delay": "5m",
  "schedules": [],
  "timezone": "UTC",
  "overwrite": false
}
This preview helps you:
- Verify all settings are correct
- Understand the exact configuration being applied
- Debug any issues with the trigger setup
Validation Status:
At the bottom of the panel, you'll see a validation message:
- Green checkmark - "Trigger configuration is valid" - Configuration is correct and ready to use
- Red error - Configuration has issues that need to be resolved
What to verify:
- Check that the timezone is correct for your use case
- Verify that schedules are configured (shown in the schedules array)
- Confirm retry settings match your requirements
- Ensure the enabled status is set correctly
Important Notes:
- If schedules show "0 configured", go back to Step 1 to add at least one schedule
- The configuration won't be saved until you complete this step
- You can navigate back to previous steps to make changes
Once you've verified that all settings are correct, click Complete to finish the configuration.
Using the Scheduler Trigger in Your Workflow
After configuration is complete:
- The Scheduler Trigger node will appear at the start of your workflow
- The workflow will automatically execute according to your configured schedules
- Each scheduled execution will run independently
- You can view execution history in the Flow Management section
- The trigger can be temporarily disabled without deleting the configuration
Best Practices
Scheduling Strategy
- Be specific with timing - Choose execution times that avoid peak system usage
- Consider timezone carefully - Ensure the timezone matches your business location or user base
- Avoid overlapping schedules - Don't create too many schedules that might conflict
- Use appropriate intervals - Balance between timeliness and system load
Execution Settings
- Set realistic retry counts - Too many retries can cause resource exhaustion
- Configure appropriate retry delays - Give enough time for transient issues to resolve
- Use concurrency limits wisely - Prevent resource contention by limiting concurrent runs
- Enable "Skip on Previous Failure" for non-critical workflows - Prevents backlog during outages
Performance
- Monitor execution times - Ensure workflows complete before the next scheduled run
- Optimize workflow logic - Keep scheduled workflows efficient to avoid timeouts
- Consider batch processing - Process multiple items in a single scheduled run when possible
- Review execution history - Regularly check for patterns of failures or delays
Maintenance
- Document schedule purposes - Use clear schedule names and descriptions
- Review schedules regularly - Remove or update outdated schedules
- Test schedule changes - Verify new schedules work as expected before deploying
- Keep configurations simple - Avoid overly complex cron expressions when possible
Common Scheduling Patterns
Here are some common cron expression patterns for typical use cases:
Daily Executions:
- Every day at 9:00 AM: Minutes=0, Hours=9, Days=, Months=, Weekdays=*
- Every day at midnight: Minutes=0, Hours=0, Days=, Months=, Weekdays=*
Weekly Executions:
- Every Monday at 8:00 AM: Minutes=0, Hours=8, Days=, Months=, Weekdays=Monday
- Every Friday at 5:00 PM: Minutes=0, Hours=17, Days=, Months=, Weekdays=Friday
Monthly Executions:
- First day of every month at 6:00 AM: Minutes=0, Hours=6, Days=1, Months=, Weekdays=
- 15th and last day of month: Configure two separate schedules
Hourly Executions:
- Every hour on the hour: Minutes=0, Hours=, Days=, Months=, Weekdays=
- Every 30 minutes: Minutes=0,30, Hours=, Days=, Months=, Weekdays=
Business Hours:
- Every weekday at 9 AM, 12 PM, and 3 PM: Create three schedules or use Minutes=0, Hours=9,12,15, Weekdays=Mon-Fri
Troubleshooting
Common Issues
Schedule Not Running:
- Verify the trigger is enabled (check the toggle in the configuration drawer)
- Confirm at least one schedule is configured
- Check that the workflow is deployed
- Verify the timezone matches your expectations
Workflow Not Completing:
- Check if execution time exceeds the schedule interval
- Review Maximum Concurrent Runs setting
- Look for errors in the execution logs
- Consider increasing retry count or delay
Too Many Executions:
- Review all configured schedules for duplicates
- Check if multiple schedules are triggering at similar times
- Verify the cron expression matches your intent
- Consider using "Skip on Previous Failure" to prevent queuing
Missed Executions:
- Check if concurrent run limit was reached
- Verify system resources are available
- Review execution logs for errors
- Ensure the schedule configuration is correct
Monitoring Scheduled Workflows
Once your workflow is deployed with a Scheduler Trigger:
- Navigate to the Scheduled Workflows section in Flow Management
- View all workflow runs triggered by your Scheduler Trigger
- Check execution status (Success, Failed, Running, Skipped)
- Click on individual runs to see detailed execution information
- Monitor execution duration and resource usage
- Use the replay feature to visualize workflow execution
For more information on monitoring and debugging workflow executions, see the Traceability documentation.
Next Steps
After setting up your Scheduler Trigger:
- Add processing nodes to define what the workflow should do
- Test the workflow manually before relying on the schedule
- Deploy your workflow to activate the schedule
- Monitor the first few scheduled executions to ensure they run correctly
- Adjust the schedule or execution settings as needed based on performance
The Scheduler Trigger provides powerful time-based automation for FlowGenX workflows, enabling you to build reliable, recurring processes that run without manual intervention.